Welcome to the final lesson in our module on Azure App Service. In the previous lesson, we focused on managing application versions safely using deployment slots, which allow for zero-downtime deployments and easy rollbacks.
Today, we shift our focus from managing code to managing resources and performance. We'll tackle a critical aspect of running a modern, cloud-native application: how to automatically adjust its capacity to meet user demand while controlling costs. This lesson addresses the learning outcome: implement auto-scaling rules based on metrics and schedules in App Service. You'll learn how to configure your application to scale out when traffic is high and scale in when it's quiet, ensuring both a responsive user experience and cost efficiency.
1. The "What" and "Why" of Autoscale
Before configuring rules, it's essential to understand the core concepts. When we talk about scaling in Azure, there are two primary methods:
- Scale up (Vertical Scaling): Increasing the resources of an existing instance (e.g., moving to a more powerful CPU or more RAM). In App Service, this means changing your App Service Plan tier (e.g., from S1 to P1v2). This is a manual process.
- Scale out (Horizontal Scaling): Increasing the number of instances running your application. This is what autoscale does. It adds or removes instances of your app to handle the load.
Autoscale is a feature of the App Service Plan, not the individual web app, and it's only available on the Standard, Premium, and Isolated tiers.

To get a clear explanation of these concepts and see where autoscale fits in, start with this short video.
Autoscale on Azure App Services
This video from Atmosera effectively distinguishes between scaling up and scaling out in the context of App Service.
Watch the initial segment to solidify your understanding of which App Service tiers support autoscale and the difference between scale-up and scale-out.
2. Metric-Based Scaling: Responding to Demand
The most common way to use autoscale is to react to real-time performance metrics. You define rules that tell Azure when to add or remove instances based on the load your application is experiencing.
A complete autoscale configuration consists of:
- Instance Limits: A minimum, maximum, and default number of instances. Autoscale will never go below the minimum or above the maximum.
- Scale-Out Rule: A condition that, when met, triggers adding instances (e.g., "if average CPU > 70% for 10 minutes, add 1 instance").
- Scale-In Rule: A condition that, when met, triggers removing instances (e.g., "if average CPU < 25% for 10 minutes, remove 1 instance").
- Cooldown: A waiting period after a scale event before another one can be initiated. This prevents "flapping"—a rapid cycle of scaling out and in.
The official Microsoft Learn documentation provides an excellent, step-by-step guide to creating your first autoscale setting.
Get started with autoscale in Azure
This guide from Microsoft Learn walks you through creating a standard metric-based autoscale configuration in the Azure portal.
Read the section titled "Create your first autoscale setting." Pay close attention to how a scale-out rule, a scale-in rule, and instance limits are configured together to create a complete policy.
To see this in action, the following video provides a quick demonstration of setting up these rules in the Azure portal.
How to automatically scale Azure App Services | Azure Tips and Tricks
The "Azure Tips and Tricks" channel provides a concise walkthrough of creating a custom autoscale rule.
Watch from the beginning to see how to enable custom autoscale and define rules based on metrics like CPU percentage or data out. Notice the configuration of instance limits and the cooldown period.
Understanding Rule Logic
A crucial point for the exam and for practical use: when you have multiple rules, Azure's autoscale engine evaluates them differently for scaling out versus scaling in.
- Scale-out: Occurs if ANY scale-out rule is met (an
ORcondition). This ensures your app scales aggressively to handle spikes from any monitored metric. - Scale-in: Occurs only if ALL scale-in rules are met (an
ANDcondition). This is a conservative approach to prevent scaling in prematurely while another metric might still indicate high load.
3. Schedule-Based Scaling: Preparing for Predictable Load
Sometimes, you know in advance that traffic will change. For example, you expect high traffic during business hours or a massive surge for a Black Friday sale. For these scenarios, schedule-based scaling is ideal.
Instead of waiting for metrics to cross a threshold, you can configure autoscale to change the instance count during a specific time window. This allows you to pre-warm your environment, ensuring you have enough capacity ready before the load arrives.
Let's return to the Microsoft Learn documentation to see how to configure this.
Get started with autoscale in Azure
This section details how to create time-bound scale conditions.
Read the section "Scheduled scale conditions." Note the two types: a repeating schedule (e.g., every Monday) and a fixed-date schedule (e.g., for a specific event).
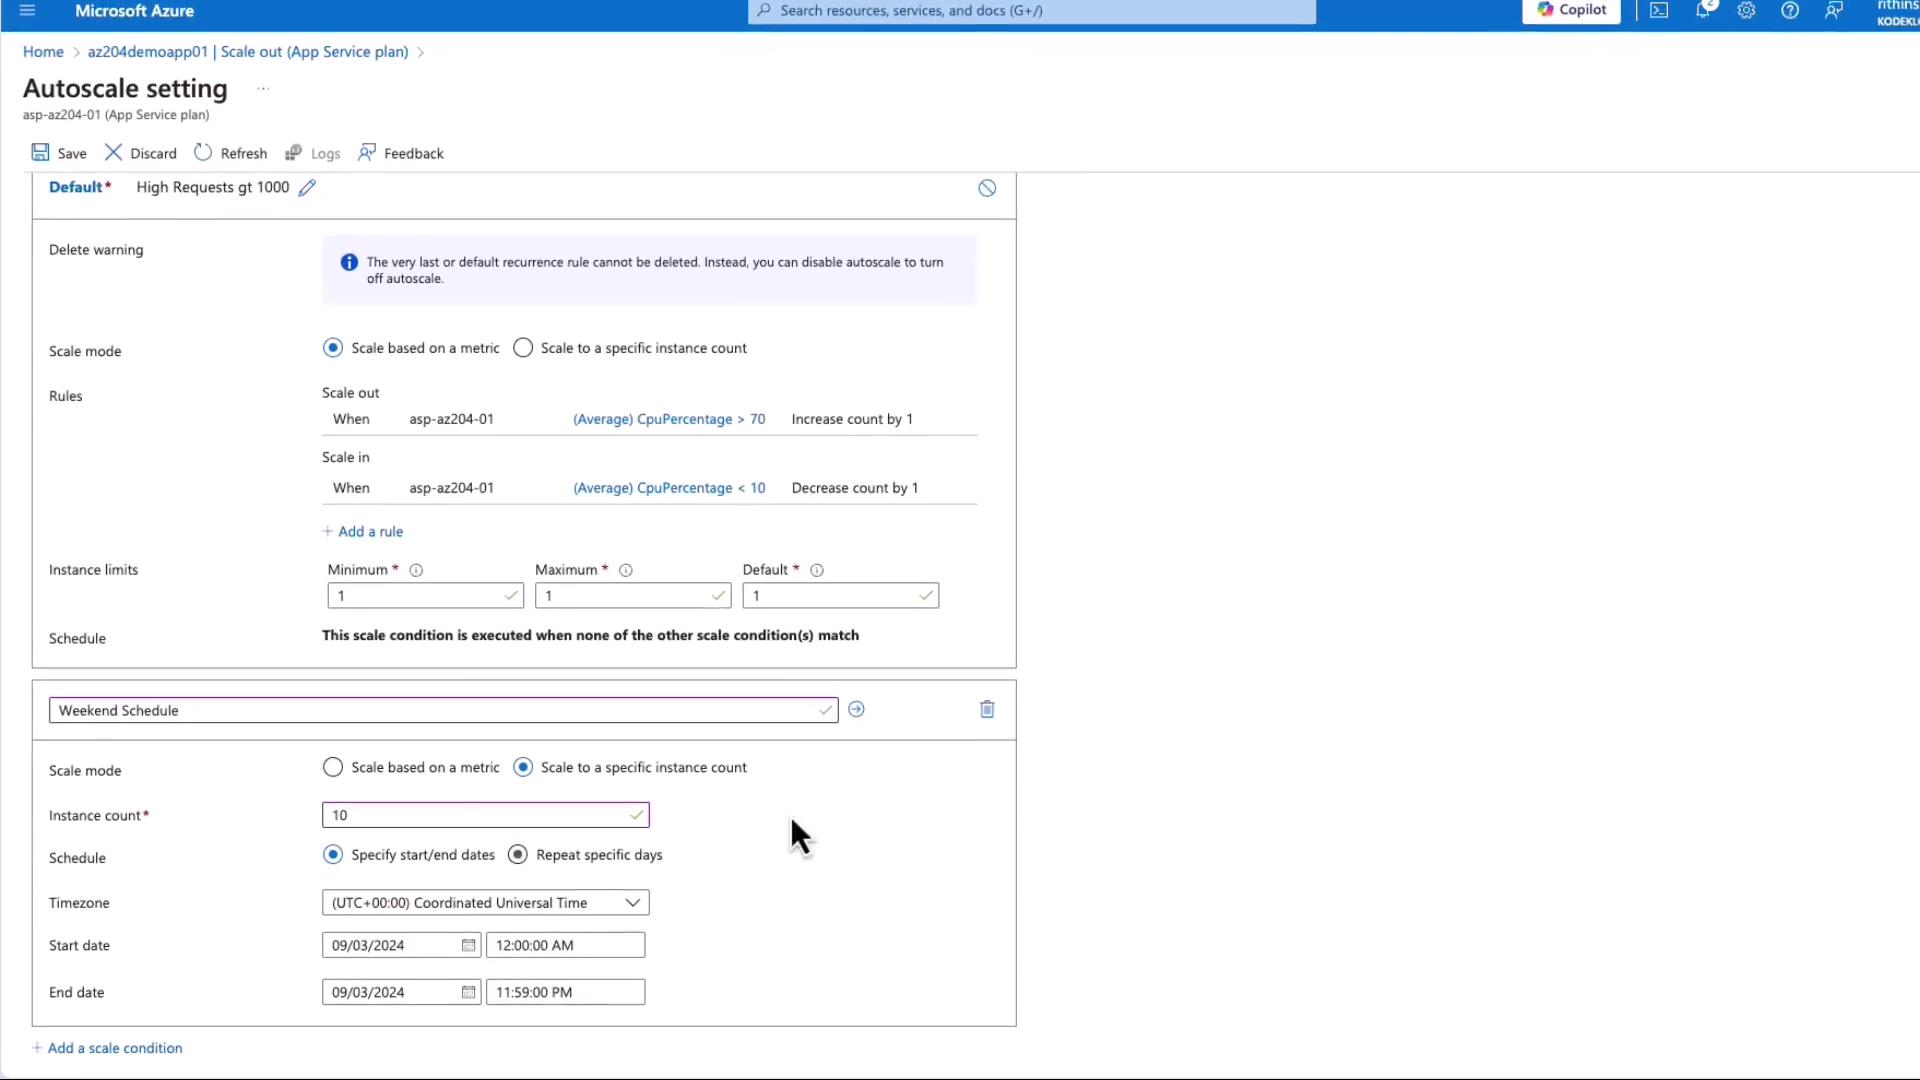
4. Hands-On: Configuring Autoscale with the Azure CLI
Given your experience with automation and scripting, let's implement autoscale using the Azure CLI. This aligns with infrastructure-as-code practices and is a common task for developers working with Azure.
We will configure autoscale for the App Service Plan associated with the MyFirstAzureWebApp you've been working on.
Step 1: Get the App Service Plan Resource ID
First, you need the resource ID of your App Service Plan. You can find this by querying for the plan associated with your web app.
# Replace with your app name and resource group
APP_NAME="<your-unique-app-name>"
RESOURCE_GROUP="<your-resource-group-name>"


# Get the App Service Plan name and then its ID
ASP_NAME=$(az webapp show --name $APP_NAME --resource-group $RESOURCE_GROUP --query appServicePlanId --output tsv | cut -d'/' -f9)
ASP_ID=$(az appservice plan show --name $ASP_NAME --resource-group $RESOURCE_GROUP --query id --output tsv)

echo "App Service Plan ID: $ASP_ID"
Step 2: Create the Autoscale Setting
Now, create an autoscale setting for this plan. We'll set the minimum instances to 1, the maximum to 3, and the default count to 1.
az monitor autoscale create \
  --resource $ASP_ID \
  --resource-group $RESOURCE_GROUP \
  --name "${ASP_NAME}-autoscale" \
  --min-count 1 \
  --max-count 3 \
  --count 1
Step 3: Add a Scale-Out Rule
Let's add a rule to scale out by one instance if the average CPU percentage is greater than 70% over a 5-minute period. We'll set a 1-minute cooldown.
az monitor autoscale rule create \
  --autoscale-name "${ASP_NAME}-autoscale" \
  --resource-group $RESOURCE_GROUP \
  --resource $ASP_ID \
  --condition "Percentage CPU > 70 avg 5m" \
  --scale out 1 \
  --cooldown 1
Step 4: Add a Scale-In Rule
Finally, add a rule to scale back in by one instance if the average CPU percentage drops below 25% over a 5-minute period. A longer cooldown (e.g., 5 minutes) is often wise for scaling in.
az monitor autoscale rule create \
  --autoscale-name "${ASP_NAME}-autoscale" \
  --resource-group $RESOURCE_GROUP \
  --resource $ASP_ID \
  --condition "Percentage CPU < 25 avg 5m" \
  --scale in 1 \
  --cooldown 5
You have now programmatically configured a dynamic scaling policy for your application. You can verify this by navigating to your App Service Plan in the Azure portal and selecting "Scale out (App Service plan)" from the settings menu.
Conclusion
In this lesson, you've learned how to make your App Service application elastic, allowing it to adapt to changing loads automatically. This is a fundamental skill for building resilient and cost-effective cloud solutions.
Here are the key takeaways:
- Autoscale in App Service means scaling out (horizontal scaling) by changing the number of running instances.
- It operates on the App Service Plan and requires a Standard, Premium, or Isolated tier.
- Metric-based rules allow your app to react dynamically to load, using metrics like CPU, memory, or HTTP queue length.
- Schedule-based rules allow you to proactively adjust capacity for predictable traffic patterns.
- A robust configuration includes both scale-out and scale-in rules, appropriate instance limits, and cooldown periods to prevent flapping.
This lesson concludes our module on Azure App Service. You've gone from deploying a simple .NET web app to configuring advanced features like deployment slots and auto-scaling.
In our next lesson, we will begin a new module on a core Azure service: Azure Storage. We'll start with Azure Blob Storage, a massively scalable object store that is a foundational component for countless cloud architectures.