Introduction
In the last lesson, you took a crucial step towards professionalizing your application by refactoring it to remove all hardcoded secrets and configuration values. By using dotenv and environment variables, your project is now secure and flexible, ready for different deployment environments.
This lesson focuses on the final, critical quality check before packaging your project for submission: verifying HTTP status codes. We will perform a systematic audit of every API endpoint to ensure it returns the correct status code for every possible scenario—success, client error, and server error. A correctly behaving API is a hallmark of a professional developer and will be a key factor in your exam evaluation.
The Language of Your API: A Status Code Refresher
HTTP status codes are the universal language that your API uses to communicate the result of a request to a client. Getting them right is not just about following rules; it's about creating a predictable and debuggable system.
Before we dive into the audit, let's get a quick and effective refresher on what the most important codes mean.
HTTP Status Codes Explained In 5 Minutes
This video from ByteByteGo, 'HTTP Status Codes Explained In 5 Minutes', provides a fast-paced and clear overview of the essential status codes you'll be working with. Pay close attention to the distinctions between the 2xx, 4xx, and 5xx families.
Watch the segments covering 2xx codes (00:26-01:01), 4xx codes (01:01-02:02), and 5xx codes (02:16-03:30). This will set the stage for our audit.
Your Final Audit: A Systematic Checklist
Your task now is to go through your API endpoint by endpoint and verify its behavior. Use Postman for this entire process. For each request you send, check the status code returned by your server.

We'll categorize our checks into three parts: Success Scenarios (2xx), Client Error Scenarios (4xx), and Server Error Scenarios (5xx).
1. Success Scenarios (The "Happy Path")
These tests confirm that your API works as expected when given valid inputs.
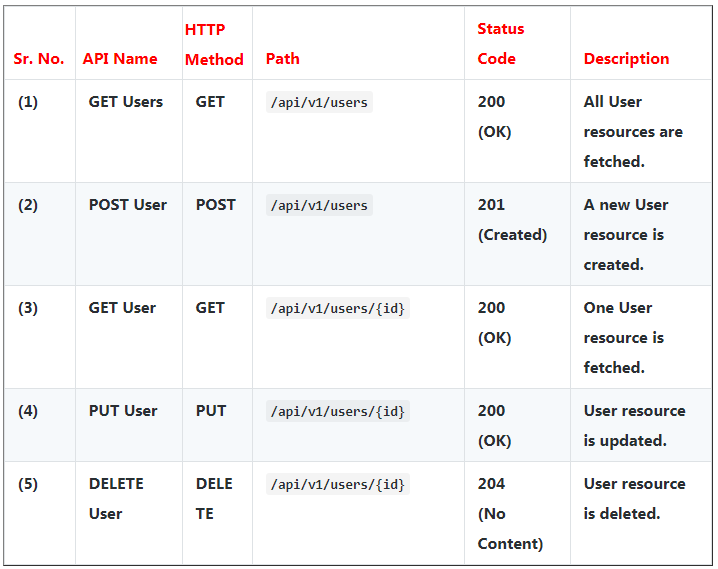
Your Checklist:
-
GET /api/v1/items: Does it return200 OKwith an array of items? -
GET /api/v1/items/:id: When given a valid, existing ID, does it return200 OKwith the correct single item? -
POST /api/v1/items: When given a valid request body, does it return201 Createdwith the newly created item in the response body? -
PUT /api/v1/items/:id: When given a valid, existing ID and a valid request body, does it return200 OKwith the updated item? -
DELETE /api/v1/items/:id: When given a valid, existing ID, does it return204 No Contentwith an empty response body?
To dive deeper into the implementation of these codes, review the following guide.
# HTTP Response Status Codes Explained: A Complete Guide for ...
The article 'HTTP Response Status Codes Explained' provides code examples for implementing these success codes in an Express application.
Read the section titled '2xx Success Codes'. Notice how res.status(200), res.status(201), and res.status(204) are used for GET, POST, and DELETE routes, respectively.
2. Client Error Scenarios (Handling Bad Requests)
These tests are just as important. They prove your API is robust and can gracefully handle incorrect or invalid client requests.
Your Checklist:
-
Invalid ObjectId:
GET /api/v1/items/123(use an ID that is not a valid MongoDB ObjectId)PUT /api/v1/items/123DELETE /api/v1/items/123- Expected Result: All should return
400 Bad Requestwith a clear error message like{ "error": "Invalid ObjectID" }.
-
Resource Not Found:
GET /api/v1/items/<valid_but_nonexistent_id>(e.g.,60d5f3f5c5b5c00015f1e8a0)PUT /api/v1/items/<valid_but_nonexistent_id>DELETE /api/v1/items/<valid_but_nonexistent_id>- Expected Result: All should return
404 Not Foundwith an error message like{ "error": "No user with this ID" }.
-
Validation Failure:
POST /api/v1/itemswith a required field missing from the request body.- Expected Result: The API should return
400 Bad Requestwith a message indicating which field is missing.
-
Route Not Found:
GET /api/v1/nonexistent-route- Expected Result: This should be caught by your 404 handler middleware and return
404 Not Found.
The code pattern for handling invalid IDs and not-found resources is critical. The following resource shows a perfect, concise implementation.
Best practice for validating input in Express/Mongoose app
This Stack Overflow answer provides a textbook example of a controller function that correctly handles the exact GET /:id scenarios you need to verify.
Review the code snippet under 'users.controller.js'. Pay close attention to how mongoose.Types.ObjectId.isValid is used to return a 400 status, and the check for !user is used to return a 404 status.
3. Server Error Scenarios (The Safety Net)
You can't easily force a server error, but you can confirm your safety net—the global error handler—is configured correctly.
Recall from the lesson on error handling that this middleware is your final line of defense. Its job is to catch any unexpected errors, log them for you (the developer), and send a generic, safe response to the user.
Your Checklist:
- Review your Global Error Handler:
- Open your error handling middleware file.
- Confirm that for any unknown error, it sets a default status of
500 Internal Server Error. - Crucially, verify that the JSON response it sends is a generic message (e.g.,
{ "error": "Internal server error" }) and that you are not leaking theerr.stackin a production environment.
The video you saw in the error handling module demonstrates exactly this principle: returning a clean JSON response instead of a default HTML error page with a stack trace.
Conclusion
By methodically completing this audit, you have hardened your API and confirmed it communicates with professional clarity. This attention to detail is what separates a student project from a production-ready application.
Key Takeaways:
- 2xx for Success:
200 OKfor successful fetches and updates,201 Createdfor new resources, and204 No Contentfor successful deletions that don't return data. - 4xx for Client Errors:
400 Bad Requestfor invalid input (like a malformed ID or missing body field), and404 Not Foundfor requests to resources or routes that don't exist. - 5xx for Server Errors: Your global error handler should catch all other errors and return a generic
500 Internal Server Errorwithout leaking sensitive stack trace information.
Next Up:
Your API is now complete, secure, configurable, and correct. The final step is to prepare it for submission. In the next lesson, you will create a submission-ready ZIP archive and assemble all the required artifacts, including your live API link and Postman collection.