Introduction
Welcome to the final lesson of your backend engineering crash course. In the previous lesson, you mastered the critical skill of packaging your project into a clean, professional ZIP archive, ensuring you exclude unnecessary files like node_modules and sensitive data like .env.
This lesson is your final pre-flight check. We will assemble and verify every required artifact for your submission. Your technical skills are sharp, and now we ensure your presentation is equally flawless. A complete and working submission package demonstrates professionalism and attention to detail—qualities as important as the code itself.
By the end of this lesson, you will have a complete checklist and all the verified components ready for submission:
- A live API link
- A live Swagger documentation link
- A GitHub repository link
- An exported Postman collection file
1. Verify Live API and Swagger Documentation Links
In Lesson 11, you deployed your application to a live server. Now, let's confirm that it's accessible and your documentation is working as expected.
Your submission requires two links derived from this deployment:
- Live API Base URL: The root URL of your deployed service (e.g.,
https://your-api-name.onrender.com). - Swagger Documentation URL: The URL where your Swagger UI is served (e.g.,
https://your-api-name.onrender.com/api-docs).
Action: Verify Your Endpoints
- Check the Live API: Open your live API base URL in a web browser. While you might see a "Cannot GET /" message (which is expected if you haven't defined a root route), you shouldn't get a server error or "Not Found" from the hosting service. This confirms the server is running.
- Check the Swagger Docs: Open your live Swagger documentation URL. The page should load and display your interactive API documentation. Test one of the
GETendpoints directly from the UI to confirm it can communicate with your live API.
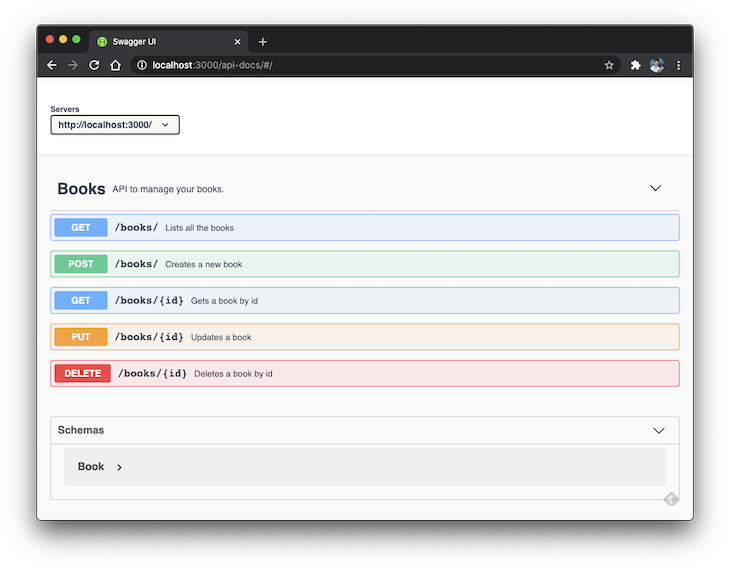
If either of these links is broken, return to your hosting provider's dashboard, check the server logs, and resolve any deployment errors.
2. Audit Your GitHub Repository
Your GitHub repository is a record of your work. It must be clean, secure, and professional.
Action: Audit Your Repository and Get the Link
Navigate to your project's repository on GitHub and perform this quick audit.
- Check the
.gitignorefile: Ensure that.envandnode_modules/are listed in your.gitignorefile. A proper setup here prevents accidental commits of secrets and large, unnecessary folders. - Confirm No Secrets are Committed: This is critical. Browse your repository's files on GitHub and confirm that no
.envfile is present. If you accidentally committed it in the past, you must remove it from your Git history. For the exam, it's often faster to create a new repository and push a clean version of your code. - Copy the URL: Once you've verified the repository is clean, copy the main URL from your browser's address bar. It should look like
https://github.com/your-username/your-repo-name.
A Developer’s Guide to a Tidy Workspace
The following article explains why keeping your project clean is essential. It highlights files like node_modules (Generateables) and .env (Sensitive Data) that should be excluded from sharing.
Read the sections 'The “What” and “Why” of a Clean Workspace' and 'Prevention First: The Power of .gitignore'. This reinforces the importance of using .gitignore to prevent sensitive and generated files from ever ending up in your repository.
3. Export Your Postman Collection
In Lesson 10, you created a Postman collection to test your API. Most certification exams require you to submit this collection as a JSON file.
Action: Export the Collection
The process is straightforward. You will export the collection you built, which includes all your saved requests for the CRUD operations.
How to Share Postman Collections in Seconds (Export + Import JSON Tutorial)
This brief video demonstrates exactly how to export a Postman collection. Follow these steps to generate the required JSON file.
Watch from 00:37 to 00:58. The video shows clicking the three dots next to the collection name, selecting 'Export', and saving the collection as a JSON file.
Steps to Export:
- In Postman, find your API collection in the left sidebar.
- Click the three dots (...) next to the collection name.
- Select Export from the dropdown menu.
- Choose the recommended
Collection v2.1format. - Click Export and save the JSON file to your project folder. Name it clearly, for example,
[YourName]-API.postman_collection.json.
Verification: Sanity Check Your Export
To be absolutely sure the export worked, you can try re-importing it. In Postman, click the "Import" button and select the JSON file you just saved. It should import as a copy of your collection. This confirms the file is not corrupt.
4. Final Submission Checklist
You've built, tested, documented, deployed, and packaged your application. This is the final moment of assembly. Create a folder on your desktop for your final submission files and use this checklist to ensure everything is present and correct.
The Submission Package:
-
Live API Link
- Example:
https://your-cool-api.onrender.com - Verified?:
Yes / No(Loads without a server error)
- Example:
-
Live Swagger Documentation Link
- Example:
https://your-cool-api.onrender.com/api-docs - Verified?:
Yes / No(UI loads and is interactive)
- Example:
-
GitHub Repository Link
- Example:
https://github.com/your-username/backend-exam-project - Verified?:
Yes / No(Repo is public,.gitignoreis correct, no secrets are present)
- Example:
-
Postman Collection File
- Example:
api-collection.postman_collection.json - Verified?:
Yes / No(Exported successfully)
- Example:
-
Project Source Code ZIP Archive (from previous lesson)
- Example:
your-name-project.zip - Verified?:
Yes / No(Unzips and runs successfully afternpm installin a clean directory)
- Example:
Once you've ticked every box, you are ready to submit.
Conclusion
Congratulations on completing this intensive crash course! You have moved from a blank folder to a fully built, documented, tested, and deployed production-ready API. You've tackled project setup, database integration, CRUD operations, error handling, documentation, automated testing, and deployment.
Key Takeaways from this Final Step:
- Verification is Everything: Building is half the battle; verifying that every link and file works is the other half. Never submit anything you haven't double-checked.
- Assemble with Care: Keep your final submission artifacts organized in a single folder. This prevents last-minute panic and mistakes.
- Professionalism Matters: A clean GitHub repository, a working set of links, and correctly packaged files leave a strong positive impression.
You now possess the practical skills and the complete submission package required to meet the certification standard. Go into your exam with confidence. You've earned it. Good luck