Introduction
Welcome to the third lesson in our Network Security module. In our previous lesson, we explored Denial-of-Service attacks, which aim to make a network service unavailable. We saw how attackers use SYN floods and other techniques to overwhelm a target. This naturally leads to the question: how does an attacker find a target and identify its weaknesses in the first place?
This lesson delves into that initial reconnaissance phase. You will learn how to use Nmap (Network Mapper), one of the most powerful and widely used tools for network discovery and security auditing. Our focus will be on using nmap to scan a host for open ports to discover running services. Crucially, we will also explore how firewalls can interfere with these scans and how to interpret the results nmap gives you, fulfilling a key step in understanding both network defense and offense.
Getting Started with Nmap
Nmap is a free and open-source utility used by network administrators to inventory their networks and by security professionals to probe for potential vulnerabilities. Before we dive in, let's get it set up on your machine.
Since you're comfortable in a Linux-like environment, the easiest way to install Nmap is through your system's package manager.
Nmap Tutorial: from the Basics to Advanced Tips
The following resource provides clear instructions for installing Nmap. We will use the package manager method for simplicity.
Please read the section 'Alternative: Install via Package Manager'. You can skip the sections on installing from source and using VMs/containers. Follow the instructions to install Nmap on your system and verify the installation.
Why sudo?
You will notice that many nmap commands are prefixed with sudo. While nmap can run without root privileges, it's far more effective with them. Without sudo, nmap is forced to use the operating system's high-level networking functions to perform a TCP connect scan (-sT), which is slower and "noisier" (i.e., more easily logged and detected).
With sudo, nmap can craft its own raw packets, enabling faster and stealthier scans like the SYN scan (-sS), which we will discuss shortly.
From Host Discovery to Port Scanning
The first step in mapping a network is often just finding out which hosts are online. Nmap can do this with a "ping scan".
Run this command in your terminal:sudo nmap -sn 192.168.1.0/24
(Remember to replace 192.168.1.0/24 with your actual local network address range if it's different. You can find this from your ifconfig or ip addr output.)
The -sn flag tells Nmap to skip port scanning and only report which hosts responded to its probes. This is a quick way to get a list of live devices on your network.
Once you have a target, the next step is to see what services it might be running. This is done by port scanning. As we learned, services like SSH, HTTP, and DNS listen for incoming connections on specific port numbers. Finding an "open" port usually means a service is listening there.
Let's watch a short video to see this in action.
Nmap Tutorial to find Network Vulnerabilities
This video from NetworkChuck provides an energetic introduction to Nmap, demonstrating both host discovery and a basic port scan.
Watch from the beginning to 03:42. The first part covers host discovery, which you just tried. The second part introduces port scanning to find potential web servers on a network. Pay attention to the -sT (TCP Connect Scan) and -p (for specifying ports) options.
Understanding Scan Types and Port States
The -sT or TCP Connect Scan shown in the video works by completing the full three-way handshake with the target port. If the handshake succeeds, the port is open. If the server responds with a reset (RST) packet, the port is closed.

However, the most common and default scan type (when run with sudo) is the SYN Scan (-sS), also known as a "stealth" or "half-open" scan.
Nmap Tutorial to find Network Vulnerabilities
Let's return to the NetworkChuck video to understand the difference between a Connect scan and a SYN scan.
Watch from 03:42 to 06:42. The first part is a quick recap of the TCP handshake. The second part explains the SYN scan (-sS) and demonstrates how it avoids completing the full connection, making it faster and less conspicuous.
As the video explains, by not completing the handshake, a SYN scan reduces the likelihood of the connection being logged by the application listening on the port.
When you run a scan, nmap will report the state of each port. Understanding these states is crucial for interpreting the results, especially when a firewall is involved.
There are three primary states you'll encounter:
- Open: An application is actively accepting TCP connections on this port.
- Closed: The port is accessible (it receives and responds to Nmap's probe packets), but there is no application listening on it.
- Filtered: Nmap cannot determine if the port is open or closed because a firewall, filter, or other network device is blocking the probes.
To get a solid grasp of these states, let's turn to a detailed tutorial.
Understanding Open, Closed and Filtered Ports
This article from HackerTarget provides excellent, clear explanations of the three main port states, complete with diagrams illustrating the packet-level interactions.
Read the section 'Understanding Open, Closed and Filtered Ports'. Focus on how the target's response (or lack thereof) allows Nmap to infer each state. Pay special attention to the 'Filtered ports' explanation.
How Firewalls Alter Scan Results
As you just read, the filtered state is our primary clue that a firewall is at work. Firewalls enforce security policies by blocking traffic. When nmap sends a probe packet to a port and gets no response back, it marks the port as filtered. The firewall simply "dropped" the packet in silence.
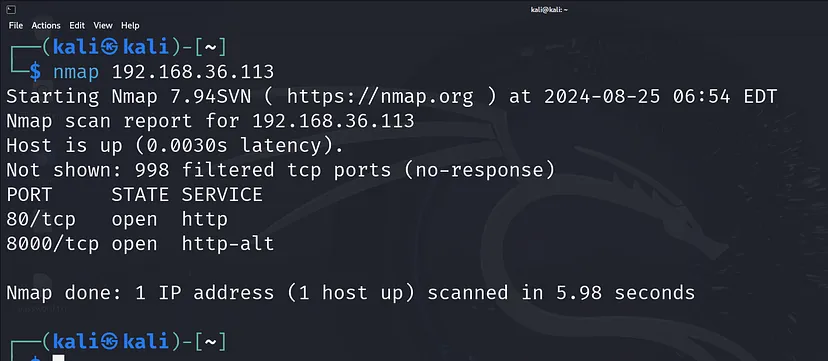
This firewall interference can begin even before the port scan. Many firewalls are configured to block the ICMP echo requests (pings) that Nmap uses by default to check if a host is online. If a host doesn't respond to the ping, Nmap might assume it's down and not even attempt a port scan.
This is where the -Pn option becomes essential. It tells Nmap to skip the host discovery phase and proceed directly to port scanning, treating the target as if it's already confirmed to be online.
Nmap Basics: Port Scanning Tutorial
The video 'Nmap Basics: Port Scanning Tutorial' clearly explains the filtered state and demonstrates how the -Pn option is used to bypass firewall rules that block ping probes.
Watch from 03:02 to 04:27 to see the -Pn flag in action against a firewalled host. Then watch from 07:03 to 09:43 for a detailed breakdown of the open, closed, and filtered states.
Diving Deeper with the Official Docs
The official Nmap documentation provides the most precise definition of how it distinguishes these states. The key is how the target system is expected to behave according to the TCP protocol (RFC 793).
- A probe to a
closedport should elicit a TCP RST (reset) packet in response. - A probe to a
filteredport results in either no response (the packet is dropped) or an ICMP error message (e.g., "port unreachable").
This subtle difference is how Nmap reliably separates closed from filtered ports.
Let's read a short excerpt from the official Nmap book to solidify our understanding of how Nmap technically identifies filtered ports.
First, read the section 'Standard SYN Scan'. This will show you a command example and explain how RST packets identify closed ports while dropped packets indicate filtered ports. Then, skip down and read the single paragraph under the heading 'ACK Scan' that begins with 'This pair of scans also demonstrates...'. This final paragraph provides a key insight: a port's 'state' is not an absolute property but depends on how and from where you scan it.
Let's Practice
Now it's time to put this together. Nmap provides a safe and legal target for practicing scans: scanme.nmap.org.
Try running these commands in your terminal and interpret the output based on what you've learned.
-
A standard SYN scan:
sudo nmap -sS scanme.nmap.org
Look at the list of open ports. Do you see any filtered ports mentioned in the summary line? -
Scan specific ports and detect service versions:
sudo nmap -sV -p 22,80,443 scanme.nmap.org
The-sVflag asks Nmap to try and determine the version of the service running on open ports. The-pflag lets you specify a comma-separated list of ports. -
Scan a firewalled host:
The hostscanme.nmap.orgis not heavily firewalled, to allow for scanning practice. However, if you were scanning a corporate server, you would likely see manyfilteredports. If the initial scan failed because ping was blocked, you would use:sudo nmap -sS -Pn <target_IP>
Experiment with these commands. Your ability to read and understand the output is the most important skill you can develop when learning Nmap.
Conclusion
In this lesson, we took our first steps into network reconnaissance with Nmap. You learned how to discover live hosts, scan for open ports, and, most importantly, interpret the results in the context of network defenses like firewalls.
Key Takeaways:
- Nmap is an essential tool for discovering hosts and services on a network.
- The SYN Scan (
-sS) is the default and preferred scan type, as it's faster and stealthier than a full TCP Connect Scan (-sT). - The three main port states are
open(service listening),closed(no service, but host responded), andfiltered(probe was blocked, likely by a firewall). - Firewalls alter scan results primarily by dropping packets, causing ports to appear as
filtered. They can also block initial discovery pings, requiring the use of the-Pnflag to force a port scan. - A port's state is relative; it describes what Nmap saw from its specific vantage point at that moment, not an absolute property of the host.
Preview of the Next Lesson:
We've now seen how attackers can find open doors (nmap) and how they can try to break them down (DDoS) or listen in (MitM). But what about locking the doors themselves? In our next lesson, we will shift our focus to cryptography, the science of secure communication. You'll learn the fundamental differences between symmetric and asymmetric encryption, the building blocks that secure almost all modern digital communication.