Hello! Welcome to the final lesson in our module on the Data Link Layer.
In our previous lessons, we've built a solid theoretical foundation. We've covered:
- The role and structure of MAC addresses.
- How to find your own device's MAC address using
ipconfig/ifconfig. - The components of an Ethernet frame.
- The logic a switch uses with its MAC address table to forward frames.
Today, we bring all of that theory into practice. We'll get hands-on with one of the most essential tools in networking: Wireshark. You will learn how to capture live data from your own network and see the Ethernet frames we've been discussing, complete with their source and destination MAC addresses.
This lesson directly addresses the learning outcome: Capture and inspect Ethernet frames using Wireshark to identify MAC addresses. For someone with your interest in coding and problem-solving, you can think of Wireshark as a debugger for your network—it lets you inspect the data structures (packets and frames) that underpin all internet communication.
What is Wireshark?
Wireshark is a free and open-source network protocol analyzer. It "sniffs" or captures the data packets traveling across a network interface (like your Wi-Fi or Ethernet card) and displays them in a structured, human-readable format. It's an indispensable tool for network administrators, security professionals, and developers.
Let's start by getting familiar with the Wireshark interface. It's generally divided into three main sections:
- Packet List Pane (Top): A list of all captured packets, with summary information like source/destination IP addresses.
- Packet Details Pane (Middle): A detailed, hierarchical view of the selected packet, broken down by protocol layers (Ethernet, IP, TCP, etc.). This is where we'll do our inspection.
- Packet Bytes Pane (Bottom): The raw data of the packet, shown in hexadecimal.
Wireshark Course - Beginner to Advanced
This short clip from the CyberFlow channel provides a quick tour of the Wireshark interface, introducing the three main panes.
Please watch from 02:13 to 03:03 to get acquainted with the layout of the Wireshark application.
Capturing Your First Packets: A Step-by-Step Guide
Now for the hands-on part. We're going to start a capture, generate some simple network traffic, and then analyze what we've collected.
Before you begin: Make sure you have Wireshark installed on your computer.
Step 1: Configure Capture Settings
For this exercise, we want to see the raw MAC addresses. By default, Wireshark sometimes tries to be helpful by translating the first half of a MAC address into a vendor name (e.g., Apple_ or Dell_). Let's turn this off so we can see the full address.
Wireshark Course - Beginner to Advanced
The following video demonstrates how to access the capture options and, most importantly, how to disable MAC address resolution. This ensures we see the complete MAC addresses in our capture.
Watch from 16:05 to 17:20. Follow the steps to open 'Capture Options' and make sure the 'Resolve MAC addresses' box is unchecked.
Step 2: Start, Generate, and Stop
Now we'll perform the capture itself. The process is simple:
- Start the capture on the correct network interface.
- Generate some local traffic.
- Stop the capture.
To generate predictable traffic, we'll use the ping command to contact your default gateway. This action is perfect because it happens entirely within your local network and forces your computer to create frames addressed to your router.
7.1.6 Lab - Use Wireshark to Examine Ethernet Frames
This video from Christian Augusto Romero Goyzueta walks through the exact process we need: starting a capture, using ping to generate traffic to the default gateway, and stopping the capture.
Please watch from 03:07 to 05:07. Follow these steps on your own machine: Open Wireshark and identify your active network interface (it will show a graph of traffic). Double-click the interface to start capturing. Open a command prompt or terminal and find your default gateway's IP address (ipconfig on Windows, ip r or netstat -nr on Linux/macOS). Ping your default gateway (e.g., ping 192.168.1.1). Go back to Wireshark and click the red square button to stop the capture.
Analyzing the Captured Ethernet Frames
After stopping the capture, you'll see a list of packets. There might be a lot of "background noise" from other applications. To focus on the traffic we just generated, we can use a display filter.
In the filter bar at the top of the Wireshark window, type icmp and press Enter. This will show only the ping packets (which use the ICMP protocol) and their replies.
Now, let's inspect one of these frames to find the MAC addresses.
- In the Packet List (top pane), click on the first packet that says "Echo (ping) request".
- Look at the Packet Details (middle pane). You will see a line that starts with
Ethernet II. This represents the Layer 2 header. - Click the
>arrow to expand theEthernet IIdetails.
You should see something like this:
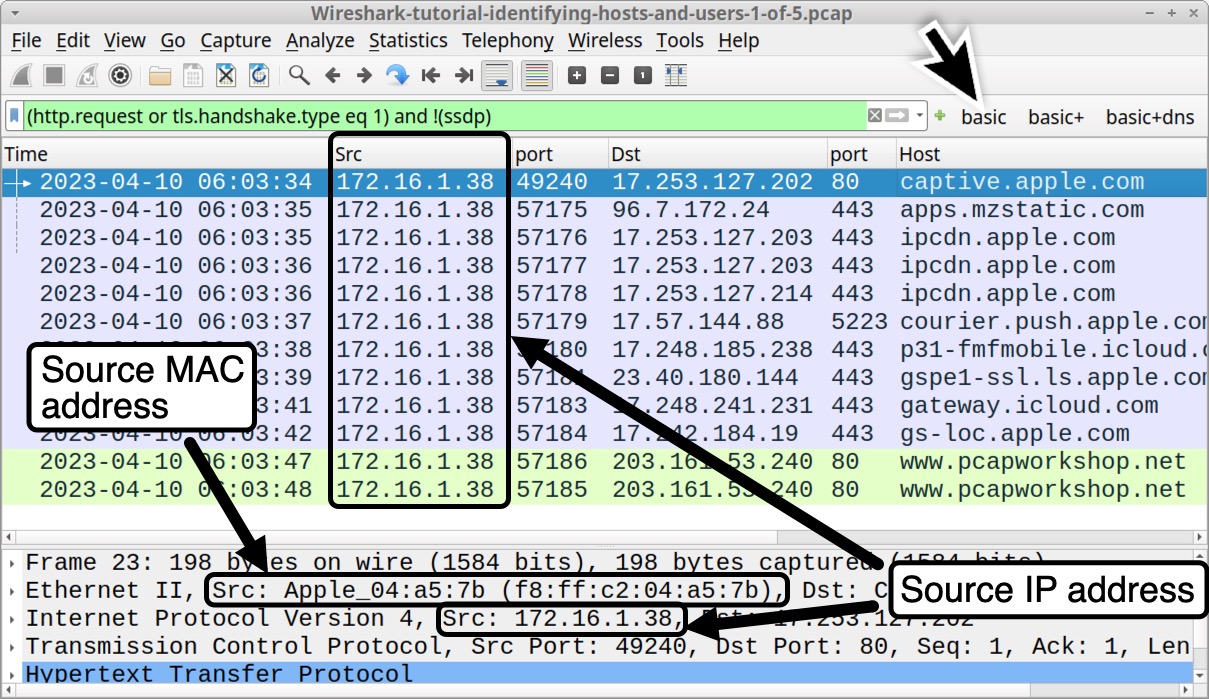
Let's break down what you're seeing:
- Destination: This is the MAC address of the device the frame was sent to. For a ping to your default gateway, this will be the MAC address of your router.
- Source: This is the MAC address of the device that sent the frame. This should match the MAC address of your own computer's network adapter, which you can verify with
ipconfig /allorifconfig.
The following video segment walks through this exact analysis.
7.1.6 Lab - Use Wireshark to Examine Ethernet Frames
Let's confirm our findings. This part of the lab video shows how to examine an ICMP echo request and identify the source and destination MAC addresses within the Ethernet II header.
Watch from 22:02 to 24:35. Pay close attention to how the presenter selects the ICMP request and expands the Ethernet II details to find the MAC addresses of the PC and the default gateway.
By completing this exercise, you have successfully bridged theory and practice. You've seen a real Ethernet frame, not as a diagram in a textbook, but as live data on your network, and you've verified its contents.
Local vs. Remote: What's the Destination MAC?
Here's a crucial point that reinforces the difference between Layer 2 (local) and Layer 3 (global) addressing.
- When you pinged your local gateway, the destination MAC address was your gateway's MAC address.
- What happens if you ping a remote server, like
www.google.com?
The destination IP address will be Google's, but the destination MAC address will still be your default gateway's MAC address. Your computer knows it can't send a frame directly to Google; it can only send it to the next hop on the path—your router. The router is then responsible for forwarding the packet onward.
7.1.6 Lab - Use Wireshark to Examine Ethernet Frames
To solidify this important concept, let's watch one final clip. It demonstrates a capture of a ping to a remote host and explains why the destination MAC address remains that of the local default gateway.
Watch from 28:28 to 33:16. The key takeaway is the answer to the question: 'Why has the destination IP address changed, while the destination MAC address remained the same?'
Conclusion
Congratulations! You've successfully used Wireshark to capture and inspect network traffic, achieving a key milestone in understanding how networks operate at a practical level. This skill will be invaluable as we move up the network stack.
Key Takeaways:
- Wireshark is a network protocol analyzer that allows you to see the data packets on your network.
- By starting a capture and generating traffic with
ping, you can isolate specific frames for analysis. - The Packet Details pane in Wireshark allows you to expand the Ethernet II header to view the source and destination MAC addresses.
- The destination MAC address in an Ethernet frame is always for a device on the local network segment. For remote destinations, this is the MAC address of your default gateway.
Preview of the Next Lesson:
This lesson provided a perfect transition from the Data Link Layer (Layer 2) to the Network Layer (Layer 3). We saw how frames use MAC addresses for local delivery, while the encapsulated packets use IP addresses for end-to-end routing. In our next module, we will dive deep into the Network Layer, starting with the fundamental topic of IPv4 addressing and subnetting. You'll learn the structure of an IP address and how it's used to define networks and hosts.