Hello! Welcome back to your course on contributing to open-source software.
In our last lesson, we established the conceptual foundation of Git, covering repositories, commits, branches, and remotes. We discussed how every commit is a snapshot of your project that includes metadata, such as who made the change and when. Today, we'll put that knowledge into practice by performing the very first setup task you need to do on any new machine: configuring your Git identity. By the end of this lesson, you will be able to configure Git with your personal username and email address, ensuring all your future contributions are correctly attributed to you.
Why Your Identity Matters in Git
Before you make your first commit, Git needs to know who you are. This isn't for authentication, but for attribution. The name and email you set are permanently baked into every commit you create. In the collaborative world of open source, this is how your work is identified.
But what happens if you forget to do this? Let's see.
Git Config File Tutorial: What, Where, Why and How?
This short clip from the 'Git Config File Tutorial' by Cameron McKenzie demonstrates the exact error you'll encounter when trying to commit without a configured identity.
Watch from 00:18 to 01:23. Notice the specific error message Git provides and the commands it suggests to fix the issue.
As the video shows, Git will stop you and ask, "Please tell me who you are." Now, let's learn how to do that correctly from the start.
Setting Your Global Identity
For most use cases, you will set your identity once per computer using the --global flag. This tells Git to use this information for every repository on your system.
The two essential commands are:
git config --global user.name "Your Name"
git config --global user.email "youremail@example.com"
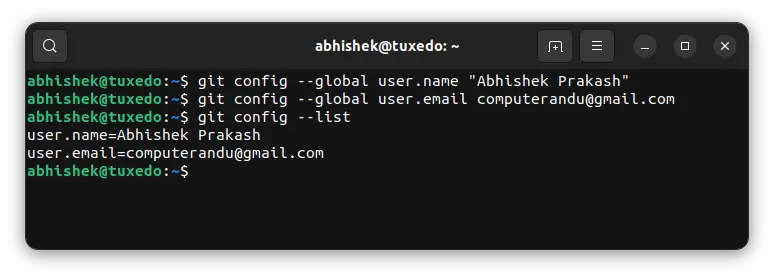
When choosing your email, it's a best practice to use the same email address that you have associated with your GitHub account.
Git Config Username: The Complete Guide to a Clean ...
The article 'About Git Usernames and Identity' from DataCamp explains why this is so important. It clarifies the distinction between your local Git identity and your GitHub account.
Read the section 'About Git Usernames and Identity'. Pay close attention to the part explaining how platforms like GitHub use your email address to link your commits to your profile.
In short: GitHub uses your commit email to link that commit to your account, displaying your profile picture and creating a link to your profile. The user.name is just displayed as plain text. Getting the email right is key to having your contributions properly recognized on the platform.
Understanding Configuration Scopes
When you use git config, you're modifying plain text files. Git actually uses a three-tiered hierarchy for configuration settings. This concept of scope and precedence will be familiar from your computer science background.
1.6 Getting Started - First-Time Git Setup
The official Git documentation, 'First-Time Git Setup', provides a definitive explanation of the three configuration levels.
Read the introductory section, up to but not including the 'Your Identity' sub-heading. Focus on the definitions of the system, global, and local levels and the rule of precedence.
Here is a summary of the levels, from lowest to highest precedence:
- System (
--system): These settings apply to every user and repository on the entire machine. This file is often located in/etc/gitconfig. You'll rarely need to touch this. - Global (
--global): This is what we used above. These settings apply to you, the current user, across all of your repositories. The file is located in your user's home directory (e.g.,~/.gitconfig). - Local (
--localor default): These settings apply only to the current repository. The file is located inside the repository's hidden.gitdirectory (.git/config).
The rule is simple: settings at a more specific level override settings at a broader level. This means a local configuration will always trump a global one.
Test your understanding!
You have set your global user.name to "Personal Name". You then navigate into a repository for a work project and set the local user.name to "Work Name". If you make a commit inside this project, what author name will be recorded in the commit's metadata? What if you commit in a different, personal project folder?
Show answer
Inside the work project, the commit will be recorded with "Work Name". This is because the local setting (.git/config) has higher precedence and overrides the global setting. In any other repository that does not have a local override, your commits will be recorded with "Personal Name", the value from your global configuration (~/.gitconfig).
Verifying Your Configuration
You should always verify your settings after changing them. Git provides a few ways to do this.
To see all your settings from all levels, run:
git config --list
To check a specific value, like your username:
git config user.name
This command cleverly shows you the value that will actually be used, respecting the precedence rules.
The most powerful command for debugging is --show-origin, which tells you exactly which configuration file is responsible for each setting.
Git Config File Tutorial: What, Where, Why and How?
Let's return to the 'Git Config File Tutorial' video, which provides an excellent demonstration of this debugging command.
Watch from 06:38 to 07:22. See how git config --list --show-origin lists every setting along with its source file, making it easy to resolve any confusion about where a setting is coming from.
This command is invaluable when you have a setting that isn't behaving as you expect and you need to trace its origin.
Setting a Local, Repository-Specific Identity
The hierarchical system is especially useful when you need to use different identities for different projects. A common scenario is using a work email for company repositories and a personal email for your open-source contributions.
To set a local identity, navigate inside the project directory and run the git config command without the --global flag.
# First, navigate into your project folder
cd /path/to/your-project

# Now, set the local user name and email
git config user.name "Project-Specific Name"
git config user.email "project-specific-email@example.com"
These settings will be saved in the repository's .git/config file and will only apply when you are working inside this specific project.
A Few More Useful Configurations
While user.name and user.email are the only required settings, there are a couple of others that are highly recommended for a smoother workflow.
Git Tutorial for Beginners: Learn Git in 1 Hour
The 'Git Tutorial for Beginners' by Programming with Mosh covers two other important settings: the default text editor and how Git handles line endings.
Watch the segment from 09:27 to 12:47. You don't need to worry about setting up the editor for now, but pay close attention to the explanation of core.autocrlf and why it's important for cross-platform collaboration.
- Default Editor (
core.editor): Git will sometimes prompt you to enter a message (e.g., for a commit or a merge). You can configure your favorite text editor, like VS Code, Vim, or Sublime Text, to open automatically. - Line Endings (
core.autocrlf): Windows and Unix-based systems (like macOS and Linux) use different special characters to mark the end of a line. This can cause issues in a collaborative project. Setting this property correctly ensures that line endings are handled consistently across all developers' machines.- On Windows:
git config --global core.autocrlf true - On Mac/Linux:
git config --global core.autocrlf input
- On Windows:
Setting these now will prevent future headaches when you start collaborating on projects.
Conclusion
Great work! You've completed a crucial first step in your journey as a developer. You are now ready to create commits that are properly attributed to you.
Let's summarize the key takeaways:
- Identity is for Attribution: Every Git commit is stamped with a
user.nameanduser.email. - Global is Your Default: Use
git config --globalto set your default identity for all projects on your machine. - Link to GitHub: Use the email address associated with your GitHub account to ensure your commits are linked to your profile.
- Scopes and Precedence: Git settings exist at
system,global, andlocallevels, with local settings overriding global ones. This allows you to set project-specific identities. - Verification is Key: Use
git config --list --show-originto check your settings and find out which configuration file they are coming from.
Preview of the next lesson: Now that your identity is configured, you're ready to start making changes. In the next lesson, we will dive into one of Git's most powerful features: branching. You will learn how to create and manage branches to work on new features or bug fixes in isolation, which is the standard workflow for all open-source contributions.