Hello! Welcome to your first lesson on contributing to open-source software. Your goal to contribute to a security or AI/ML project is a fantastic way to apply and grow your skills. This course is designed to take you from the fundamentals all the way to making your first successful contribution.
In this first module, we'll build a solid foundation in Git and GitHub, the primary tools for collaboration in the open-source world. Today's lesson focuses on the absolute essentials. By the end of our 60 minutes, you will be able to explain the four core concepts of Git: repository, commit, branch, and remote. Mastering these ideas is the first and most crucial step on your journey.
Let's begin!
What is Git?
First, it's important to distinguish between Git and GitHub.
- Git is a version control system (VCS). It's a tool that runs on your local computer to track changes in your code.
- GitHub is a web-based hosting service for Git repositories. It's a platform where you can store your projects and collaborate with others.
Think of it this way: Git is the tool you use to write and save different versions of a novel on your computer. GitHub is the cloud-based library where you can publish your novel, share it with editors, and work on it with co-authors.
To get a clear picture of this distinction and the power of version control, let's start with a short video.
Git & GitHub Crash Course for Beginners [2026]
The following clip from the 'Git & GitHub Crash Course for Beginners' by freeCodeCamp.org uses a simple analogy to explain what Git is and why a version control system is so indispensable for any developer.
Watch the segment from 00:28 to 04:01. Pay attention to how the video illustrates the problem Git solves and the difference between Git and GitHub.
As the video explained, Git allows you to save "snapshots" of your project over time, so you never lose previous work and can always go back. This is fundamental to managing complex projects, especially in a collaborative environment like open source.
The Git Workflow: Where Your Code Lives
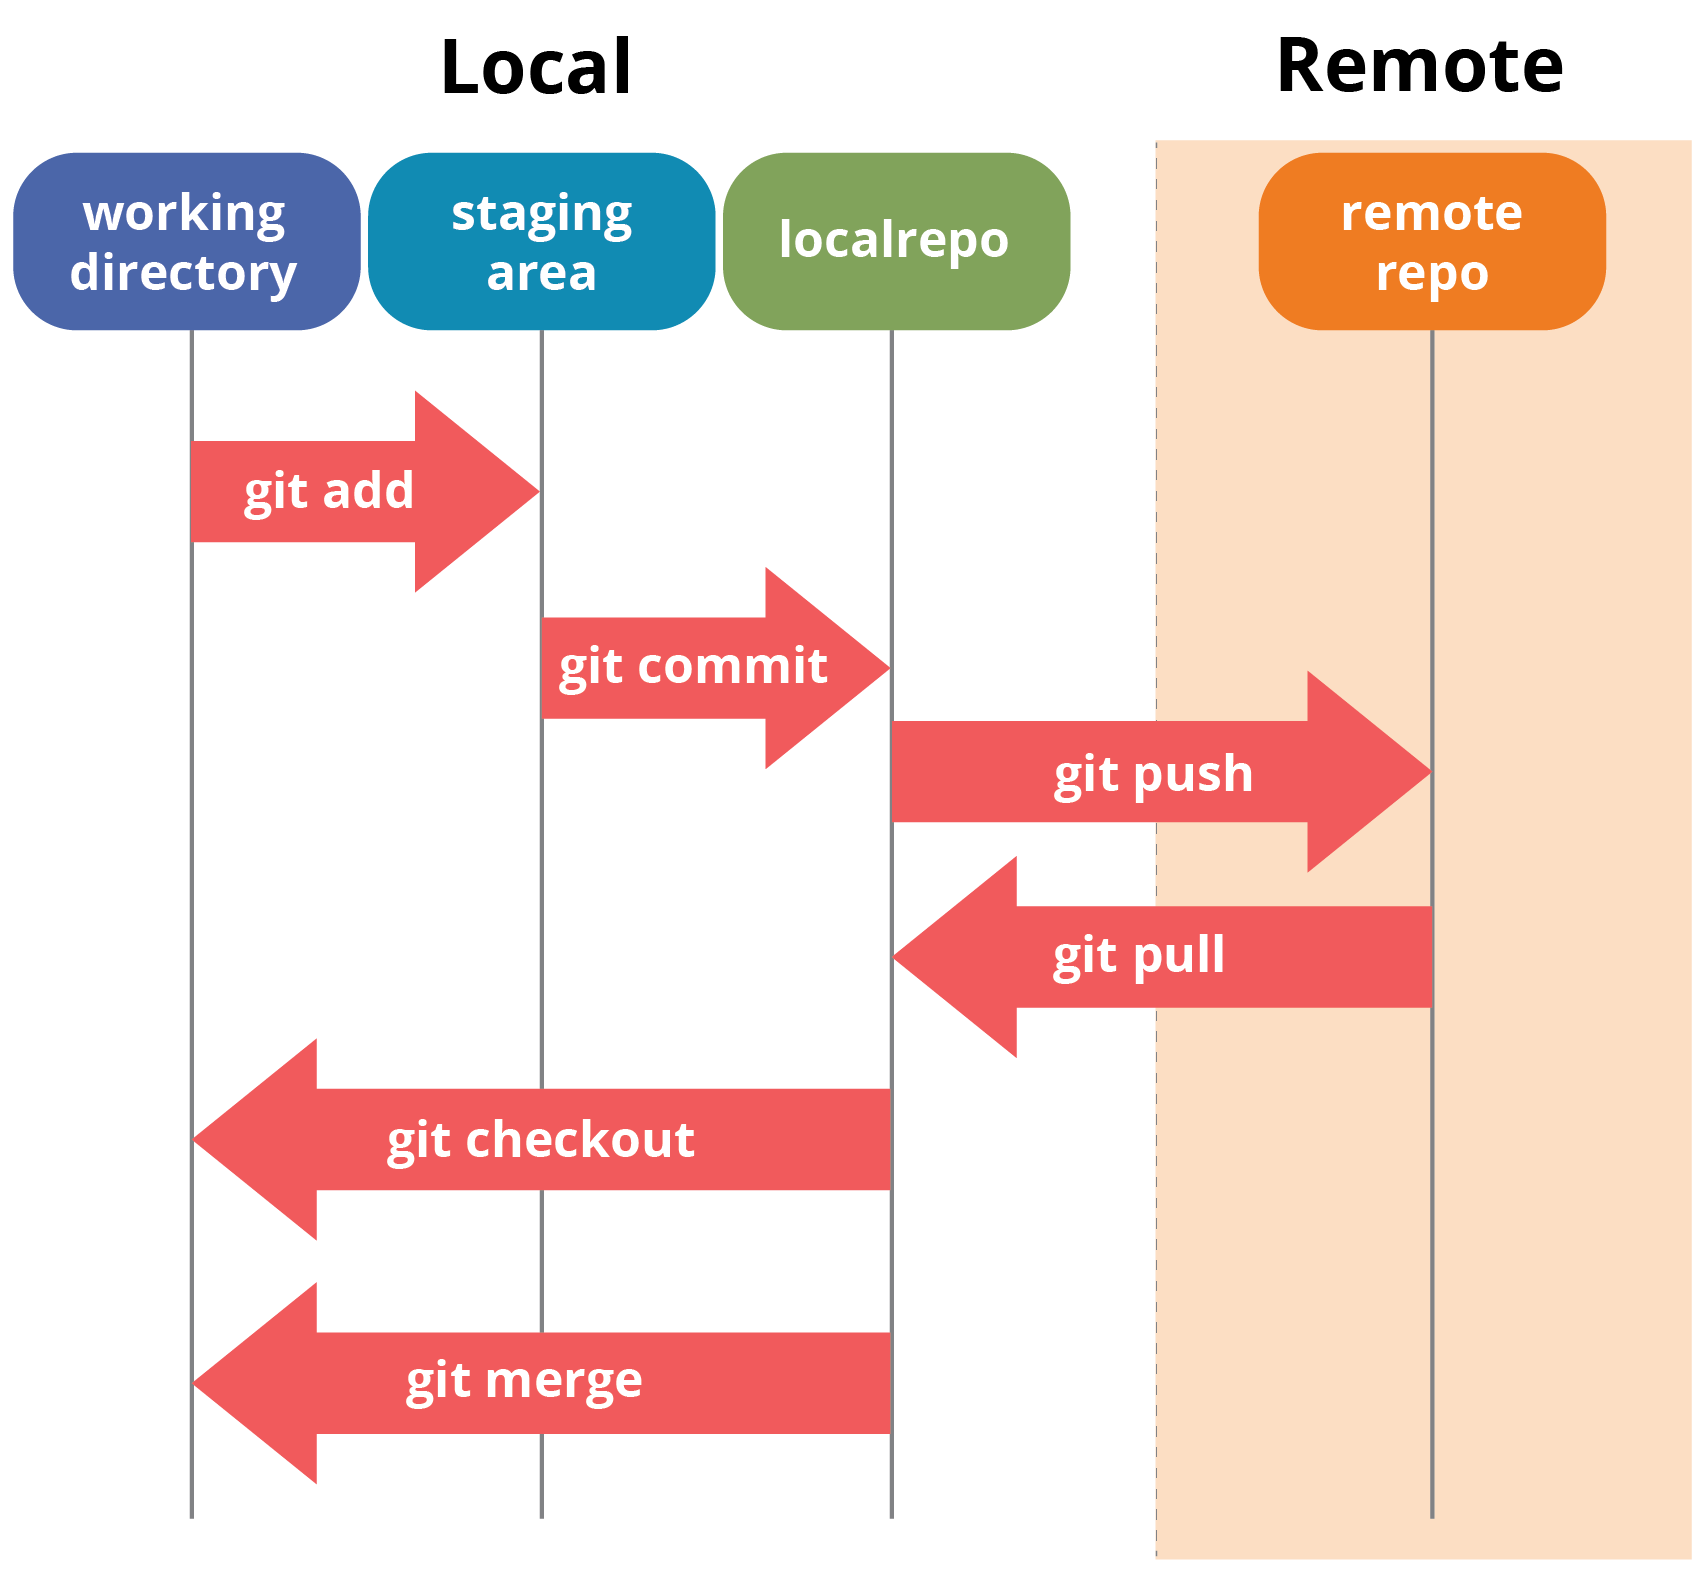
To work effectively with Git, you need a mental model of where your code resides at different stages. There are four key areas.
How Git Works: Explained in 4 Minutes
This short video from ByteByteGo, 'How Git Works: Explained in 4 Minutes', provides an excellent visual overview of the four locations where your code lives in a Git workflow.
Please watch from 00:35 to 01:20. Focus on understanding the role of the Working Directory, Staging Area, Local Repository, and Remote Repository.
Let's break down these four areas:
- Working Directory: This is your project folder on your computer. It contains the actual files you are currently editing.
- Staging Area (or Index): This is an intermediate area. When you're happy with a set of changes, you add them to the staging area. Think of it as a draft of your next saved version. It lets you group related changes into a single snapshot, even if you made them at different times.
- Local Repository: This is Git's database, stored in a hidden
.gitfolder within your project directory. When you "commit," Git takes the files from the staging area and stores a permanent snapshot of them in your local repository. - Remote Repository: This is a version of your repository hosted on a server, typically on a platform like GitHub. It's the central point for you and other developers to share changes.
This flow is the heartbeat of Git. You make changes in your working directory, stage the changes you want to save, commit them to your local repository, and then push them to a remote repository to share them.
The following diagram illustrates this entire process.
Repositories and Commits: The Building Blocks
Now that you have the basic workflow, let's formalize the first two core concepts: repository and commit.
Coding Career Advice: Using Git for Version Control Effectively
The article 'Coding Career Advice: Using Git for Version Control Effectively' by Mark Erikson provides clear, written definitions of these fundamental terms. It also delves into how Git works under the hood, which will connect with your computer science background.
First, read the section 'Git Basics' (under 'Git Fundamentals'). Then, jump to the section 'Understanding Git Internals' and read through its introduction up to the end of the part describing the three primary internal data structures (Blob, File tree, Commit). Focus on how commits are identified by a hash and form a chain.
To summarize and build on that reading:
- A Repository (or "repo") is the entire collection of your project's files and its full history. This history is stored in the
.gitdirectory. - A Commit is a snapshot of your staged changes at a specific point in time. Each commit has a unique ID (a SHA-1 hash) and contains metadata like the author, timestamp, and a message describing the changes.
Given your CS background, it's interesting to note that commits form a directed acyclic graph (DAG), but for a simple linear history, you can think of it as a linked list. Each commit points to its "parent" commit, creating a chain of history that Git can trace back to the very beginning of the project. This data structure is what makes Git so powerful and efficient.
Test your understanding!
You've made changes to three different files for a new feature. However, one of the files contains a temporary debugging change that you don't want to save permanently. How does the Staging Area help you handle this situation?
Show answer
The Staging Area acts as an intermediary. You would use git add to add only the two files related to the new feature to the staging area. The file with the debugging change remains in your working directory but is not staged. When you run git commit, only the changes in the staging area are saved in the new commit, effectively excluding the debugging change from your project's history.
Remotes: Collaborating with Others
So far, we've focused on your local machine. But open source is all about collaboration. This is where the concept of a remote comes in.
A remote is a shared repository that all team members use to exchange their changes. When you start working on an open-source project, you'll typically first clone it. This command creates a local copy of the remote repository on your machine.
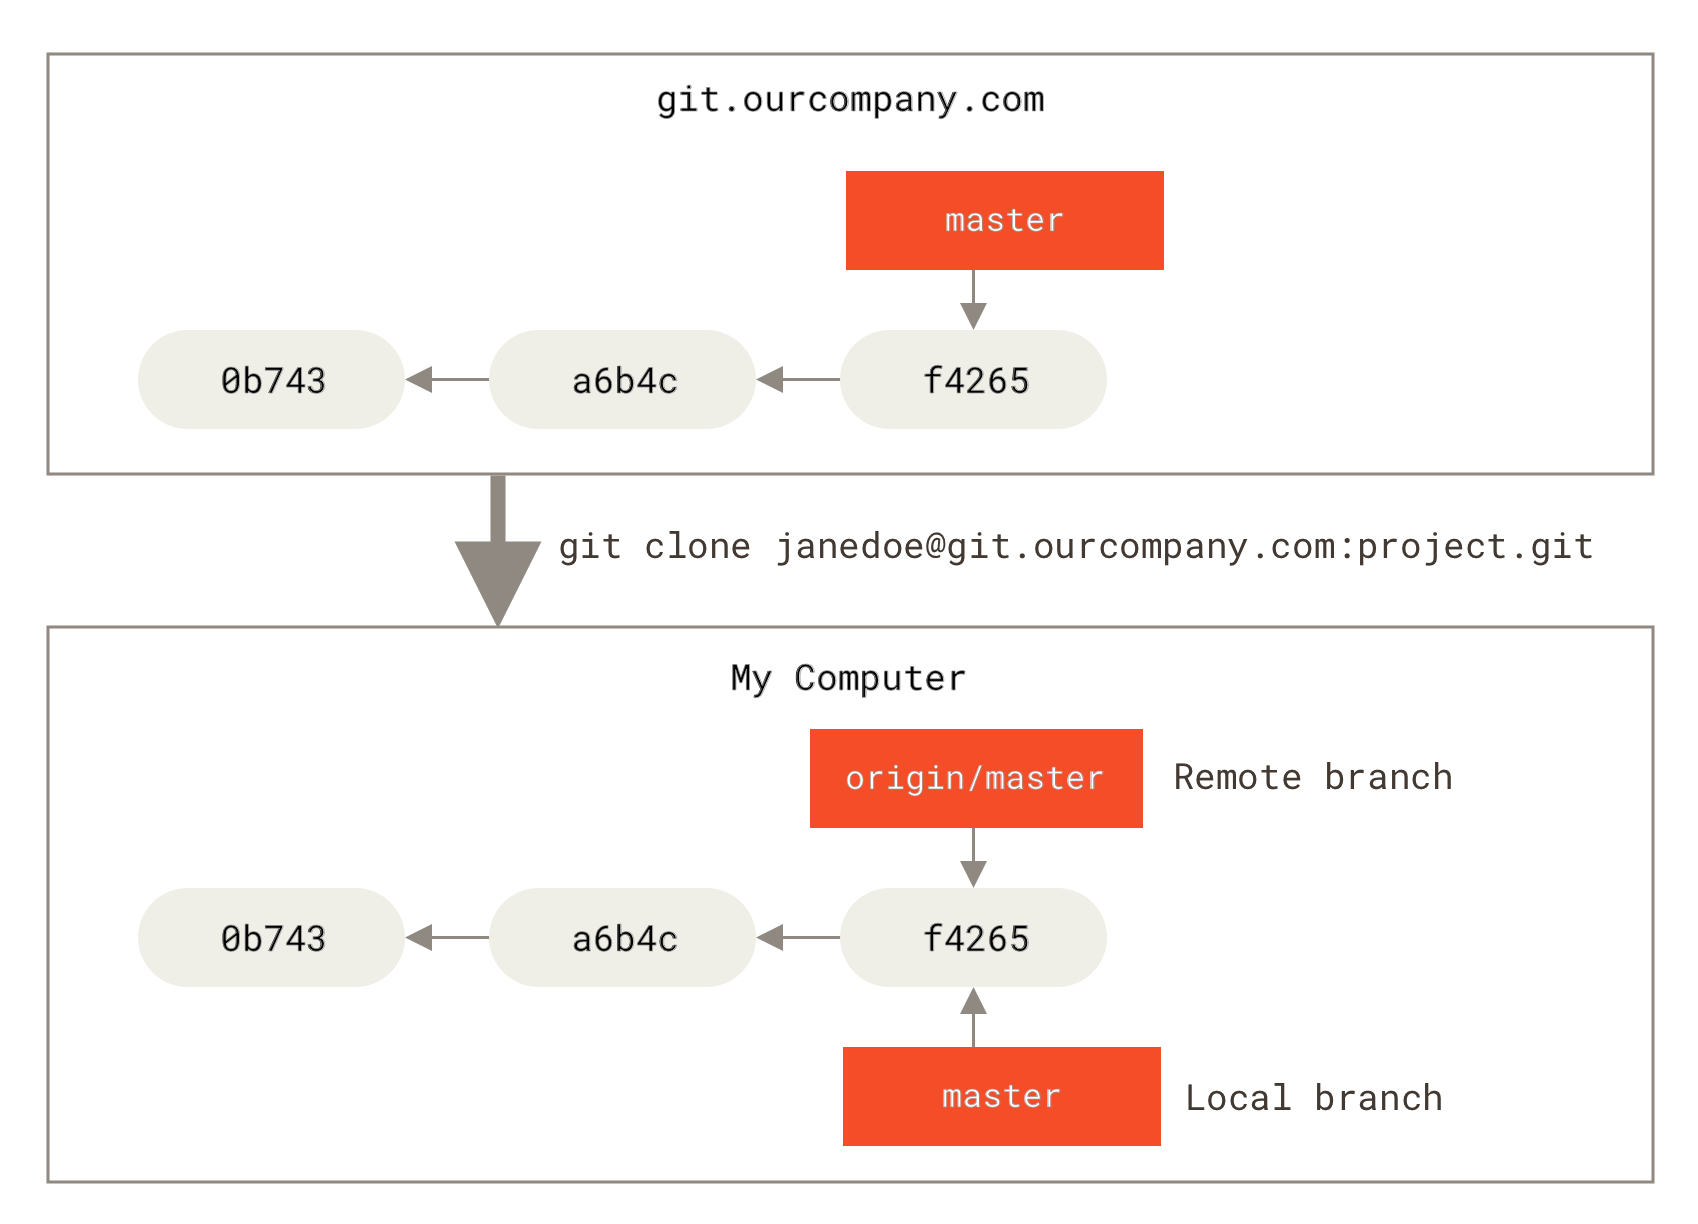
Once you have made and committed your changes locally, you push them to the remote repository to share them. If other people have made changes, you pull their changes from the remote repository into your local copy to stay up-to-date.
Coding Career Advice: Using Git for Version Control Effectively
Let's return to the 'Coding Career Advice' article for a concise explanation of how repositories are shared.
Read the section titled 'Sharing Data Between Repositories'. Focus on the definitions of remote, origin, push, pull, and clone.
Branches: Managing Parallel Universes
The final core concept is perhaps Git's most powerful feature: branching.
Imagine you're writing a story and you have an idea for a new plot twist, but you're not sure if it will work. You wouldn't want to overwrite your main manuscript. Instead, you'd save a copy and explore the new idea there. In Git, this "copy" is a branch.
A branch is an independent line of development. It allows you to work on a new feature or a bug fix in isolation without affecting the main codebase (which is often on a branch named main or master).
This is crucial in open source. You will never push your changes directly to the main branch of a project. Instead, you will:
- Create a new branch for your task.
- Make all your commits on that branch.
- When you're ready, you'll push your branch to the remote and open a "Pull Request" (we'll cover this later), asking the project maintainers to merge your branch into their
mainbranch.
The official Git documentation has an excellent chapter called 'Branches in a Nutshell'. It explains exactly what a branch is and why the feature is so central to the Git workflow.
Read the following parts of the chapter: 'Branches in a Nutshell' (the introduction), the section explaining how Git stores data (up to before Figure 11), the definition of a branch (up to the 'Note' about the master branch), the part about the 'HEAD' pointer, and finally the paragraph that begins 'Because a branch in Git is actually a simple file...'.
The key takeaways are:
- A branch in Git is just a lightweight, movable pointer to a specific commit.
- Creating a branch is extremely fast and cheap because Git doesn't copy all the files; it just creates a new 41-byte pointer file.
- Git uses a special pointer called
HEADto know which branch you are currently working on. When you make a new commit, the branch thatHEADpoints to moves forward to the new commit.
This lightweight branching model encourages developers to use branches for everything, from tiny fixes to large features, which keeps the main codebase stable and organized.
Test your understanding!
You are currently on the main branch and have just created a new branch called new-feature. Does this action change any of the files in your working directory? What does the HEAD pointer now refer to?
Show answer
No, simply creating a new branch with git branch new-feature does not change any files in your working directory. It only creates a new pointer (new-feature) that points to the same commit as the main branch. The HEAD pointer still refers to the main branch because you have not switched to the new branch yet. To switch, you would need to use a command like git checkout new-feature or git switch new-feature.
Conclusion
Congratulations on completing your first lesson! We've covered the conceptual bedrock of Git. Let's quickly recap the key takeaways:
- Repository: The database of your project, containing all files and their history of changes. It exists both locally on your machine and often as a remote on a server like GitHub for collaboration.
- Commit: A snapshot of your project at a single point in time. Commits are the basic units of your project's history.
- Branch: An independent line of development, allowing you to work on features or fixes in isolation. It's simply a pointer to a commit.
- Core Workflow: The process generally involves modifying files in your working directory, adding them to the staging area, saving them with a commit to your local repository, and then sharing them via a remote repository.
You now have the mental model needed to understand the practical Git commands that we'll explore in the upcoming lessons.
Preview of the next lesson: In our next session, we'll move from theory to practice. You will learn how to configure Git with your personal identity (username and email), which is the first practical step you need to take before you can create your own commits.