Hello! Welcome back to your course on contributing to open-source software.
In the last lesson, you configured your Git identity, ensuring every change you make is correctly attributed to you. Now, we're ready to explore one of Git's most powerful and fundamental features: branching. Understanding branches is the key to collaborating effectively on any software project, especially in open source.
Today, you will learn how to create and manage branches for developing new features or bug fixes. This practice allows you to work in an isolated environment without affecting the main, stable version of the project's code. This is the cornerstone of the workflow you'll use for your first open-source contribution.
What is a Branch and Why Do You Need It?
Imagine you're working on a project. The main version of the code, often called main or master, is stable and working. Now, you want to add a new feature. If you start making changes directly to the main codebase, you risk introducing bugs or leaving it in an unstable, half-finished state. What if a critical bug is discovered in the live version while you're in the middle of your work?
This is the exact problem that branching solves.
Git Branching and Merging - Detailed Tutorial
To see this common scenario in action, watch this short introductory clip from the 'Git Branching and Merging' tutorial by SuperSimpleDev. It perfectly illustrates why branching is essential for parallel development.
Watch from 00:24 to 01:44. Focus on the dilemma presented: how to handle an urgent bug fix when you're in the middle of developing a new feature.
As the video explains, a branch is essentially an independent line of development. You can create a new branch from the main line, work on your feature there, and then, when it's complete and tested, merge it back. Meanwhile, the main branch remains clean and stable.
From a technical perspective, a branch in Git isn't a full copy of your project. It's much simpler.
The official Git documentation, 'Branches in a Nutshell', provides an excellent explanation of what a branch truly is. Given your computer science background, you'll find the underlying data structure quite elegant.
Read the first two sections, 'Branches in a Nutshell' and 'Creating a New Branch'. Pay attention to the description of a branch as a 'lightweight movable pointer' to a commit. This is very different from older version control systems.
A branch is just a simple pointer to a specific commit. This makes creating and switching between branches nearly instantaneous, which is why Git encourages their frequent use.
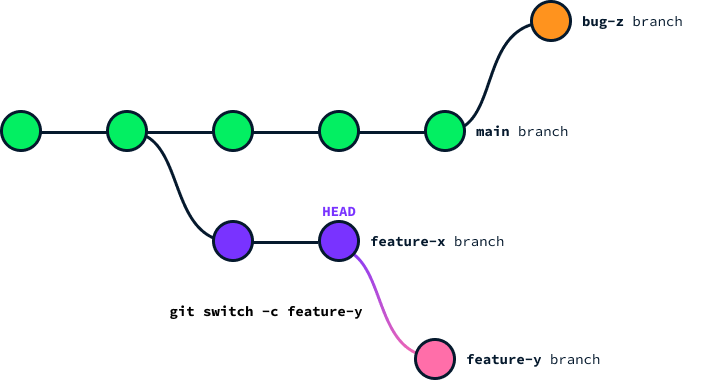
This method of working on dedicated branches is so common that it has a name: the Feature Branch Workflow.
The 'Git Feature Branch Workflow' article from Atlassian describes this popular model.
Read the introduction to understand the core concept: all feature development takes place in a dedicated branch, which keeps main stable and facilitates code review through Pull Requests.
Creating and Switching Branches
Let's get practical. The core commands for branching are straightforward. First, you'll need a practice repository. Open your terminal and run these commands:
# Create a new directory for our practice project and navigate into it
mkdir git-branch-practice
cd git-branch-practice

# Initialize a new Git repository
git init

# Create a file and make our first commit
echo "Version 1" > file.txt
git add file.txt
git commit -m "Initial commit"

# Make a second commit
echo "Version 2" >> file.txt
git add file.txt
git commit -m "Add version 2"
You now have a simple project with two commits on the main branch.
The HEAD Pointer
Before we create a branch, you need to know about HEAD. In Git, HEAD is a special pointer that indicates your current working branch. Any new commits you make will be added to the branch that HEAD points to.
Creating, Switching, and Committing
Let's simulate the workflow of starting a new feature. We'll create a new branch called new-feature.
# Create a new branch named 'new-feature'
git branch new-feature
You've created the branch, but you haven't switched to it yet. Your HEAD is still pointing to main. To start working on the new branch, you need to "check it out."
# Switch to the new-feature branch
git checkout new-feature
Now, HEAD points to new-feature. Any changes you make will be on this branch. Let's make a change:
# Add a feature-specific line to our file
echo "Feature A work" >> file.txt
git add file.txt
git commit -m "Start developing Feature A"
Your new-feature branch is now one commit ahead of main.
Modern Commands: git switch
In recent versions, Git introduced the git switch command, which is more explicit for changing branches. It's now the recommended command for this task.
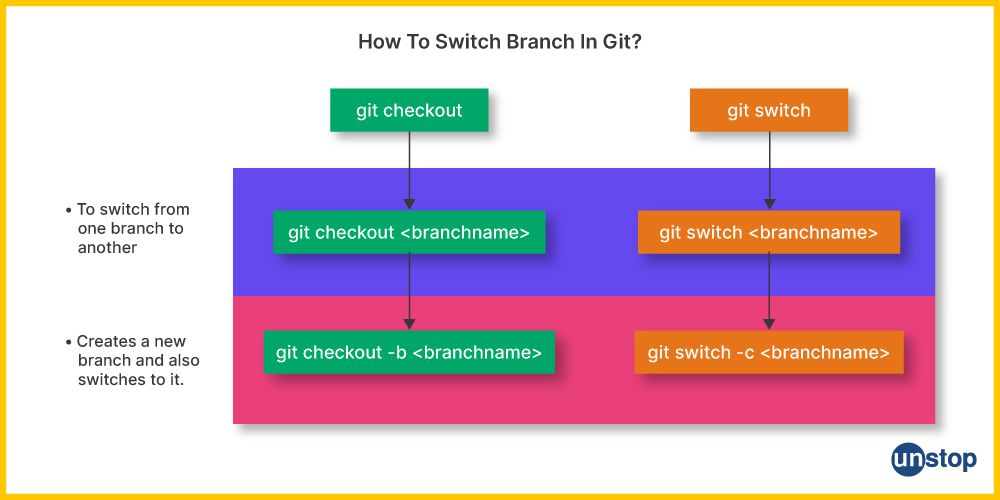
From now on, we'll use git switch. To go back to our main branch:
git switch main
Notice that if you open file.txt, the "Feature A work" line is gone! That's because it only exists on the new-feature branch. Your working directory reflects the state of the branch you are currently on.
The All-in-One Shortcut
Creating a branch and immediately switching to it is so common that there's a shortcut.
Using the new git switch command:
# Create a branch 'another-feature' and switch to it
git switch -c another-feature
The -c flag stands for "create". The older, but still very common, way to do this is git checkout -b another-feature.
Simulating a Full Workflow
Let's use a video to walk through a complete, realistic scenario: you're working on a feature, and your manager asks you to fix an urgent bug.
Git Branching and Merging - Detailed Tutorial
The 'Git Branching and Merging' tutorial provides a clear, step-by-step demonstration of this exact workflow. Follow along to see how branches keep your work organized.
Watch from 04:26 to 11:27. This section covers creating and checking out a feature branch, making commits on it, then switching back to the main branch to create a separate bug-fix branch. Pay attention to how the git log command visualizes the divergent history.
After following the video's example, you can always visualize your repository's history using this powerful command:
git log --oneline --graph --all --decorate
This will show you a text-based graph of your branches, where they diverge, and where each branch pointer (and HEAD) is currently located.
Managing Your Branches
Once you start creating branches, you'll need to know how to manage them. The freeCodeCamp.org "Git Branches Tutorial" covers these management tasks concisely.
Renaming and Deleting Branches
You might want to rename a branch for clarity or delete it after its changes have been merged.
Watch this segment to learn how to rename and delete branches. These are essential 'housekeeping' tasks.
First, watch from 07:01 to 08:50 to see how to rename the current branch and other branches using git branch -m. Then, watch from 19:56 to 22:30 to learn how to delete local branches with git branch -d and -D.
Key Commands for Branch Management:
git branch: Lists all your local branches.git branch -m <new-name>: Renames the current branch.git branch -d <branch-name>: Deletes a merged branch (a safety feature).git branch -D <branch-name>: Force-deletes a branch, even if it has unmerged changes. Use with caution!
Test your understanding!
You've been working on a branch called fix/typo. You make a few commits, but then realize a better name would be docs/update-readme. After that, you decide the whole change is unnecessary. What two commands would you run to first rename the branch and then delete it? (Assume you've switched to the main branch first).
Show answer
- To rename the branch:
git branch -m fix/typo docs/update-readme - To delete the branch:
git branch -D docs/update-readme
You would need the -D flag because the commits on the branch were never merged into main. Using -d would result in an error message warning you about unmerged changes.
Branches and Collaboration: Pushing to a Remote
So far, all our branches have been local—they exist only on your machine. To collaborate, you need to share your branch by "pushing" it to a remote repository (like GitHub).
This is the first step in creating a Pull Request, which you'll learn about in a future lesson.
This final video clip explains how to publish a local branch to a remote repository. It also introduces the crucial concept of a 'tracking connection'.
Watch from 10:19 to 13:00. Focus on the git push -u origin <branch-name> command and the explanation of what the -u flag does.
The command git push -u origin <branch-name> does two things:
- It pushes your branch and all its commits to the remote repository named
origin. - The
-uflag (short for--set-upstream) creates a tracking connection between your local branch and the new remote branch. This means that in the future, you can simply rungit pushfrom that branch, and Git will know where to send your changes.
This is the standard way to share your work when contributing to an open-source project.
Conclusion
Fantastic work! You've just mastered one of the most critical concepts in Git. You now have the skills to work on features and fixes in a clean, isolated, and professional manner.
Key Takeaways:
- Branches provide isolated environments for development, keeping the
mainbranch stable. This is the Feature Branch Workflow. - A branch is a lightweight, movable pointer to a commit.
- Use
git switch -c <branch-name>to create and switch to a new branch. Usegit switch <branch-name>to move between existing branches. HEADis a special pointer that indicates your currently active branch.- Visualize your project's history with
git log --graph --all. - Manage branches with commands like
git branch -m(rename) andgit branch -d(delete). - Share your branch with collaborators by running
git push -u origin <branch-name>.
Preview of the next lesson: You're now creating commits on separate branches, which is a big step. But what goes inside those commits? Specifically, the commit message is a vital form of communication with other developers. In our next lesson, we will focus on how to write clear and meaningful commit messages that follow established conventions, making your contributions easy for others to understand.