Hello! Welcome back.
In our last lesson, you mastered the art of writing clean, conventional commit messages. This is a crucial communication skill for any developer. Now that you know how to package your changes professionally, let's set up the infrastructure you'll need to contribute those changes to projects you don't own.
This lesson is all about the standard workflow for contributing to open-source projects on GitHub. We'll cover how to create your own copy of a project, bring it to your local machine, and set up a link back to the original project to keep your copy updated. This process is fundamental to your goal of contributing to security and AI/ML projects.
By the end of this lesson, you will be able to fork a repository, clone it locally, and configure the upstream remote.
The Collaborative Workflow: Upstream, Origin, and Local
Before we dive into the commands, let's understand the big picture. When you contribute to an open-source project, you're working with three copies of the repository, each with a specific role.
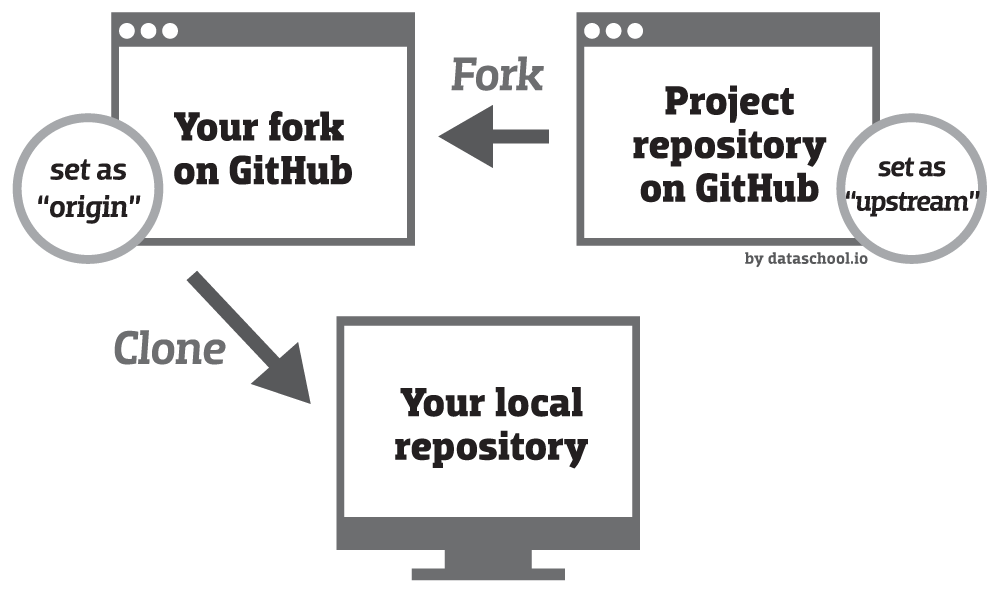
- Upstream Repository: This is the original project on GitHub (e.g., the official repository for a security tool you want to contribute to). You can read from it, but you don't have permission to write or push changes directly.
- Origin Repository (Your Fork): This is a personal copy of the upstream repository that lives on your own GitHub account. You have full control over this copy. It acts as your public "staging area" where you can push your changes before proposing them to the original project.
- Local Repository: This is a copy of your fork on your computer. This is where you'll do all your work: writing code, creating branches, and making commits.
This separation ensures that the main project stays clean and that all proposed changes can be reviewed by project maintainers before being merged.
Step 1: Forking a Repository
The first step is to create your personal server-side copy of the project. This is called forking. A fork is a new repository under your GitHub account that is linked to the original, or "upstream," repository.
Let's watch a video that demonstrates this process. We'll use a practice repository called octocat/Spoon-Knife that GitHub created specifically for this purpose.
Git and Github: Forking and Cloning from GitHub
This clip from Code With Steve clearly explains what forking is and walks you through the process on GitHub's website.
Watch from 01:22 to 02:35. Pay attention to the distinction he makes: you can't push directly to the main repository, which is why a fork is necessary.
To summarize the process:
- Navigate to the GitHub page of the repository you want to contribute to.
- Click the "Fork" button in the top-right corner.
- GitHub will create a copy of the repository under your username.
For a detailed written guide that you can refer back to, the official GitHub documentation is an excellent resource.
The official GitHub Docs provide a step-by-step guide to forking. It's a good idea to review this to solidify your understanding.
Read the sections 'About forks' and 'Forking a repository.' This will reinforce the concept and the steps you just saw in the video.
Step 2: Cloning Your Fork
Now that you have a copy of the repository on your GitHub account (origin), you need to bring it down to your computer to start working. This is done using the git clone command, which you may have seen before. The key difference here is that you clone your fork, not the original repository.
Let's continue with the video to see this in action.
Git and Github: Forking and Cloning from GitHub
The same video from Code With Steve now shows how to clone the repository you just forked.
Watch from 02:35 to 03:41. Notice that he copies the URL from his forked version of the repository, not the original.
The process is:
- Go to the page for your fork on GitHub (e.g.,
YOUR-USERNAME/Spoon-Knife). - Click the "Code" button and copy the HTTPS or SSH URL.
- In your terminal, run the command:
git clone <URL_you_just_copied>
After you clone, Git automatically sets up a "remote" named origin that points to your fork on GitHub. You can verify this by navigating into the new project directory (cd Spoon-Knife) and running:
git remote -v
You should see output similar to this, with your username:
origin  https://github.com/YOUR-USERNAME/Spoon-Knife.git (fetch)
origin  https://github.com/YOUR-USERNAME/Spoon-Knife.git (push)
This origin remote is how Git knows where to push your changes when you're ready to save them to your GitHub fork.
Step 3: Configuring the Upstream Remote
Your fork is a snapshot of the original project at the time you forked it. However, open-source projects are active! The original (upstream) repository will likely receive new commits and updates while you're working.
To keep your local copy up-to-date with the original project, you need to configure a second remote that points to it. By convention, this remote is named upstream.
Let's watch the final segment of the video, which explains how to set this up.
Git and Github: Forking and Cloning from GitHub
This last clip from Code With Steve demonstrates how to add the original project repository as the 'upstream' remote.
Watch from 03:41 to 05:26. The key steps are getting the URL of the original repository and using the git remote add upstream command.
Here is the process:
- Navigate to the GitHub page of the original repository (e.g.,
octocat/Spoon-Knife). - Click the "Code" button and copy its URL.
- In your terminal, inside your local repository, run this command:
(Replace the URL with the one you copied if you're practicing with a different repository).git remote add upstream https://github.com/octocat/Spoon-Knife.git - Now, verify your remotes again with
git remote -v. You should see bothoriginandupstream:origin https://github.com/YOUR-USERNAME/Spoon-Knife.git (fetch) origin https://github.com/YOUR-USERNAME/Spoon-Knife.git (push) upstream https://github.com/octocat/Spoon-Knife.git (fetch) upstream https://github.com/octocat/Spoon-Knife.git (push)
You now have a complete setup! You can push your work to origin (your fork) and fetch updates from upstream (the original project). We'll cover how to use this setup to sync your fork in a future lesson.
Test your understanding!
You've successfully forked a repository and cloned your fork to your local machine. You now want to get the latest updates from the original project repository, which you have not yet configured. Which of these commands is the essential first step to enable you to pull those updates?
git pull origin maingit remote add upstream <URL_of_original_repo>git clone <URL_of_original_repo>git fetch origin
Show answer
The correct answer is 2. git remote add upstream <URL_of_original_repo>.
Your local repository only knows about origin (your fork) by default. To get updates from the original project, you must first tell Git where it is by adding it as a remote. upstream is the conventional name for this remote.
Conclusion
Congratulations! You have now set up the complete, standard Git workflow for contributing to any open-source project on GitHub. This three-tiered structure of upstream, origin, and local is the foundation upon which all your future contributions will be built.
Key Takeaways:
- A fork is your personal copy of a project repository on GitHub.
- You clone your fork, not the original project, to get a local copy for development.
- Cloning automatically sets up a remote named
originpointing to your fork. - You must manually add a remote, conventionally named
upstream, that points to the original project repository. This allows you to fetch updates and keep your work in sync. - The
git remote -vcommand is used to view your configured remotes.
Preview of the next lesson: Now that you have a local copy of the code and the ability to keep it in sync, you're almost ready to start making changes. But what happens if you're working on a feature and the main project changes in a way that conflicts with your work? In the next lesson, we will explore how to merge branches locally and resolve common merge conflicts, an essential skill for collaborative development.