Welcome to your second lesson. In our last session, you mastered the crucial skill of compiling a single C file from the command line, using gcc and its warning flags to enforce code quality. This was the first step in taking direct control of your toolchain. Now, we will build upon that foundation to address a fundamental question of software engineering: how do we structure a program that grows too large for a single file?
This lesson addresses the next outcome in our module: explaining the purpose of separating a C program into multiple source (.c) and header (.h) files. As you progress toward your goal of building complex systems like game engines, moving beyond a single main.c file is not just a best practice—it's a necessity for managing complexity, enabling collaboration, and improving maintainability.
The Problem with "Spaghetti Code"
Imagine trying to build a text-based adventure game. You'd need code to manage the player, the inventory, the game world, the command parser, combat, and saving/loading the game state. If you were to write all of this in a single, massive main.c file, you would quickly end up with thousands of lines of code that are difficult to navigate, debug, and reuse. A change to the inventory system might accidentally break the combat logic. This is the classic "spaghetti code" problem.
The solution is modularity: breaking down the program into logical, self-contained units. In C, these units are called modules, and they are typically implemented as a pair of files:
- A source file (
.c) that contains the actual code—the function implementations. - A header file (
.h) that contains the public interface—the function declarations.
This separation is the bedrock of all large-scale C programming. To understand the primary benefits, let's start with a quick read.
Real world project structure with .C and .H - Stack Overflow
This Stack Overflow answer provides a concise and clear explanation of the fundamental roles of .c and .h files and the key reasons for using this structure.
Please read the first two main sections: Difference Between .c and .h Files and Why Use Multiple .c Files?. Focus on the three main benefits listed: Modularization, Reusability, and Compilation Efficiency.
As the reading highlights, this approach allows you to think about your program at a higher level. You can work on the "inventory module" without worrying about the implementation details of the "parser module," as long as you know what functions it provides.
Interface vs. Implementation
The central concept you need to internalize is the difference between a declaration and a definition.
- A declaration introduces a name and its type to the compiler. For a function, this is its signature (return type, name, and parameter types). It tells the compiler what a function looks like, but not how it works. Declarations go in header files (
.h). - A definition provides the actual implementation. For a function, this is the code block with the logic inside the curly braces
{}. It tells the compiler how a function works. Definitions go in source files (.c).
A header file acts as a public contract or an API (Application Programming Interface). It lists the functions and data structures a module makes available for others to use. The corresponding source file contains the private implementation details, which can be changed without affecting other modules as long as the public contract in the header file remains the same.
The following video from Mike Shah provides an excellent walkthrough of this concept.
Your Second Day in C (Understand .h header and .c source files) - Crash Course in C Programming
This video offers a clear, practical explanation of the roles of header and source files, using a custom math library as an example.
Please watch the following segments: The introduction explains the core idea of a header file as an "interface" or "index." This part demonstrates what goes into a header file: struct definitions and function declarations, but explicitly no implementation. Finally, watch this short clip which explains the preprocessor's role. It reveals that the #include directive is simply a copy-and-paste mechanism, a key technical detail to understand.
How the Compiler Handles Multiple Files
Now, let's connect this back to the compilation pipeline from our last lesson. How does gcc build an executable from multiple .c files?
The process involves two distinct stages: compilation and linking.
-
Compilation Stage:
gcccompiles each.csource file independently. When the compiler processesmain.cand sees an#include "my_math.h", it pastes the declarations frommy_math.hintomain.c. Ifmain.cthen calls a function likeadd(2, 3), the compiler checks the declaration in the included header. It confirms that a function namedaddexists and that it takes two integers. It trusts that the definition foraddexists somewhere else and proceeds to generate an object file (main.o). This object file contains the machine code formainbut has a "placeholder" for theaddfunction's location. The same process happens formy_math.c, resulting inmy_math.o. -
Linking Stage: After all source files have been compiled into object files, the linker takes over. Its job is to connect all the pieces. It takes
main.oandmy_math.o, sees the placeholder foraddinmain.o, finds the actual machine code foraddinmy_math.o, and links them together. It also links in any code from standard libraries (likeprintf). The final output is a single, complete executable file.
This video from Low Level provides a fantastic visual analogy for this process.
why do header files even exist?
This video brilliantly explains the distinction between the compile and link phases, which is the key to understanding how multi-file projects work.
First, watch the segment from compile vs. link. The "spiky ball" analogy for object files with dependencies is a powerful mental model. Then, watch the role of header files, which shows how including a header satisfies the compiler, leaving the linker to find the actual code.
The diagram below visualizes this entire workflow for a simple project.
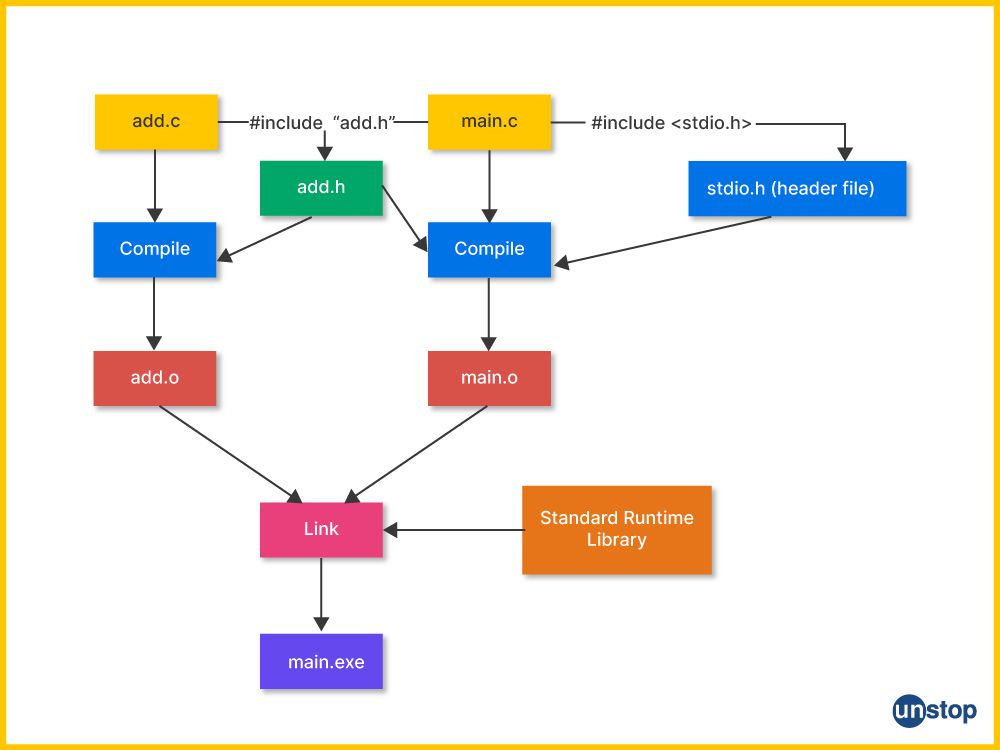
A Practical Example
Let's put this into practice. We'll create a simple calculator program split into three files:
add.h: The header file declaring ouraddfunction.add.c: The source file defining theaddfunction.main.c: The main program file that uses theaddfunction.
Multi-Module Design in C Programming
This document provides a concise, hands-on example of a multi-module program, including the code and compilation commands.
Find the section on the example program. Create the three files (add.h, add.c, and main.c) in your development environment and copy the code exactly as shown.
Once you have created the files, it's time to compile. We'll do it using the two-stage process to make the concepts clear. In your terminal, run these commands one by one:
-
Compile
add.cinto an object file:gcc -Wall -Wextra -Werror -std=c17 -c add.c -o add.oThe
-cflag tellsgccto compile but not link, producing the object fileadd.o. -
Compile
main.cinto an object file:gcc -Wall -Wextra -Werror -std=c17 -c main.c -o main.oThis creates
main.o. At this stage,main.oknows whataddlooks like but has no idea where to find its code. -
Link the object files into an executable:
gcc main.o add.o -o calculatorHere, we invoke
gccwithout any source files. It recognizes the.ofiles and understands its job is to act as a linker. It combinesmain.oandadd.oto produce the finalcalculatorexecutable.
Now you can run ./calculator, and you should see the output The sum is: 8.
You have just successfully compiled your first multi-file C program, manually orchestrating the compile and link stages.
Real-World Considerations
As projects grow, so does their structure. A professional game engine might have hundreds of source and header files organized into a clean directory structure, as seen in this C++ project in the Visual Studio IDE.

Two final points for now:
-
Include Syntax (
""vs.<>): You've seen both#include <stdio.h>and#include "add.h". The angle brackets<>tell the compiler to look in standard system directories for library headers. The double quotes""tell it to look in the current project directory first, making them the standard choice for your own project's header files. -
The Multiple Inclusion Problem: What happens if a header file gets included more than once during the compilation of a single
.cfile? This can easily happen in large projects and leads to redefinition errors. The solution is a preprocessor technique called a header guard. We will dedicate our entire next lesson to this critical mechanism.
Conclusion
In this lesson, we transitioned from single-file programs to the modular structure used in all serious C projects. You have learned the "why" and "how" of this fundamental design pattern.
Key takeaways:
- Separating code into
.c(implementation) and.h(interface) files is essential for modularity, reusability, and compilation efficiency. - Header files contain declarations (the "what"), while source files contain definitions (the "how").
- The build process involves compiling each
.cfile into an intermediate object file (.o), followed by linking all object files together to create the final executable. - The
#includedirective works by copy-pasting header content, a simple but powerful mechanism managed by the preprocessor.
In our next lesson, we will solve a critical problem that arises from this design: how to prevent a header from being included multiple times. You will learn to write and use header guards, completing your foundational knowledge of building robust, multi-file C projects.