Introduction
Welcome back to the workshop! In the last lesson, you successfully installed srsRAN, giving you the software-defined radio components of our 4G test lab: the base station (srsENB) and the user equipment (srsUE). You now have the "radio tower" and the "phone."
However, a radio tower on its own is just a transmitter. To become a functioning network, it needs to connect to a core network—the "brain" that manages users, handles data sessions, and connects to the wider internet. Today, our goal is to install that brain: you will install the Open5GS core network software suite.
Open5GS is a powerful, open-source implementation of the 4G Evolved Packet Core (EPC) and the 5G Core. We're using it because it's more feature-complete than srsRAN's built-in core, has a great web-based management interface, and paves the way for our future exploration of 5G.
By the end of this lesson, you will have the two main software components of your lab—srsRAN and Open5GS—installed and ready for configuration.
Understanding the Open5GS Architecture
Before we start typing commands, let's build a mental model of what we're actually installing. A cellular core network isn't a single program but a collection of services that work together. Given your background in IP networking, you can think of these as specialized microservices, each with a distinct role.
Let's look at the high-level architecture.
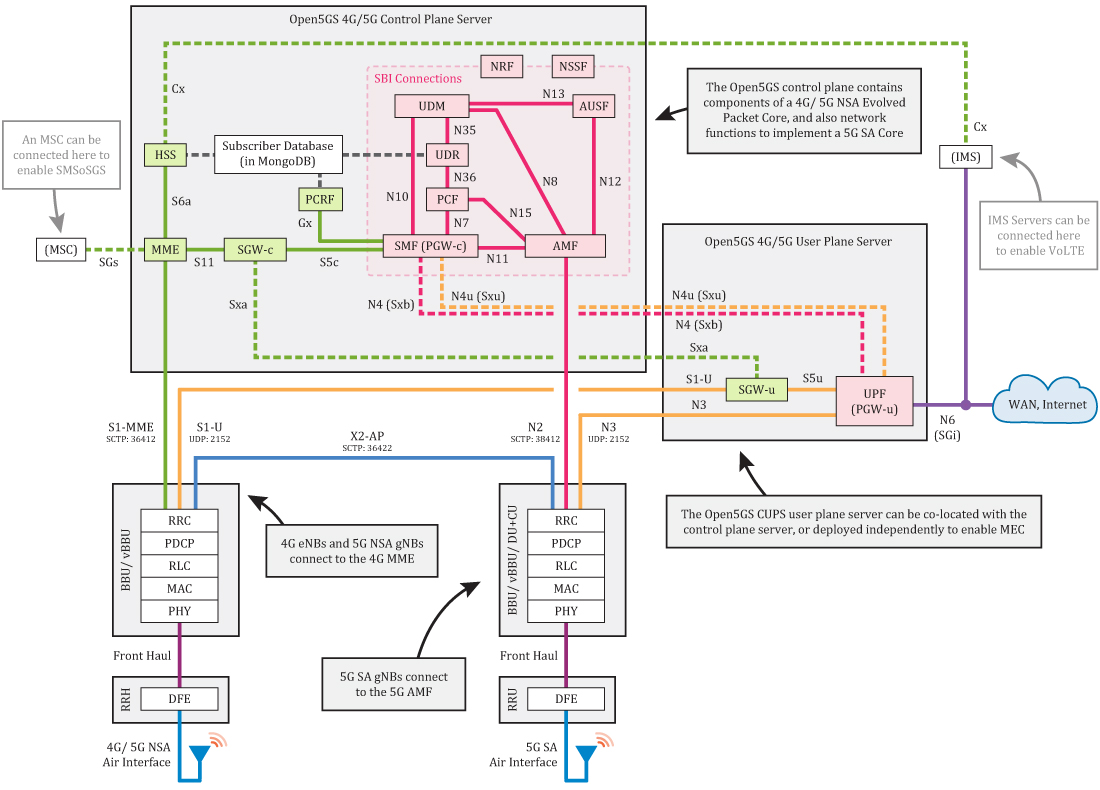
For our initial 4G lab, the four most important components are:
- HSS (Home Subscriber Server): This is the master database for all subscriber information. It stores user identities (IMSI), authentication keys, and service profiles. It's the ultimate source of truth for who is allowed on the network.
- MME (Mobility Management Entity): This is the primary control-plane node. It handles the signaling for user authentication, tracking a device's location, and managing connection states. It's the traffic controller of the network.
- SGW (Serving Gateway): This component routes and forwards user data packets within the core network. It acts as an anchor point for the user's connection as they move between base stations.
- PGW (Packet Data Network Gateway): This is the gateway to the outside world. It allocates an IP address to the user device and routes traffic between the mobile network and external packet networks, like the internet. It functions similarly to the main router on a home network.
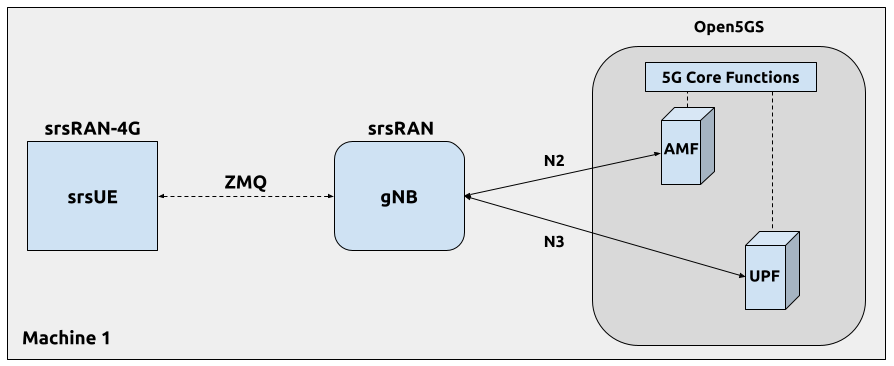
To see how these components fit into our complete lab setup, look at the diagram below. It shows how the srsRAN components you installed last time will communicate with the Open5GS core we're installing today.
Installing Open5GS
The installation process is straightforward, thanks to well-maintained packages for Ubuntu. We will install three main things:
- MongoDB: The database used by the HSS to store subscriber data.
- Open5GS: The core network components themselves (MME, HSS, etc.).
- WebUI: A Node.js-based web application for managing Open5GS.
We'll be following the official documentation, which provides the most accurate commands. I've also included a supplementary guide that adds some useful context.
First, let's review the official Open5GS installation instructions. This will be our primary source for the commands.
Read the section under '3. Open5GS'. This section provides the sequence of commands for installing MongoDB, the Open5GS packages, and the WebUI on Ubuntu.
Now, let's get our hands dirty. Open a terminal on your Linux machine and execute the following steps.
Step 1: Install MongoDB
Open5GS uses MongoDB as its database backend. The HSS stores all subscriber profiles, including their secret keys, in this database.
The following commands will add the official MongoDB repository to your system and install the database server.
# Add the MongoDB GPG key
curl -fsSL https://www.mongodb.org/static/pgp/server-8.0.asc | sudo gpg -o /usr/share/keyrings/mongodb-server-8.0.gpg --dearmor


# Add the MongoDB repository
echo "deb [ arch=amd64,arm64 signed-by=/usr/share/keyrings/mongodb-server-8.0.gpg ] https://repo.mongodb.org/apt/ubuntu jammy/mongodb-org/8.0 multiverse" | sudo tee /etc/apt/sources.list.d/mongodb-org-8.0.list


# Update your package list and install MongoDB
sudo apt-get update
sudo apt-get install -y mongodb-org
Step 2: Install Open5GS Core Components
Next, we'll add the PPA (Personal Package Archive) for Open5GS, which provides the latest versions of the software, and then install the open5gs package.
# Add the Open5GS PPA
sudo add-apt-repository ppa:open5gs/latest
sudo apt-get update


# Install the Open5GS package
sudo apt-get install open5gs
This single package installs all the core network functions (MME, HSS, SGW, PGW, etc.) and sets them up to run as system services.
Step 3: Install the Open5GS WebUI
The WebUI is an essential tool for managing your core network, especially for adding and editing subscribers. It's a web application that requires Node.js.
# Install Node.js (this example uses Node.js 18.x)
curl -fsSL https://deb.nodesource.com/setup_18.x | sudo -E bash -
sudo apt-get install -y nodejs


# Install the WebUI using the official install script
curl -fsSL https://open5gs.org/open5gs/assets/webui/install | sudo -E bash -
To see another walkthrough of this installation process, you can watch the following video. The presenter also runs into a few small, realistic issues, which can be instructive.
Broadcasting my own cellular | PLTE w/ Open5GS and B210
This video from LAN Ranger shows a complete setup of a private LTE network. Let's watch the portion where he installs Open5GS.
Watch from 10:52 to 20:00. You can see the presenter executing very similar commands to install MongoDB, Open5GS, and the WebUI. This provides a good visual confirmation of the process.
Verification
With the installation complete, the final and most important step is to verify that everything is running correctly.
First, check that the core network services have started. Open5GS creates a systemd service for each of its main components. You can check their status with a single command:
systemctl status open5gs-*
You should see a list of services like open5gs-mmed.service, open5gs-hssd.service, etc., with a status of active (running).
Next, let's check the WebUI. Open a web browser on your Linux machine and navigate to:
http://localhost:3000
You should be greeted by the Open5GS login page. The default credentials are:
- Username:
admin - Password:
admin
After logging in, you'll see the main dashboard. It will show a map and some statistics (which will all be zero for now). The most important part is the "Subscribers" menu on the left. Click it, and you should see an empty list. This is where we will add our test SIM card's profile in a future lesson.
The following video shows what checking the services and accessing the WebUI looks like.
In this video, Amin Sedighfar demonstrates a working Open5GS setup. These short clips show exactly what you should be looking for to verify your installation.
First, watch from 05:42 to 06:15 to see how to check the status of the running services. Then, watch from 04:37 to 05:10 to see what the WebUI looks like and where the subscriber list is.
If your services are running and you can log into the WebUI, your installation was a success!
Conclusion
Excellent work. You have now installed the "brain" of your private LTE network. You've gone from having a standalone radio to having a complete core network, ready to manage connections and route data.
Key Takeaways:
- Open5GS provides the 4G Evolved Packet Core (EPC) functions needed for our lab, including the HSS, MME, SGW, and PGW.
- It uses MongoDB as a database to store subscriber information, which is managed by the HSS.
- The installation process for Ubuntu involves adding repositories for MongoDB and Open5GS and installing them with
apt. - A WebUI running on port 3000 provides a convenient way to manage the core network, particularly for adding subscribers.
- Verification involves checking that the
open5gs-*services are running and that you can log into the WebUI.
Preview of the Next Lesson:
You now have the two major pieces of your puzzle installed: srsRAN for the radio access network and Open5GS for the core network. They are both running on your machine, but they don't know about each other yet. In the next lesson, we will dive into the configuration files. You will create basic configuration files for srsENB and Open5GS to establish a private LTE network, telling your base station how to connect to your core network and finally bridging the gap between them.