Introduction
Welcome to the first hands-on lesson of building your 4G security test lab! In the previous module, you did some impressive detective work, dissecting a pre-recorded LTE attach procedure in Wireshark. You learned to identify the crucial Information Elements (IEs) within RRC and NAS messages, seeing how a UE provides its identity, negotiates security, and gets an IP address.
Now, we shift from being detectives to being architects. Our goal for this lesson is to install the srsRAN software suite (srsENB, srsUE) on a Linux system. This is the first practical step toward creating your own private LTE network, a controlled environment where you can generate and capture your own traffic for analysis and experimentation.
srsRAN is a powerful open-source software suite that implements the LTE/5G radio stack. By installing it, you'll gain the tools to create a software-defined base station (eNodeB) and a software-defined phone (UE), which are the fundamental building blocks of our lab.
What is srsRAN?
Before we start installing, let's clarify what srsRAN is and which parts we'll be using. srsRAN provides software implementations for the three main components of a basic cellular network:
- srsUE: A software-based User Equipment (a phone/modem).
- srsENB: A software-based eNodeB (a 4G base station).
- srsEPC: A software-based Evolved Packet Core (the core network).
These components interact to form a complete network, as shown in the diagram below.

In our lab, we will use srsRAN for the radio components (srsUE and srsENB). For the core network, we will use a different, more fully-featured software called Open5GS in the next lesson. This combination gives us a powerful and flexible test environment. Today, our focus is solely on getting srsRAN installed and ready.
Installation Method: Packages vs. Building from Source
There are two primary ways to install srsRAN on a Linux system: using pre-compiled packages or building it from the source code. Your background in web security and comfort with Linux makes either path accessible, but the choice has important implications for your goals.
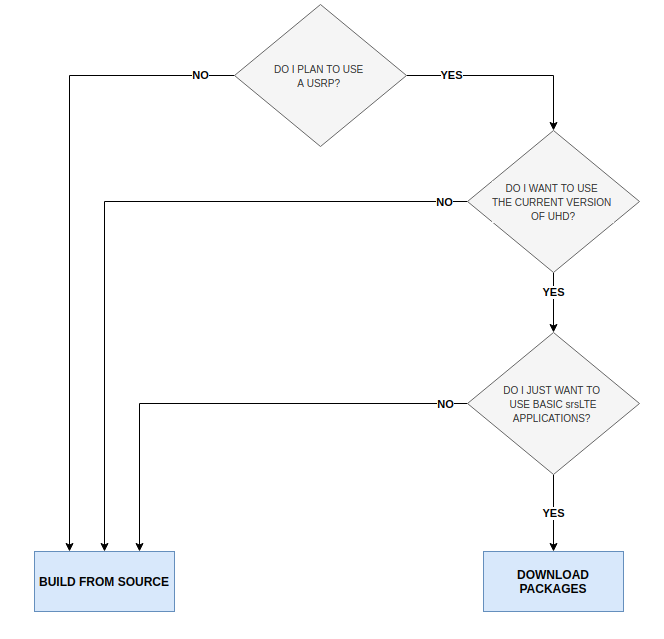
Let's study the official guidance to understand the trade-offs.
Installation Guide — srsRAN 4G 23.11 documentation
The official srsRAN documentation provides a clear comparison of the two installation methods. Let's read the first part of the installation guide.
Read the section titled 'Which Installation Should I Use?'. This will explain the key differences between a package installation and building from source.
As the documentation states:
- Package Installation: This is the simplest and quickest method. It's great for getting a standard setup running quickly, but it offers little flexibility.
- Installation from Source: This method involves downloading the source code and compiling it on your system. It takes more effort but is far more powerful. It allows you to use a wider range of SDRs (including your RTL-SDR via SoapySDR), and critically, it gives you the ability to modify the code.
For your goal of studying telecommunication hacking, building from source is the highly recommended path. The ability to modify the eNodeB's behavior to create a rogue base station, or to alter the UE's signaling, is essential for security research. We will proceed with the source installation.
Installing srsRAN from Source
This process involves three main steps: installing dependencies, compiling the code, and installing the compiled binaries and configuration files. Given your experience with Linux, these steps should feel familiar. We'll follow the official documentation, supplemented with some practical tips.
Installation Guide — srsRAN 4G 23.11 documentation
Now, let's walk through the source installation process using the detailed instructions from the official srsRAN documentation and a helpful blog post.
First, carefully read the 'Installation from Source' section in the srsRAN guide. Pay close attention to the list of mandatory requirements and the sequence of commands: git clone, cmake, make, make test, make install, and srsran_install_configs.sh.
How to Build your Own Personal 4G Network
This blog post, 'How to Build your Own Personal 4G Network', provides a real-world example of the installation process. While the dependency commands are for Arch Linux, the core compilation steps are universal and serve as a great cross-reference.
Scan through the 'Software requirements' and 'srsRAN' sections. Notice the similar pattern of installing dependencies, then using cmake and make. This reinforces the standard build process for C++ projects on Linux.
Now, let's consolidate those instructions into a clear, step-by-step guide for a Debian-based system like Ubuntu. Open a terminal on your Linux machine and follow along.
Step 1: Install Dependencies
srsRAN relies on several other libraries for things like signal processing (libfftw), cryptography (libmbedtls), and more. You must install these first.
The documentation provides a convenient command to install all mandatory dependencies at once:
sudo apt-get update
sudo apt-get install build-essential cmake libfftw3-dev libmbedtls-dev libboost-program-options-dev libconfig++-dev libsctp-dev
Step 2: Install SDR Driver
srsRAN needs a driver to communicate with your SDR. You own an RTL-SDR, which is supported through the SoapySDR framework. It is crucial to install the driver before compiling srsRAN, so the build process can detect it.
Install SoapySDR and the RTL-SDR module for it:
sudo apt-get install python3-soapysdr soapysdr-tools python3-numpy soapysdr-module-rtlsdr
After installation, you can verify that your device is detected by running:
SoapySDRUtil --probe="driver=rtlsdr"
You should see output indicating that the probe was successful and showing details about your RTL-SDR.
Step 3: Download and Compile srsRAN
Now we'll get the source code from GitHub and compile it.
-
Clone the repository: This downloads the latest version of the srsRAN 4G source code.
git clone https://github.com/srsRAN/srsRAN_4G.git cd srsRAN_4G -
Create a build directory: It's good practice to compile the project in a separate directory.
mkdir build cd build -
Run CMake: This tool inspects your system, finds the dependencies, and generates the
Makefilesneeded for compilation.cmake ../During this step, you should see output indicating that it found SoapySDR.
-
Compile the code: The
makecommand starts the compilation process. The-j$(nproc)flag tells it to use all available CPU cores to speed things up. This step can take a while (15-30 minutes depending on your computer).make -j$(nproc)
Step 4: Test and Install
-
Run tests: The srsRAN suite includes a set of self-tests to ensure everything was compiled correctly.
make testYou should see a series of tests passing.
-
Install the software: This command copies the compiled programs to a system-wide location (usually
/usr/local/bin), so you can run them from anywhere.sudo make install -
Install configuration files: This script copies the default configuration files to a hidden folder in your home directory (
~/.config/srsran/). We will be editing these files extensively in future lessons.srsran_install_configs.sh user
Verification and A Glimpse Forward
Congratulations, you've installed srsRAN! To verify that the installation was successful, you can check if the system recognizes the new commands. Try running:
srsenb --help
srsue --help
These commands should print a long list of available options, confirming that the srsenb and srsue programs are installed correctly.
To get a feel for what running these components looks like in practice, you can watch a short segment of the following video. Don't worry about the specific hardware (BladeRF, USRP) or commands being used; just observe how the presenter starts the srsenb (base station) in a terminal window.
DragonOS Focal 4G LTE basestation detailed setup (srsLTE, bladeRF xA4, USRP b205 mini-i)
This video by cemaxecuter shows a complete srsLTE (the former name for srsRAN 4G) setup in action. Let's watch the part where the base station is started.
Watch from 03:16 to 05:38. Notice how the srsenb application is launched from the command line. You can see it initialize the radio hardware and prepare to start broadcasting. This is what we will be doing ourselves in a later lesson.
Conclusion
In this lesson, you made a significant leap from theory to practice. You have successfully set up your Linux environment with the srsRAN software suite, the radio-layer foundation of your 4G security lab.
Key Takeaways:
srsRANis a software suite that implements the LTE/5G radio stack, including thesrsUE(phone) andsrsENB(base station).- Building from source is the preferred installation method for security research, as it allows for code modification and broader hardware support.
- The installation process follows a standard Linux pattern: install dependencies (including SDR drivers), clone the code, and then use
cmake,make, andmake installto build and install it. - The default configuration files are installed to
~/.config/srsran/, which will be our starting point for customization.
Preview of the Next Lesson:
Your srsENB base station is installed, but a base station is useless without a core network to connect to. In the next lesson, you will install the Open5GS core network software suite. Open5GS will act as the "brain" of our private network, managing subscribers, setting up data sessions, and connecting our lab to the internet. Once both are installed, we'll be ready to configure them to talk to each other.