Hello! Welcome to the next lesson in your journey through the Fundamentals of Financial Accounting.
In our last session, we drew the critical line between capital and revenue expenditure. That distinction determines which accounts we use when recording transactions. Today, we take the next logical step in the accounting cycle: we'll learn how to aggregate the information from all our individual ledger accounts into a single, powerful summary called a trial balance.
This lesson will equip you to prepare a trial balance from a set of ledger accounts. Mastering this is a foundational skill in accounting. The trial balance serves two primary purposes: it acts as a crucial arithmetic check to ensure our bookkeeping has been accurate, and it forms the raw material from which we will later construct the main financial statements.
1. The Trial Balance in Context
Before we dive into the "how," let's solidify the "what" and "why." The trial balance is an internal report that lists every single account from the general ledger and its final balance. It is a pivotal link between the raw transaction recording (in journals and ledgers) and the final polished financial statements.
The following video provides an excellent overview of what a trial balance is, its role in the accounting process, and its objectives.
Trial Balance - Concept & Problem - Class 11 B.COM CA Foundation
This video, "Trial Balance - Concept & Problem" by Saheb Academy, clearly explains the purpose of the trial balance and its position in the accounting workflow.
Please watch the introductory section from the beginning. Pay close attention to its three main purposes: To summarize the ledger accounts. To provide a base for preparing financial statements. To establish the arithmetical accuracy of the books. Note the important point the video makes: a "balanced" trial balance proves that debits equal credits, but it doesn't guarantee there are no errors. For example, a whole transaction could have been omitted, or an amount posted to the wrong account.
2. Step 1: Balancing the Ledger Accounts
To prepare a trial balance, we first need the final, or "closing," balance of each ledger account. If an account only has entries on one side (e.g., a Furniture account with only debit entries for purchases), its balance is simply the sum of those entries.
However, for accounts with both debit and credit entries (like a Bank or Cash account), we need to perform a procedure called "balancing off" the account. This involves netting the two sides to find the final balance.
The following text from OpenLearn provides a clear, numbered procedure for this process. It introduces the key terms Balance c/d (carried down) and Balance b/d (brought down).
Introduction to bookkeeping and accounting
This guide from OpenLearn offers a step-by-step method for balancing T-accounts. Understanding this procedure is essential before you can extract the balances needed for the trial balance.
Please read the section titled "What is the procedure for balancing off accounts?". Focus on the 4-step process. The 'balance carried down' is the figure needed to make the smaller side equal the larger side. This same amount then becomes the 'balance brought down' on the opposite side to start the next accounting period. This 'balance b/d' is the figure we will use for our trial balance.
The key idea is that the Balance b/d represents the true closing balance of the account at the end of the period. This is the number we carry forward to the trial balance.
3. Step 2: Assembling the Trial Balance
Once we have the closing balance for every ledger account, we can assemble the trial balance. This is a simple statement with two columns: one for debit balances and one for credit balances.
The crucial rule is knowing which balance goes in which column. This brings us back to the fundamental principles we've been building upon. The video from Saheb Academy explains this perfectly.
Trial Balance - Concept & Problem - Class 11 B.COM CA Foundation
This segment of the video explains the rules for populating the trial balance. It's a direct application of the rules of debit and credit.
Please watch the section covering the format and rules. The key takeaway is the direct link to the nature of the accounts: Debit Balances: Assets, Expenses, and Drawings/Dividends. Credit Balances: Liabilities, Equity (Capital), and Revenue/Income.
With the rules clear, let's walk through a complete, practical example. This is where theory becomes practice, which is central to your preference for numerical application.
Trial Balance - Concept & Problem - Class 11 B.COM CA Foundation
This is the core practical component of our lesson. The video walks through a set of T-accounts, determines the nature and balance of each, and constructs a trial balance from scratch.
Please watch the detailed worked example from "Balance Method". As the presenter goes through each account (Furniture, Cash, Salaries, etc.), pause and ask yourself: What type of account is this (Asset, Liability, Expense, etc.)? Based on its type, should it have a debit or a credit balance? Does my conclusion match where the presenter places the balance in the trial balance? This active engagement will solidify your understanding far more than passive watching. Notice how the final debit and credit totals match perfectly.
4. A Complete Picture
To see how the pieces fit together, let's look at a static example showing a collection of balanced ledger accounts and the final trial balance derived from them. This reinforces the process you just learned.
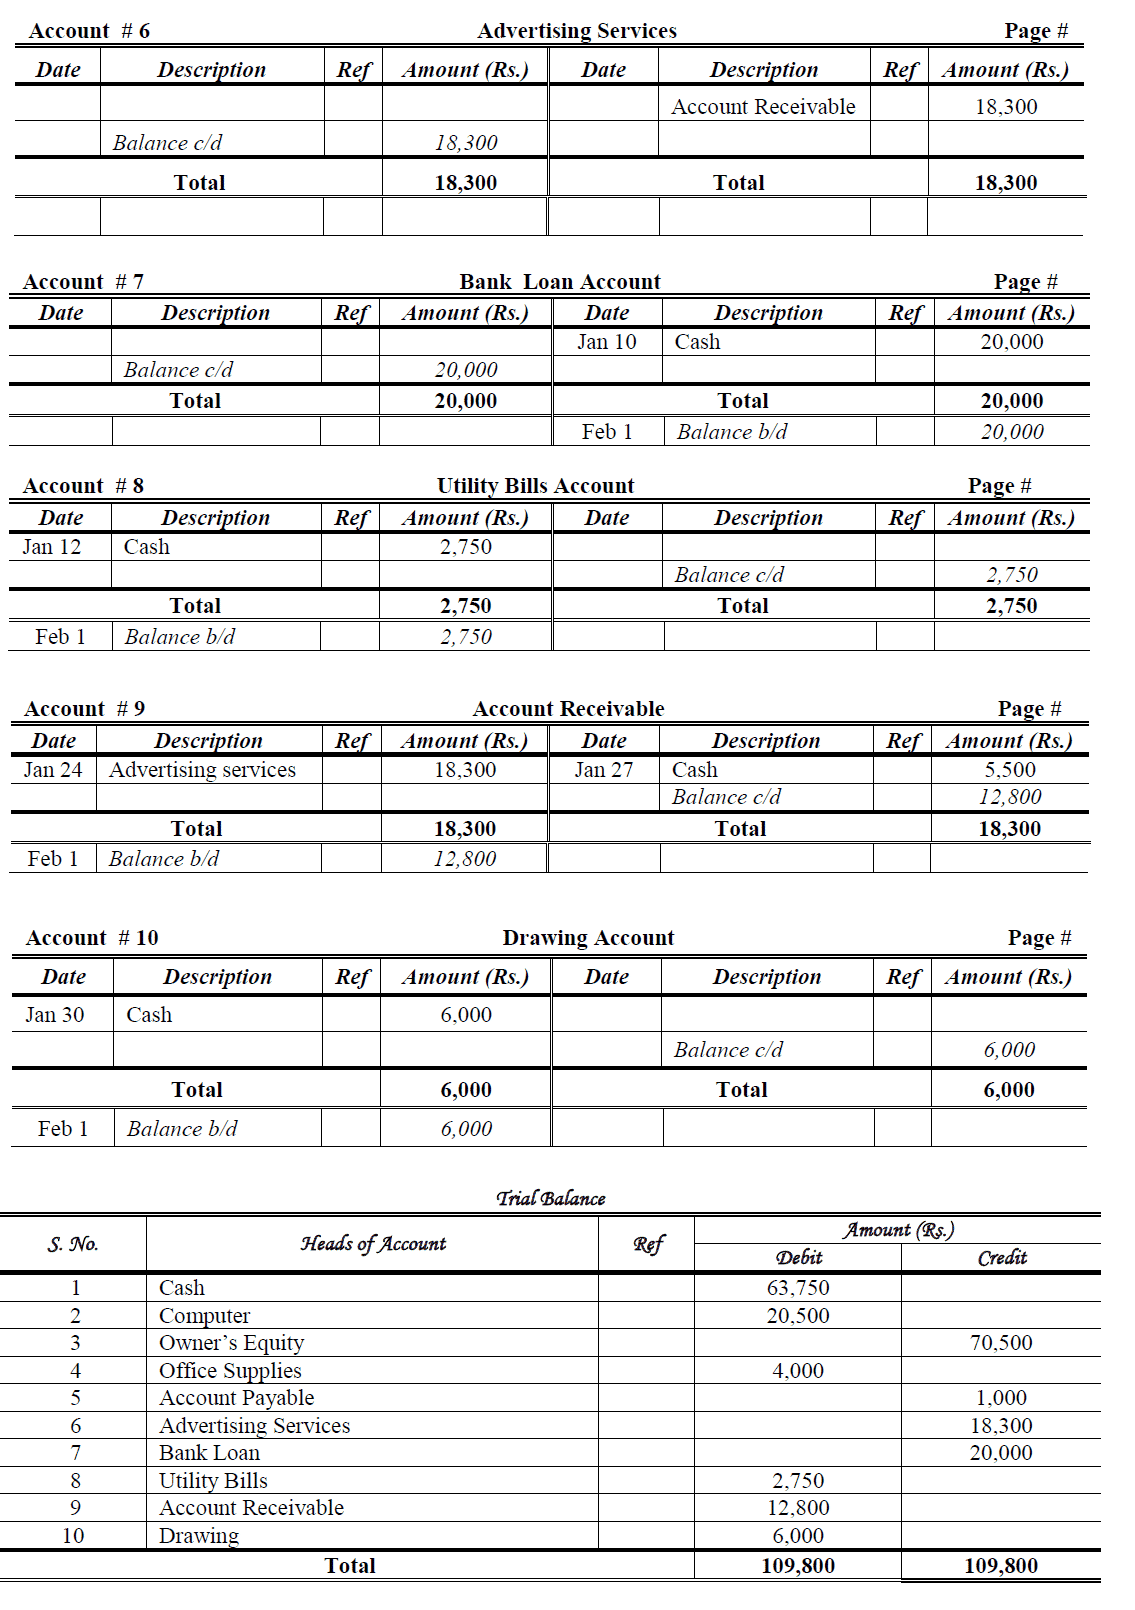
Take a moment to trace a few balances:
- Bank Loan Account (#7): The balance b/d of 20,000 is on the credit side. A bank loan is a liability, so its balance correctly appears in the credit column of the trial balance.
- Utility Bills Account (#8): The balance b/d of 2,750 is on the debit side. Utility bills are an expense, so the balance correctly appears in the debit column.
- Owner's Equity: While the specific T-account isn't fully shown, you can see it in the trial balance with a credit value of 70,500, which is correct for an equity account.
Conclusion
In this lesson, we have moved from individual account records to a comprehensive summary. The trial balance is a testament to the elegant logic of the double-entry system.
Key Takeaways:
- A trial balance is a list of all ledger account balances at a specific point in time.
- Its primary purpose is to verify that total debits equal total credits, providing an arithmetic check of the bookkeeping.
- The preparation involves a two-step process:
- Balance off each ledger account to find its closing balance (
Balance b/d). - List these balances in the appropriate debit or credit column of the trial balance statement based on the account type (Assets/Expenses are debits; Liabilities/Equity/Income are credits).
- Balance off each ledger account to find its closing balance (
- A trial balance that balances is a necessary, but not sufficient, condition for error-free accounts.
You have now completed the entire accounting cycle at a basic level: from classifying transactions (CapEx vs OpEx), to recording them (double-entry), to summarizing them (trial balance).
Our work is not yet done, however. The trial balance we created is "unadjusted." In the next module, Constructing Financial Statements, we will begin by learning how to make crucial year-end adjustments for things like depreciation, accruals, and prepayments. These adjustments will give us an "adjusted trial balance," which is the final springboard for creating the Statement of Profit or Loss and the Statement of Financial Position.