Welcome back. In our last lesson, you implemented the elegant probabilistic function that assigns a maximum layer l to each new vector. This is the crucial first step in building the HNSW hierarchy. Now that we know how high a new node can go, we need to implement the algorithm that actually places it into the graph structure and forges its connections.
This lesson covers the core logic of the HNSW insertion algorithm. You will learn how to implement the top-down traversal that finds the optimal neighborhood for a new vector and prepares it for connection. This process cleverly reuses the SEARCH-LAYER algorithm you've already built, demonstrating a powerful principle of software design: composing complex behaviors from simpler, reusable components.
The Insertion Strategy: From the Top Down
A naive approach to insertion might be to simply find the nearest neighbors on layer l and connect to them. However, HNSW employs a much more sophisticated strategy that is key to its performance. The insertion process always begins at the very top layer of the entire graph, regardless of the new vector's own maximum layer l.
This top-down approach has a significant advantage. The upper layers of the graph are extremely sparse and act as a super-fast "expressway" system. By starting at the top, the algorithm can quickly navigate across vast regions of the vector space to find the rough neighborhood where the new vector belongs. It then progressively refines this search as it moves down through the denser lower layers.
This is analogous to finding a specific address in a large country. You don't start by randomly checking houses. You first navigate to the correct state (top layer), then the correct city (middle layer), and only then do you start searching street-by-street (bottom layer).
The insertion process can be broken down into two distinct phases:
- Phase 1: Fast Traversal (Above
l): From the graph's top layerLdown tol+1, the algorithm's only goal is to find the best possible entry point for the layer below. In these layers, we perform a minimal search, looking for just the single nearest neighbor to our new vector. - Phase 2: Neighbor Discovery (From
ldown to 0): Once we reach layerl(the highest layer for our new vector), the mission changes. Now, and for every layer below it, we perform a more exhaustive search to find a set of high-quality candidate neighbors. These are the nodes our new vector will actually connect to.
Let's look at a visualization of this process.
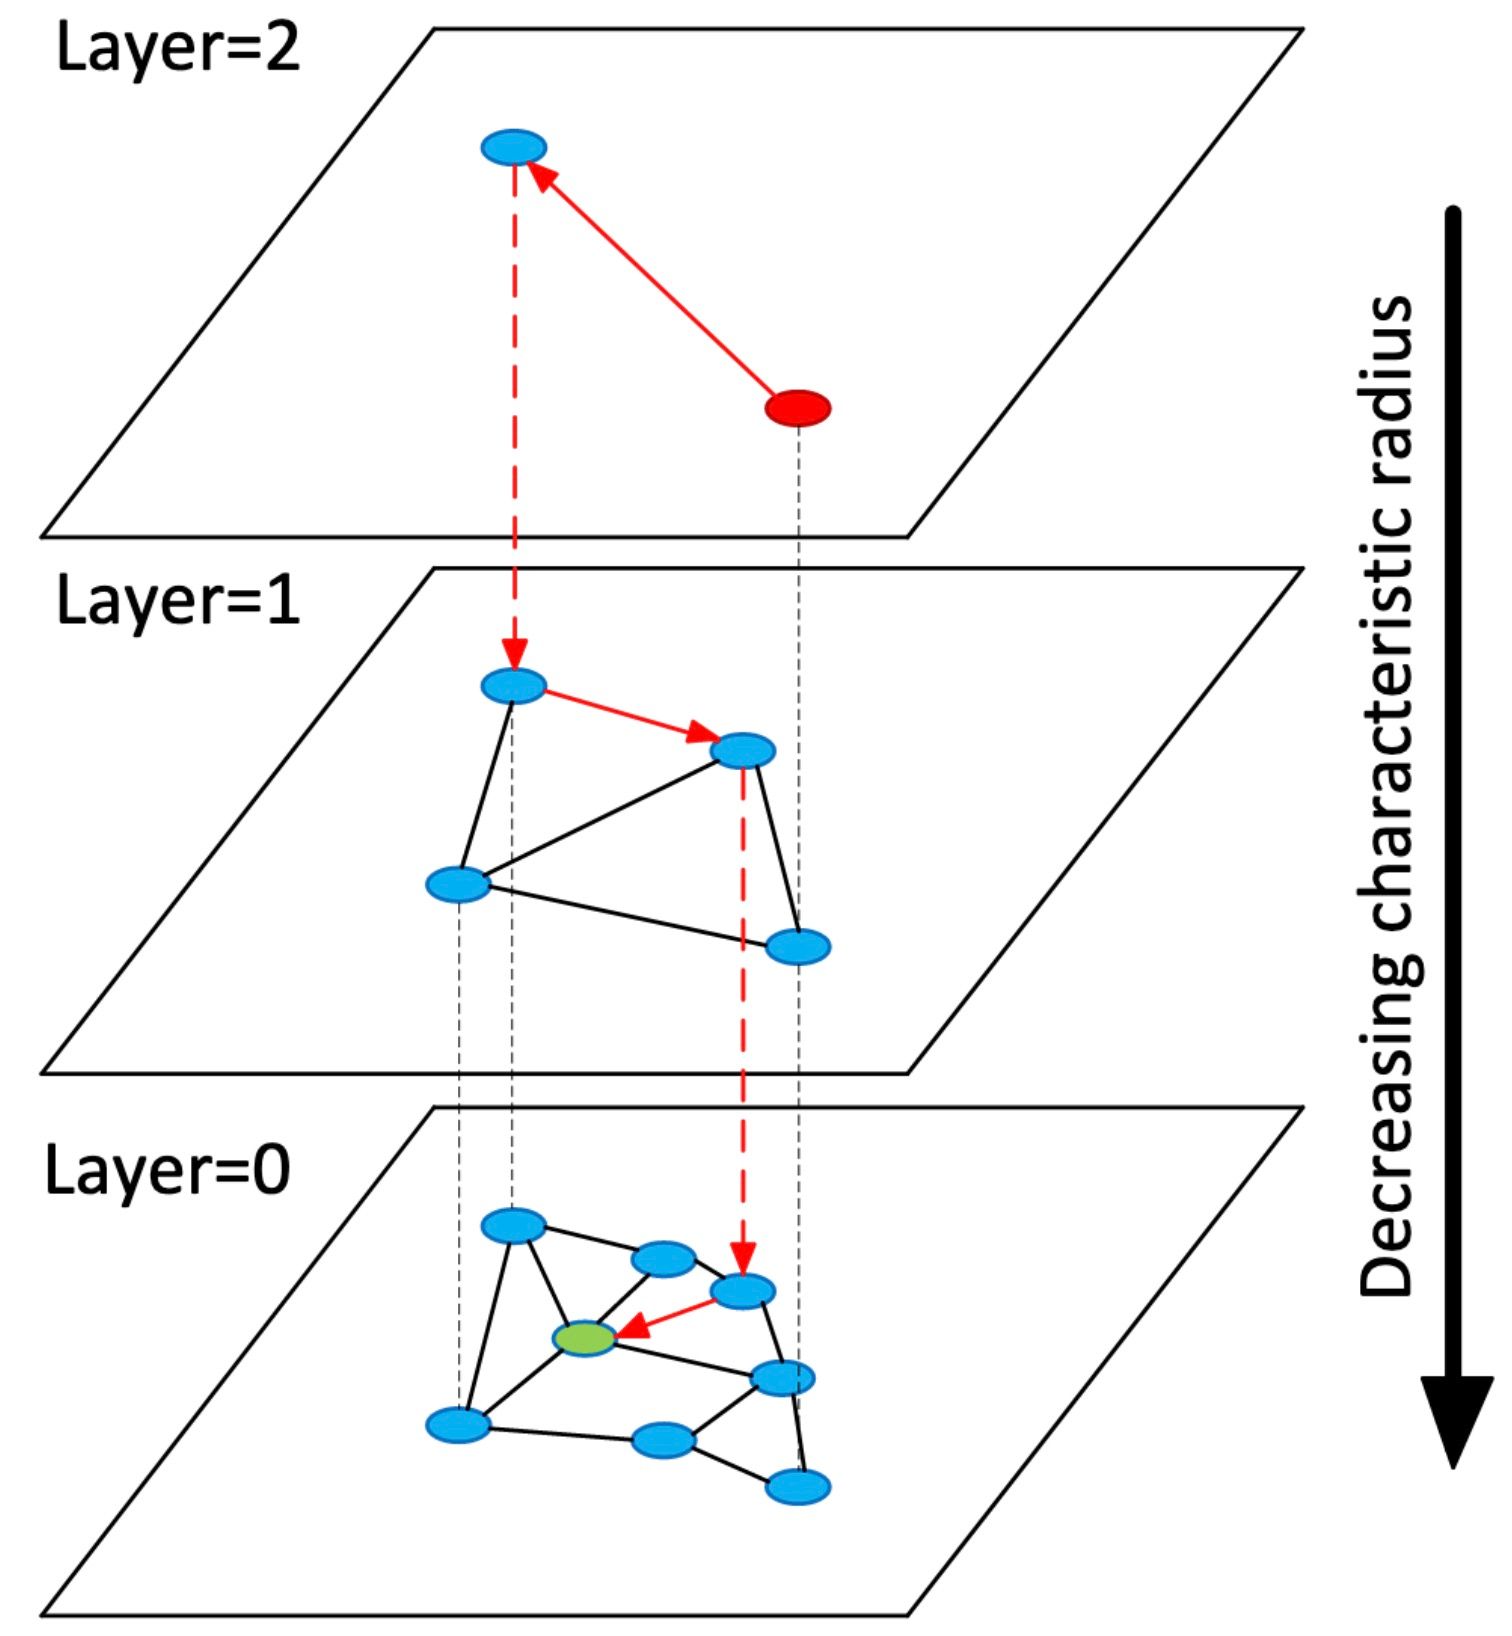
The Formal Algorithm
The original HNSW paper provides the definitive pseudocode for this process. While it looks dense, it maps directly to the two-phase strategy we just discussed.
[PDF] Efficient and robust approximate nearest neighbor search using ...
This is the seminal paper on HNSW. We'll focus on Algorithm 1, which is the complete recipe for insertion.
Read the description of the network construction algorithm in Section 4, starting from the first paragraph. Then, carefully study the pseudocode for Algorithm 1: INSERT. Try to identify the two phases we discussed: the loop for navigating the upper layers and the loop for finding neighbors and connecting on the lower layers.
Let's break down the key lines of Algorithm 1: INSERT(hnsw, q, M, Mmax, efConstruction, mL):
- Line 2-4: Initialize the process. Get the global entry point
epfor the graph, find its levelL, and calculate the new element's max levellusing the function from our last lesson. - Lines 5-7 (Phase 1): This
forloop runs from the top layerLdown tol+1. Notice the call toSEARCH-LAYER(q, ep, ef=1, lc). Settingef=1is the key here; we are performing the most minimal search possible, just to find the single best node to use as the entry point (ep) for the next layer down. - Lines 8-10 (Phase 2): This
forloop runs frommin(L, l)down to 0. Now we are in the layers where the new nodeqwill actually exist. The call toSEARCH-LAYERusesefConstruction, a larger parameter that ensures we find a high-quality, diverse set of candidate neighborsW. Line 10 then passes these candidates to aSELECT-NEIGHBORSfunction.
The subsequent lines (11-17) deal with creating connections and pruning them if necessary. We will tackle those specific steps in the upcoming lessons. For today, our focus is the main control flow that finds the candidates.
This video provides a great conceptual walkthrough of how the search and insertion processes traverse the hierarchy.
Semantic Search: A Deep Dive Into Vector Databases (with Zain Hasan)
In this clip from "Semantic Search: A Deep Dive Into Vector Databases," Zain Hasan gives an excellent high-level intuition for how HNSW's hierarchical structure enables efficient search, which is the same mechanism used for insertion.
Watch the segment from this timestamp. His analogy of finding a house by first finding the city, then the neighborhood, is a perfect way to understand the top-down approach and why it achieves logarithmic complexity.
A Detailed Example
Let's trace the insertion of a new blue node, which has been assigned a maximum layer l=2. The graph's highest layer is L=4.

- Layer 4 (Navigating): The algorithm starts at the global
entry point. It performs aSEARCH-LAYERwithef=1to find the single node on layer 4 closest to our blue node. This node becomes the entry point for layer 3. - Layer 3 (Navigating): Starting from the entry point provided by layer 4, the algorithm again runs
SEARCH-LAYERwithef=1. It finds the nearest neighbor on layer 3 and uses it as the entry point for layer 2. - Layer 2 (Connecting): Now we have reached
l=2, the highest layer for our new node. The mission changes. The algorithm runsSEARCH-LAYERwithefConstruction(a larger value, e.g., 100) to find a good set of candidate neighbors. From these candidates, a heuristic (SELECT-NEIGHBORS, which we'll build next) chooses the bestMneighbors (here,M=2). Bidirectional links are created between the new blue node and these two neighbors. The entire set of candidates found becomes the entry point for the next layer. - Layer 1 (Connecting): Using the candidates from layer 2 as entry points, the algorithm again runs
SEARCH-LAYERwithefConstructionto find candidates on layer 1. It selects the bestM=3neighbors and creates connections. - Layer 0 (Connecting): The process repeats one last time on the densest layer.
SEARCH-LAYERis called, and the best neighbors (here,M_max0=4) are selected and connected.
The insertion is now complete. For a more concise explanation and pseudocode, this article is also very helpful.
HNSW Index - Write You a Vector Database - Hi, I'm Alex Chi
This part of Alex Chi's excellent series on building a vector database provides a very clear, implementation-focused view of HNSW insertion.
Read the section on Insertion, paying close attention to the pseudo-code. It cleanly separates the two loops for the two phases of insertion.
C Implementation Structure
Based on this logic, we can now sketch out the main hnsw_insert function in C. The core of the function will be the two loops we've identified. We will assume the existence of hnsw_search_layer (from Module 6) and stub out the functions for neighbor selection and connection, which we will implement next.
/**
* @brief Inserts a new vector into the HNSW graph.
*
* @param hnsw A pointer to the HNSW index.
* @param q The vector data for the new element.
* @param node_id The ID of the new node to be inserted.
*/
void hnsw_insert(HNSW* hnsw, const float* q, int node_id) {
// A temporary list to hold neighbors found by search_layer.
// In a real implementation, this would be a min-priority queue or similar.
CandidateList W = candidate_list_new();
// Get the global entry point and the top layer of the graph.
int enter_point_id = hnsw->enter_point_id;
int top_layer = hnsw->max_layer;
// Step 1: Calculate the random layer for the new element.
int new_node_layer = hnsw_random_level(hnsw->ml_factor);
if (new_node_layer > top_layer) {
// If the new node's layer is higher than the current top layer,
// it becomes the new entry point. We'll handle this detail later.
}
// This will be our entry point for the searches on each layer.
int current_ep_id = enter_point_id;
// Phase 1: Traverse from the top layer down to the new node's layer + 1.
// The goal is just to find the best entry point for the lower layers.
for (int lc = top_layer; lc > new_node_layer; lc--) {
hnsw_search_layer(hnsw, q, ¤t_ep_id, 1, 1, lc, &W);
current_ep_id = candidate_list_get_nearest(W); // Get the single best candidate
candidate_list_clear(W);
}
// Phase 2: From the new node's layer down to 0, find and connect neighbors.
for (int lc = MIN(top_layer, new_node_layer); lc >= 0; lc--) {
// Use a more thorough search to find a good set of candidates.
hnsw_search_layer(hnsw, q, ¤t_ep_id, 1, hnsw->ef_construction, lc, &W);
// From the candidate list W, select the M best neighbors.
NeighborList neighbors = hnsw_select_neighbors(q, W, hnsw->M, lc);
// Add connections from the new node to its neighbors.
hnsw_connect_neighbors(hnsw, node_id, neighbors, lc);
// Prune connections of the neighbors if they exceed M_max.
// (This will be covered in a future lesson).
// Use the found candidates as the entry points for the next level down.
// For simplicity, we just use the best candidate, but using all is better.
current_ep_id = candidate_list_get_nearest(W);
candidate_list_clear(W);
}
// Update the graph's metadata (e.g., new top layer, entry point).
if (new_node_layer > hnsw->max_layer) {
hnsw->max_layer = new_node_layer;
hnsw->enter_point_id = node_id;
}
candidate_list_free(W);
}
This C code provides the complete skeleton. You have already implemented hnsw_random_level and hnsw_search_layer. The next lessons will focus on filling in the details of hnsw_select_neighbors and hnsw_connect_neighbors.
Conclusion
You have now designed the central control flow for inserting elements into the HNSW graph. This algorithm is the engine of graph construction, and its efficient, top-down design is a masterclass in trading precision for speed at the upper layers to achieve logarithmic performance.
Key Takeaways:
- Top-Down Insertion: The insertion process always starts at the graph's highest layer and descends, ensuring fast navigation through the sparse upper layers.
- Two-Phase Process: The algorithm has two phases: a fast-traversal phase (
ef=1) in layers above the new node's levell, and a neighbor-discovery phase (ef=efConstruction) in layers at and belowl. - Reuse of
SEARCH-LAYER: The insertion algorithm is built directly on top of the search algorithm, demonstrating excellent code reuse and modularity. - Entry Point Propagation: The closest node found on one layer becomes the entry point for the search on the layer below, creating a greedy path to the correct neighborhood.
In the next lesson, we will dive into the SELECT-NEIGHBORS heuristic. This is the crucial step where, from a large pool of candidates, we must intelligently choose the best M nodes to connect to, ensuring the graph maintains its "small-world" properties.