Welcome to Module 7. In the previous module, we fully assembled the search mechanism for our HNSW graph. You now have the complete algorithm to query an existing index, balancing speed and accuracy using the efSearch parameter. Our vector database can answer questions, but it cannot yet be built or modified.
In this new module, we shift our focus from searching to construction. We will implement the procedures for inserting new vectors, which is how the HNSW graph is built from the ground up. The very first step when adding a new vector is to decide how "important" it will be in the hierarchy—that is, how many layers it will exist on.
This lesson addresses that crucial first step. You will learn about the probabilistic method HNSW uses to assign a maximum layer to each new vector and implement the C function to perform this assignment. This mechanism is the foundation for creating the multi-layered structure that makes HNSW so efficient.
The Hierarchical Principle: Probabilistic Promotion
The power of HNSW comes from its layered structure, which emulates the logic of a probabilistic skip list. Upper layers are sparse and contain long-range connections for fast, coarse-grained navigation, while the dense bottom layer contains all vectors for fine-grained, accurate search.
To build such a structure, we need a way to decide which nodes belong to which layers. HNSW does this probabilistically: every new node is assigned a maximum layer, l, with an exponentially decaying probability. This means:
- Almost all nodes will be assigned
l=0, living only on the bottom layer. - A small fraction will be "promoted" to
l=1, existing on layers 0 and 1. - An even smaller fraction will reach
l=2, and so on.
This random promotion ensures that the number of nodes decreases exponentially with each layer, creating the exact hierarchical pyramid structure we need for logarithmic search complexity. The randomness also makes the graph construction robust and incremental, as it doesn't depend on the order in which vectors are inserted.
This article provides an excellent explanation of the core insight behind HNSW's layered structure, drawing a clear parallel to skip lists.
Read the section titled The Hierarchical Insight. Focus on how HNSW translates the one-dimensional skip list concept into a multi-dimensional graph hierarchy.
The Layer Assignment Formula
This probabilistic assignment is not arbitrary; it's governed by a precise mathematical formula presented in the original HNSW paper. When a new element is inserted, its maximum layer l is chosen as:
Let's break down this elegant formula, as it's the heart of today's lesson:
unif(0,1): We start with a random floating-point number drawn from a uniform distribution between 0 and 1. This is the source of randomness.-ln(...): We take the negative natural logarithm of that random number. In probability theory, this is a standard technique called inverse transform sampling. Applying it to a uniform distribution generates a random variable that follows an exponential distribution. This is the mathematical key to achieving the "exponentially decaying probability" for layer assignments.m_L: This is a normalization factor or "level multiplier". It controls the shape of the exponential decay. A smallerm_Lleads to a steeper decay (fewer nodes on higher layers), while a largerm_Lleads to a gentler decay (more nodes on higher layers).⌊...⌋: The floor function simply converts the resulting floating-point value into an integer layer index.
The following interactive resource provides a clear breakdown of this formula and its components. It also includes a concrete example showing the resulting probabilities, which makes the concept much more tangible.
This section dives deeper into the construction phase, specifically the layer assignment process.
Please read the subsection Assigning a Layer. Pay close attention to the table of probabilities (e.g., P(l=0) ≈ 93.8%). This shows the practical effect of the formula.
The m_L Normalization Factor
The m_L parameter is not just a magic number; it's directly tied to the connectivity of the graph. The authors of HNSW found that an optimal choice for this parameter is:
Here, M is the parameter that defines the number of neighbors each node will have on a given layer. This creates a beautiful synergy: the probability of a node being promoted to a higher, sparser layer is inversely related to the density of connections on the layers below. A graph with many connections per node (large M) can be navigated effectively even with very sparse upper layers (small m_L).
This entire process is visually summarized in the diagram below and explained well in the following video clip.
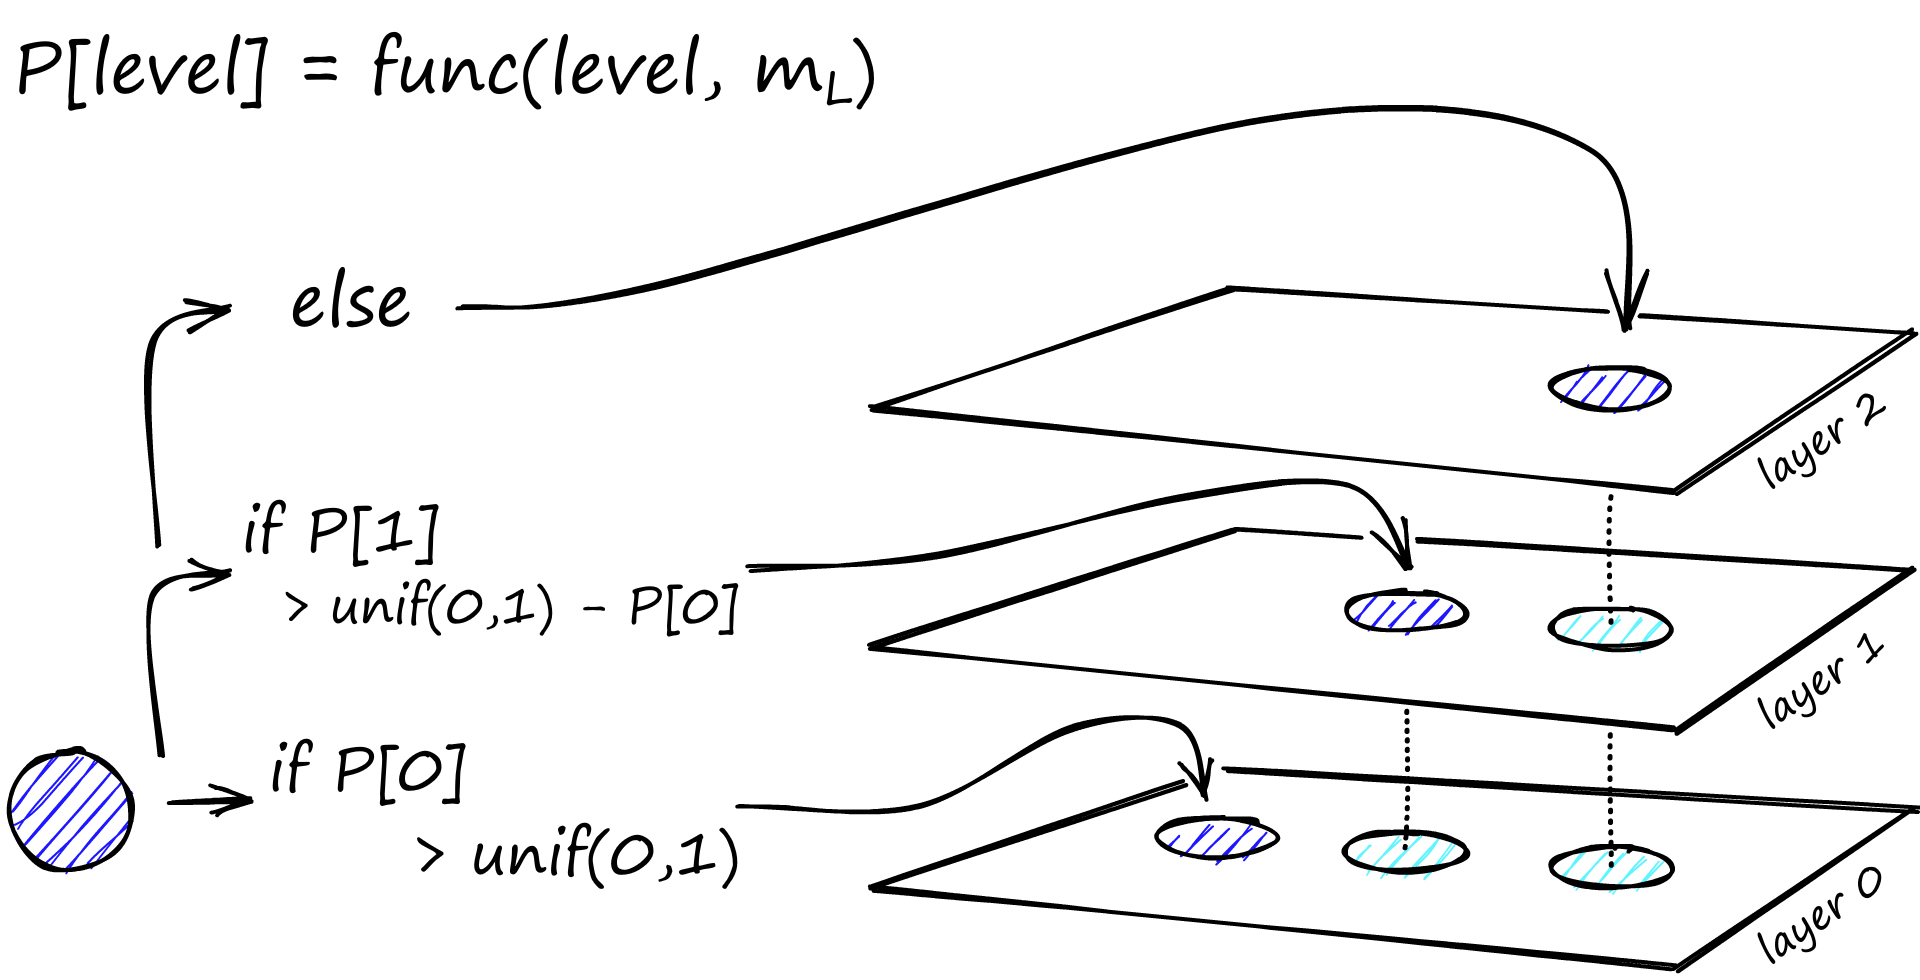
A new node (striped blue) is considered for insertion into the HNSW graph. Its maximum layer is determined probabilistically. It is always added to layer 0, but its presence on higher layers is decided by a series of random trials against an exponentially decaying probability, governed by the m_L factor.
HNSW for Vector Search Explained and Implemented with Faiss (Python)
This video by James Briggs provides a clear walkthrough of the HNSW mechanics, including a great segment on the probabilistic layer assignment.
Watch the segment explaining the graph building process from this section. The presenter's flowchart visualizes the layer assignment decision, and he clearly explains the role of the ml level multiplier and its relationship with M.
Implementation in C
Now, let's translate this directly into a C function. The implementation is a straightforward application of the formula. We'll need rand() from <stdlib.h> to generate a random number and log() and floor() from <math.h> for the mathematical operations.
Here is a function that implements the logic.
#include <math.h>
#include <stdlib.h>
#include <time.h> // For seeding the random number generator

/**
 * @brief Assigns a random layer to a new element based on an exponential distribution.
 *
 * This function implements the formula l = floor(-ln(uniform(0,1)) * mL)
 * from the HNSW paper. This ensures that the probability of assigning a higher
 * layer decreases exponentially, creating the hierarchical structure.
 *
 * It is crucial to seed the random number generator once at the start of the
 * program (e.g., using srand(time(NULL))) for this function to produce
 * different results on each run.
 *
 * @param ml_factor The normalization factor, calculated as 1.0f / log(M).
 * @return The randomly selected maximum layer for the new element.
 */
int hnsw_random_level(float ml_factor) {
    // Generate a random float in the range (0, 1].
    // We add 1 to rand() and RAND_MAX to avoid the case where rand() is 0,
    // since log(0) is undefined.
    float r = (float)(rand() + 1) / ((float)RAND_MAX + 1);

    // Apply the formula
    float level = -logf(r) * ml_factor;

    return (int)floorf(level);
}
A few notes on this implementation, which are relevant given your background in systems programming:
- Randomness Quality: The standard C
rand()function is a pseudo-random number generator (PRNG). While sufficient for this project, production-grade systems often use more robust generators (like those in C++'s<random>library or system-specific sources like/dev/urandom) for better statistical properties. - Seeding:
rand()must be seeded once at the beginning of your program's execution (e.g., inmain()withsrand(time(NULL))). If you don't seed it, it will produce the same sequence of "random" numbers every time you run the program. - Floating Point Precision: We use
logfandfloorf, the single-precision versions of the math functions, as we are working withfloattypes. This can be slightly more performant on some architectures than using the double-precisionlogandfloor.
For a deeper dive, the same video resource shows the presenter analyzing the actual Faiss C++ implementation and replicating its behavior in Python. This is an excellent real-world confirmation of the principles we've discussed.
HNSW for Vector Search Explained and Implemented with Faiss (Python)
This part of the video is highly relevant as it connects the theoretical formula to a real-world, high-performance implementation in Faiss.
Watch the segment from the code analysis. Seeing the Faiss C++ code and its Python equivalent will reinforce your understanding of how this probabilistic model is translated into a practical system.
Conclusion
In this lesson, you've implemented the very first and one of the most elegant components of the HNSW insertion algorithm. By assigning layers probabilistically, the graph builds a robust, efficient hierarchy automatically, without complex rebalancing operations.
Key Takeaways:
- Probabilistic Hierarchy: HNSW uses a random process with an exponentially decaying probability to assign a maximum layer
lto each new vector. - The Core Formula: The assignment is governed by the formula
l ← ⌊-ln(unif(0,1)) ∙ m_L⌋, which turns a uniform random number into an exponentially distributed one. - Tuning with
m_L: Them_Lparameter, typically set to1/ln(M), tunes the steepness of the layer hierarchy, linking it to the graph's connection densityM. - C Implementation: The function is a direct and concise translation of the mathematical formula, requiring careful handling of random number generation and floating-point edge cases.
Now that we can determine the maximum layer for a new vector, the next logical step is to find its neighbors and connect it into the graph on each of its assigned layers. In the next lesson, we will implement the main insertion algorithm, which cleverly reuses the SEARCH-LAYER function you built in the previous module to find the best connection points for the new element.