Hello! Welcome to our next lesson.
In our previous session, we mastered solving quadratic equations by factorising. As we noted, this is a fast and elegant method, but it has a key limitation: it only works if the quadratic expression can be factorised into simple integer factors. For an equation like , factorising isn't a viable option.
Today, we will learn a powerful and universal algebraic technique to solve any quadratic equation: completing the square. This method overcomes the limitations of factorising. By the end of this lesson, you will be able to apply this technique to find the roots of any quadratic equation. This skill is not only for solving equations; it's a fundamental process that forms the basis for deriving the quadratic formula and for analysing the graphs of quadratic functions, which we will see later.
The "Why": What Does "Completing the Square" Mean?
Before we jump into the algebraic steps, let's build an intuition for the name. Why is it called "completing the square"? The idea is surprisingly visual. We can think of the terms of a quadratic expression as geometric areas.
To see this in action, let's watch a short, insightful video.
Why do we "complete the square"?
This video, 'Why do we "complete the square"?' from the MindYourDecisions channel, provides a brilliant geometric explanation of the concept.
Watch from the beginning to 03:38. Focus on how the rectangular area representing the 'x' term is split in two and rearranged to almost form a larger square. Pay attention to the small piece that is 'missing' and needs to be added to complete it.
As the video demonstrated, we are literally turning the expression into a perfect square by adding a missing piece.
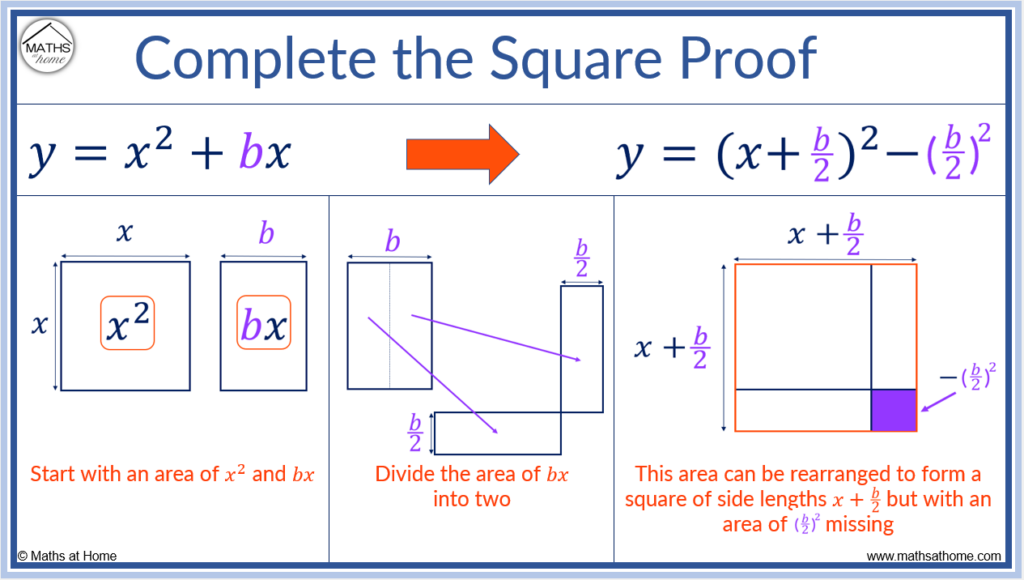
This key idea of adding to create a perfect square is the foundation of the algebraic method we will now learn.
The "How": The Step-by-Step Algebraic Method
Now let's translate this geometric concept into a reliable algebraic procedure. We will start with the most straightforward case and build up from there.
Case 1: The coefficient of is 1
Let's learn the core steps for solving an equation in the form .
Solving Quadratic Equations by Completing the Square - GCSE Higher Maths
This video from 1st Class Maths, 'Solving Quadratic Equations by Completing the Square', will walk us through the procedure. It uses the British terminology you're familiar with.
Please watch from the beginning to 02:50. The narrator demonstrates how to transform the left side of the equation into the 'completed square form' and then rearrange it to solve for x.
Let's summarise the process seen in the video:
To solve an equation like :
- Rearrange: Rewrite the equation to isolate the and terms. It's common to move the constant term 'c' to the other side: .
- Find the "magic number": Take the coefficient of (which is ), halve it, and then square the result: .
- Complete the square: Add this number to both sides of the equation to keep it balanced.
- Factorise: The left side is now a perfect square and can be factorised into a single bracket:
- Solve for : Take the square root of both sides (remembering to include the positive and negative roots, ), and then isolate .
Test your understanding!
Solve the equation by completing the square.
Show answer
- Rearrange: Move the constant term to the right side.
- Find the number: The coefficient of is 8. Half of 8 is 4, and .
- Complete the square: Add 16 to both sides.
- Factorise:
- Solve for :
This gives two separate solutions:
The roots are and . (You can check that factorising would have given , yielding the same roots).
Case 2: The coefficient of is not 1
What happens when we have an equation like ? The logic is the same, but there's a crucial first step: we must make the coefficient of equal to 1. We do this by dividing every term in the equation by the coefficient of .
Let's see how this works.
Solving Quadratic Equations by Completing the Square - GCSE Higher Maths
We'll continue with the '1st Class Maths' video, which now addresses these more complex cases.
Watch from 05:36 to 08:36. Notice how the instructor first takes out a factor of 4 from the first two terms to create a simpler expression to work with inside the brackets. An alternative, often simpler method for equations is to divide the entire equation by the coefficient at the start.
Let's clarify the process for solving when :
- Divide: Divide every term of the equation by .
- Proceed as before: Now you have an equation with a leading coefficient of 1, so you can apply the exact same 5 steps as in Case 1. The arithmetic might involve more fractions, but the process is identical.
For a text-based explanation and more examples, the following resource is very helpful.
Completing The Square - GCSE Maths - Steps & Examples
The article 'Completing The Square' from Third Space Learning provides clear, step-by-step written instructions and examples that reinforce the video content.
Please read the section 'How to solve quadratic equations using completing the square', including 'Example 7' and 'Example 8'. This will solidify the full procedure for both simple and harder cases.
Visualising the Solution
So, what do the roots we calculate actually represent? Just as with factorising, the roots of the equation are the x-coordinates where the graph of the corresponding quadratic function intersects the x-axis.
Completing the square allows us to find these points algebraically, even when they aren't nice, whole numbers.

Conclusion
Well done! You have now learned a universal method for solving any quadratic equation. While it can seem more complex than factorising, its real power is that it always works.
Key Takeaways:
- Completing the square transforms a quadratic equation into the form .
- The core idea is to add the "magic number" to both sides of the equation to create a perfect square trinomial.
- If the coefficient of is not 1, your first step must be to divide the entire equation by that coefficient.
- Solving is then a matter of taking the square root of both sides (remembering the ) and isolating .
Preview of the Next Lesson:
You might have noticed that the steps for completing the square are the same every time. In mathematics, when we have a repetitive process, we often try to generalise it into a formula. In the next lesson, we will do exactly that. We will apply the method of completing the square to the general quadratic equation, , to derive the famous Quadratic Formula. This will give us a powerful shortcut to find the roots of any quadratic equation without having to go through the full completing the square process each time.