Welcome! In our last session, you crafted a comprehensive Jupyter Notebook that tells the complete story of your machine learning project. This notebook is the heart of your portfolio piece, documenting your journey from data exploration to model evaluation and explainability. Now, it's time to package everything and present it to the world.
This lesson is the final step in creating your end-to-end ML project. We will focus on publishing your work to GitHub in a way that showcases your professionalism and technical competence. A well-organized and clearly documented repository is often the first impression you make on a recruiter or hiring manager, so making it count is essential.
By the end of this lesson, you will have published your complete project—including the notebook, API code, and other artifacts—to a public GitHub repository with a polished, professional README.md file.
1. The Anatomy of a Professional Project Repository
Before we start pushing code, let's establish what a high-quality data science project repository looks like. It's not just a folder of files; it's a structured, self-contained, and reproducible project.
A logical directory structure makes your project easy for others (and your future self) to navigate. A common and effective structure separates data, source code, notebooks, and models.
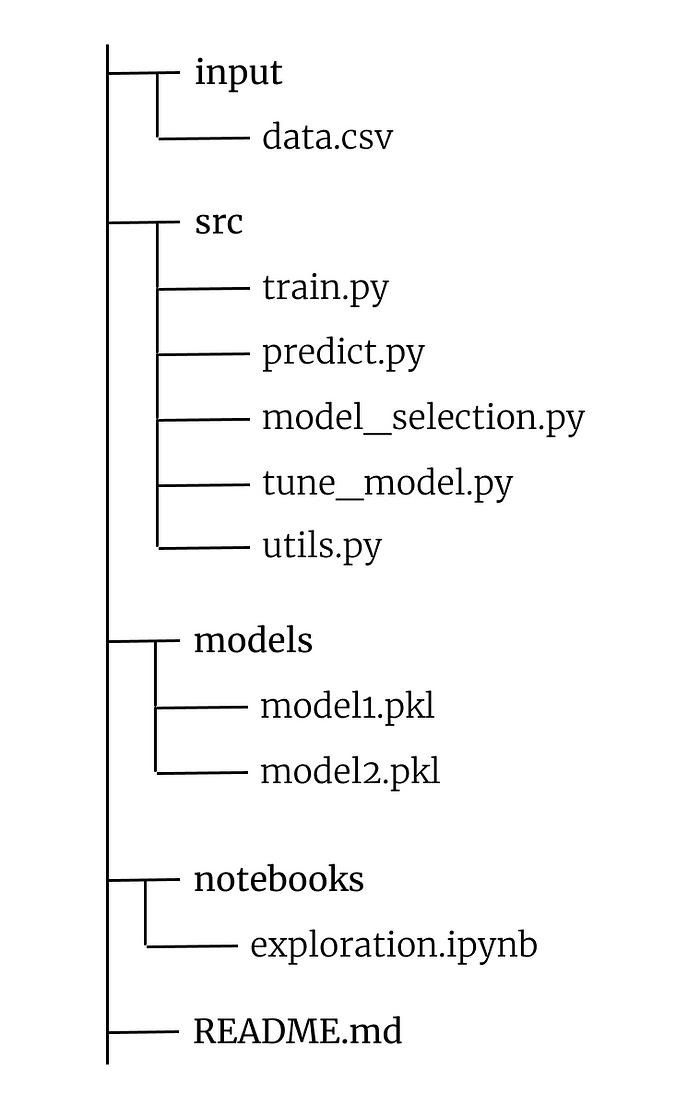
For our project, which includes a FastAPI application and Docker configuration, we can adopt a slightly more comprehensive structure. A great real-world example is the ML_API_with_FastAPI_and_Docker repository on GitHub.
0-mostafa-rezaee-0/ML_API_with_FastAPI_and_Docker: ML ...
This GitHub repository is a fantastic template for an end-to-end ML project that includes a web API.
Please review the repository's file structure. Look at the root directory and then read the section that describes the purpose of each folder, which starts with a "Folder PATH listing". Note how it separates concerns: app/: Holds the FastAPI application code (main.py). notebooks/: Contains the exploratory and development notebooks. data/: For storing datasets. models/: For saved model files (e.g., .pkl). docker/: Holds the Dockerfiles.
Your first task is to organize your project files from our previous lessons into a similar structure.
2. The README.md: Your Project's Front Door
The README.md file is the most important part of your GitHub repository. It's the first thing anyone sees and your primary tool for explaining the project's value, how it works, and how to run it.
What Should Be A Proper Structure Of Your Data Science Projects In Github?
In his video, "What Should Be A Proper Structure Of Your Data Science Projects In Github?", Krish Naik explains what recruiters look for in a project repository.
Watch the section on the README file. Pay attention to the key components he highlights: A clear title and description. Visual aids (images, gifs) to quickly show what the project does. Information about the dataset. Instructions for installation and setup. Instructions on how to run the code or use the application.
To build a professional README, you should include the following sections:
- Project Title: A clear, descriptive title.
- Introduction/Overview: A short paragraph explaining the project's purpose and the problem it solves. Visuals are great here.
- Table of Contents: Makes your README easy to navigate.
- Installation: Step-by-step instructions on how to set up the environment. This includes cloning the repository and installing dependencies.
- Usage: Clear instructions on how to run your project (e.g., execute the notebook, start the Docker container, use the API endpoints).
- Project Structure: A brief overview of the directory layout, explaining what's in each folder.
To make this process faster, you can use a tool like readme.so, which provides a template editor for creating README files.
How to Create an Engaging README for your Data Science Project on GitHub
The Data Professor channel demonstrates how to use readme.so to quickly generate a professional README.
Watch the video to see how you can use this tool to structure your documentation. It allows you to select sections, fill in your project's details, and download the finished Markdown file. Adding sections Customizing and reordering Downloading and using

3. Managing Your Project's Environment
A professional project must be reproducible. This means anyone should be able to recreate the environment needed to run your code. This is achieved through two key files: requirements.txt and .gitignore.
How to Present Your Data Science Portfolio on GitHub
This Dataquest article provides a great summary of the essential files for managing a project repository.
Please read the following sections: "Requirements": This explains how to create a requirements.txt file to list your project's Python dependencies. This file allows others to install the exact libraries you used with a single command (pip install -r requirements.txt). "Additional files", "Secret keys or files", and "Large or restricted data files": These sections explain the purpose of a .gitignore file. This file tells Git which files or directories to ignore, preventing you from committing unnecessary clutter (like __pycache__), sensitive information (like API keys), or large data files into your repository.
Key takeaways for your project:
requirements.txt: Generate this file by runningpip freeze > requirements.txtin your project's virtual environment..gitignore: Create this file in your root directory. A good starting point is the standard Python .gitignore template from GitHub. You should add your data folder (e.g.,data/) and models folder (e.g.,models/) if they contain large files. Since you are using Docker, you will also have a.dockerignorefile, which serves a similar purpose for the Docker build process.
4. Publishing to GitHub
You have experience with Git and GitHub from your previous projects, so this should be a familiar process. Here's a quick walkthrough of the commands to get your local project onto GitHub.
- Initialize a Git repository: Navigate to your project's root directory in your terminal and run:
git init - Create a new repository on GitHub: Go to GitHub.com and create a new public repository. Do not initialize it with a README or .gitignore file, as you have already created these locally.
- Add and commit your files: Stage all your project files for the first commit.
git add . git commit -m "Initial commit: End-to-end churn prediction project" - Connect to the remote repository: Link your local repository to the one you created on GitHub. Copy the URL from your GitHub repository page.
git remote add origin <YOUR_REPOSITORY_URL> - Push your code: Upload your files to GitHub.
git push -u origin main
After pushing, visit your repository on GitHub. Your README.md should be beautifully rendered, and your project structure should be clean and professional.
5. Your Task: Publish Your Project
It's time to bring everything together. Follow these steps to publish your project:
- Organize Files: Create the directory structure (
app,notebooks,data, etc.) and move your project files into the appropriate folders. - Create
requirements.txt: If you haven't already, activate your project's virtual environment and runpip freeze > requirements.txt. - Create
.gitignore: Create the file and add entries for temporary files, environment folders, large data files (data/), and model files (models/). - Write
README.md: Following the guidelines and using the tools mentioned, write a comprehensive README for your project. - Publish to GitHub: Follow the
gitcommand sequence to initialize a repository, commit your files, and push them to a new public repository on your GitHub account. - Final Review: Open your GitHub repository in a browser. Read through your README. Click through the directories. Does it look professional? Does it clearly communicate the value and function of your project?
Conclusion
Congratulations! You have now completed and published an end-to-end machine learning project. This is a significant accomplishment and a powerful asset for your data science portfolio. You have not only demonstrated your ability to build and deploy a model but also to document and present your work professionally, a skill that is highly valued by employers.
Key Takeaways:
- A clean, logical project structure is crucial for readability and maintainability.
- The
README.mdis your project's most important piece of documentation. It should be comprehensive, engaging, and provide clear instructions. - Using
requirements.txtensures your project is reproducible, while.gitignorekeeps your repository clean and secure. - A polished GitHub repository is a direct reflection of your skills and attention to detail as a data scientist.
In our next module, we will begin our "epic" portfolio project: building an AI-powered tutor chatbot. We will dive into the world of Natural Language Processing (NLP), starting with the foundational concepts of text embeddings and vector databases, which are the building blocks of modern Retrieval-Augmented Generation (RAG) systems.