Welcome to the next step in bringing your machine learning project to life! In the last lessons, you successfully built a model, analyzed its behavior with SHAP, and exposed its predictive power through a FastAPI web service. Your model is now accessible, but it's still tied to your local development environment.
This lesson bridges the gap between a working local application and a truly portable, deployable service. We will use Docker to containerize your FastAPI application. Containerization packages your application, its dependencies, and its configurations into a single, isolated unit that can run consistently on any machine. Given your familiarity with Docker from your technical background, we'll focus specifically on the best practices for containerizing a Python-based machine learning service.
By the end of this lesson, you will have a self-contained Docker image of your model-serving API, ready for documentation and deployment.
1. The Blueprint for a Containerized ML App
To package our FastAPI application, we need to provide Docker with a set of instructions. This is done through a special file called a Dockerfile. Think of it as a recipe that tells Docker exactly how to build the environment for our application.
The core components of this process are:
- FastAPI application code: Your
main.pyscript. - Trained model: The
.pklor.joblibfile you saved. - Dependencies list: A
requirements.txtfile. - The Dockerfile: The step-by-step recipe for building the container image.
The diagram below illustrates this entire workflow, from your application files to a running, isolated container.
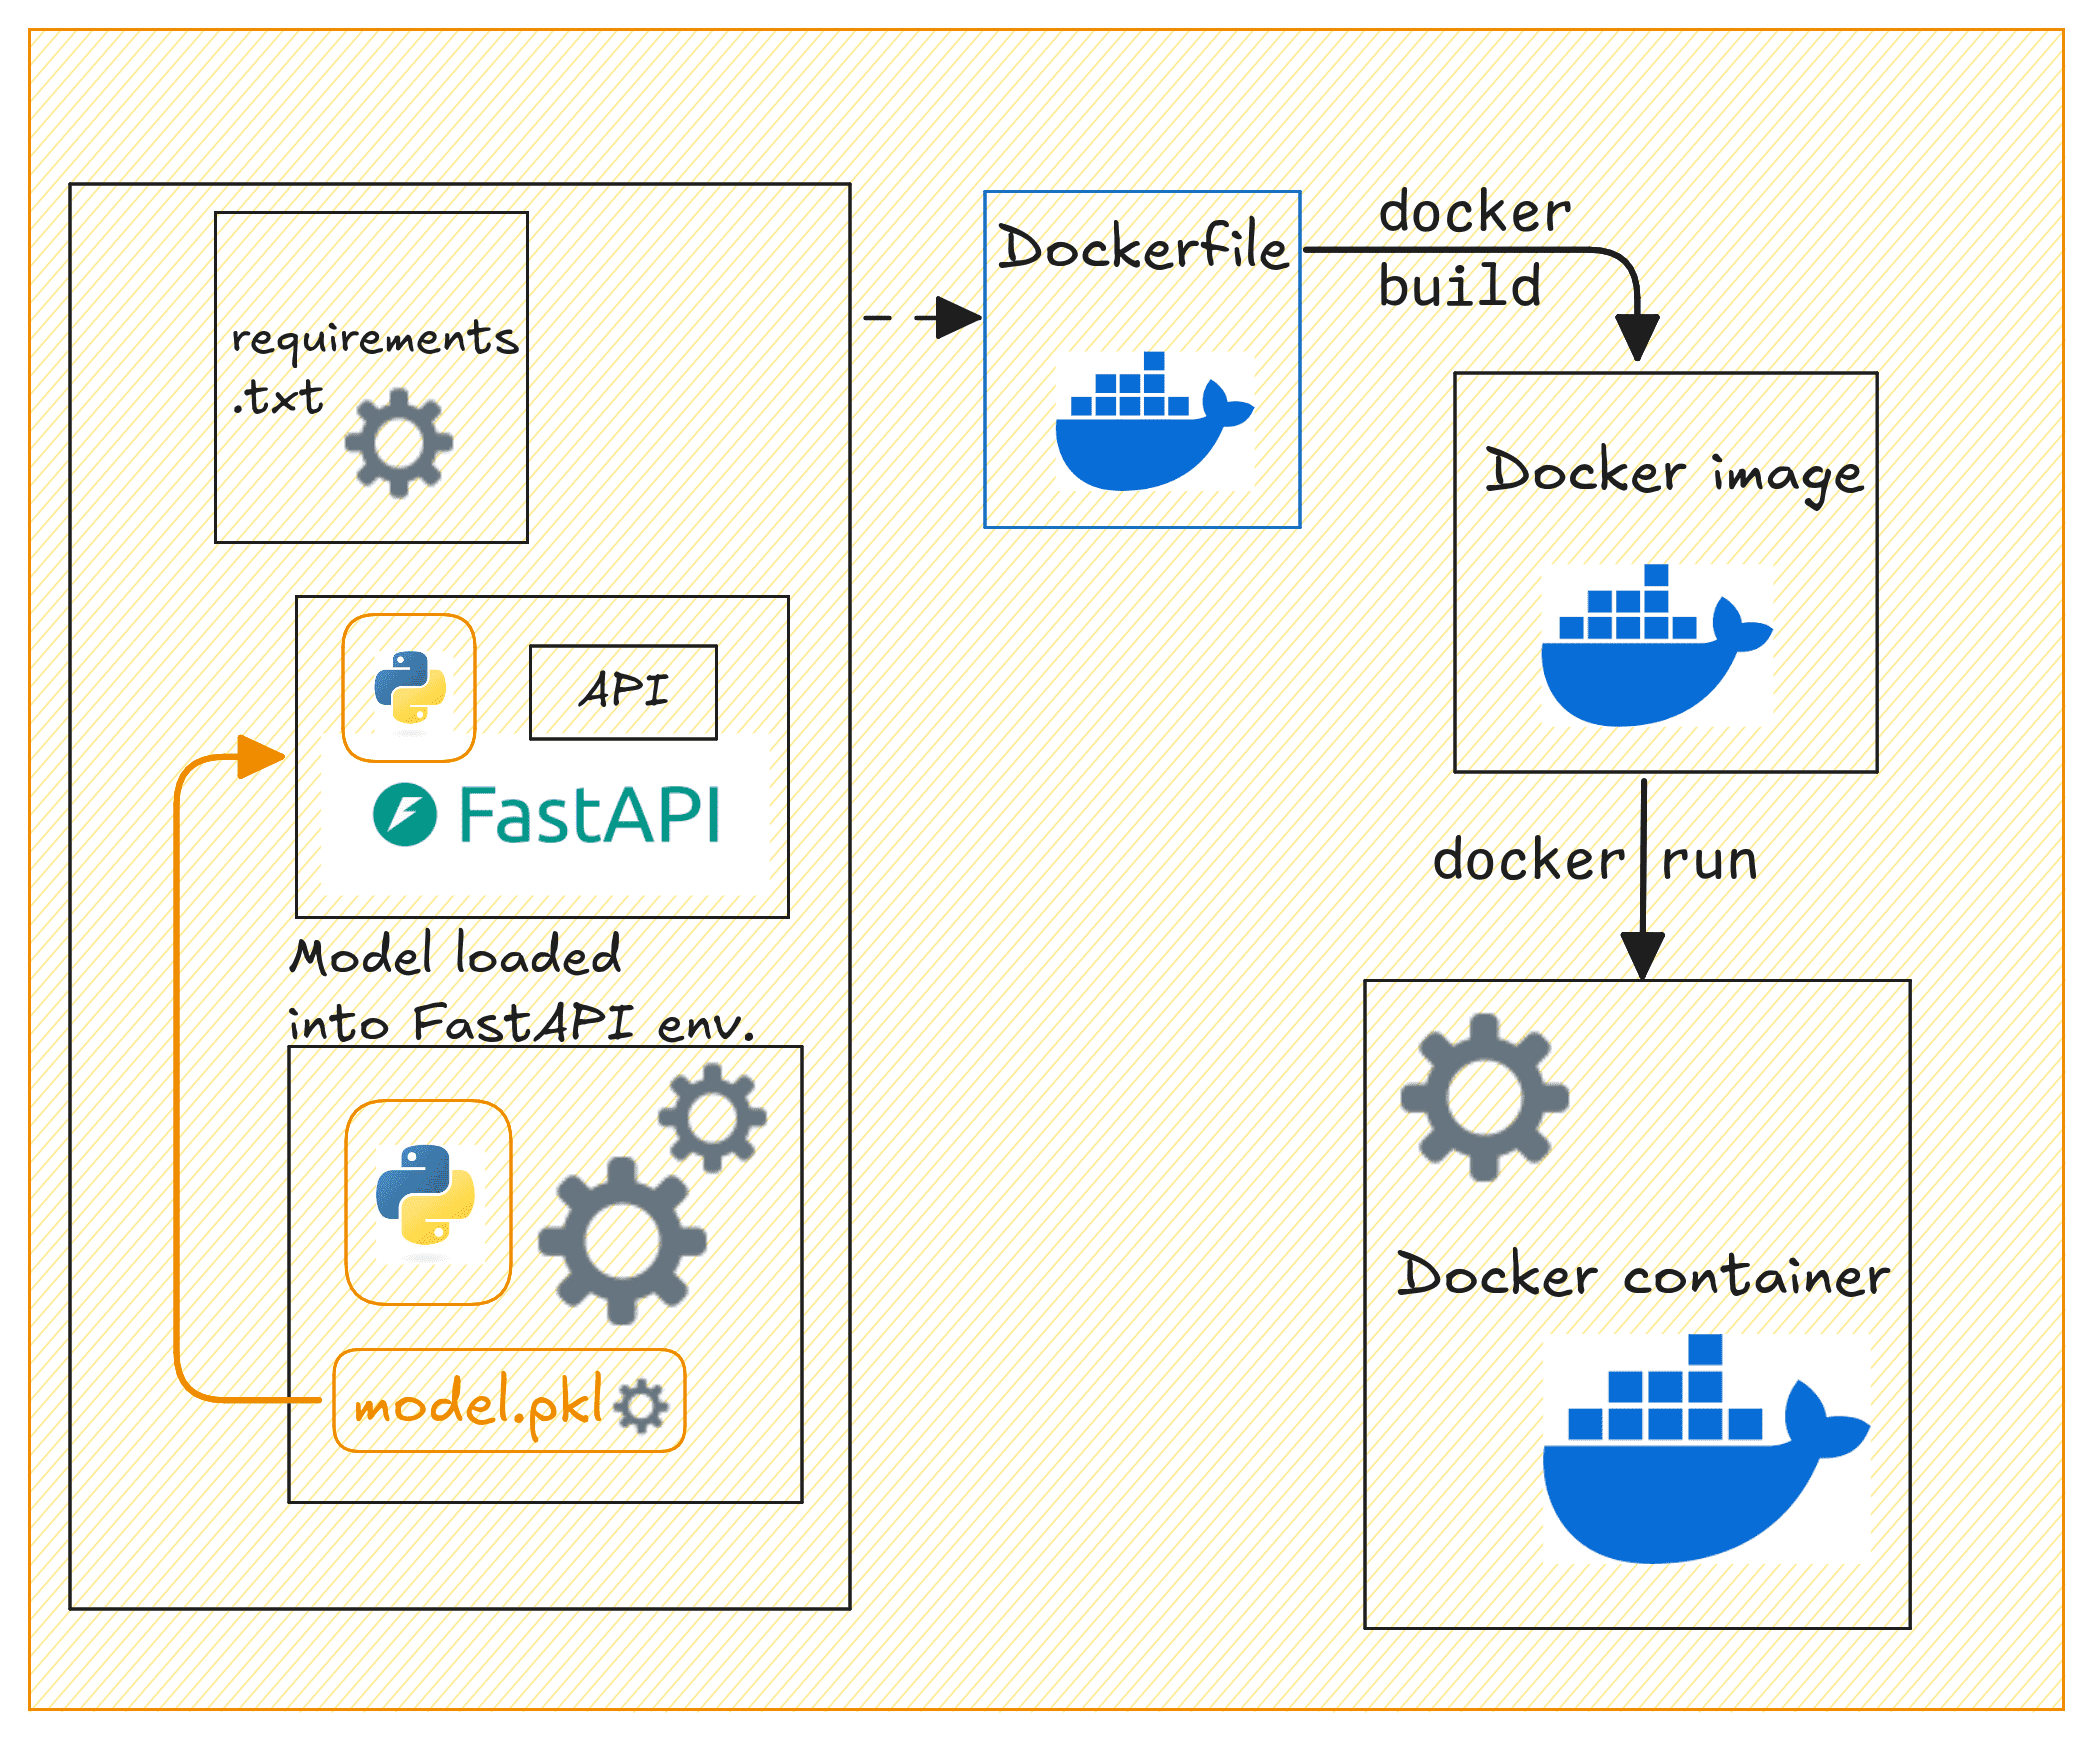
This diagram shows how your requirements.txt, API code, and ML model are combined using a Dockerfile to build a Docker image, which is then run as an isolated Docker container.
Before we write our own Dockerfile, let's explore the official FastAPI documentation, which provides a clear and optimized approach.
FastAPI in Containers - Docker
This is the official documentation for deploying FastAPI with Docker. It provides the gold-standard template and explains the reasoning behind each step.
Read the sections titled "Build a Docker Image for FastAPI" and the detailed breakdown of the Dockerfile that follows. Pay close attention to: The overall structure of the Dockerfile. The explanation of Docker Cache and why the requirements.txt file is copied and installed before the application code. This is a crucial optimization technique. The CMD instruction and the importance of using the "exec form" (["command", "arg1", "arg2"]).
2. Deconstructing the Dockerfile
As you saw in the documentation, a Dockerfile for a Python application follows a logical sequence. Let's review the key instructions and why they are structured this way:
-
FROM python:3.10-slim
This specifies the base image. We're starting with an official, lightweight Python environment, which is a great practice to keep our final image size smaller. -
WORKDIR /app
This sets the working directory inside the container. All subsequent commands (COPY,RUN,CMD) will be executed from this/appdirectory. -
COPY requirements.txt .
This copies only therequirements.txtfile into the container. -
RUN pip install --no-cache-dir -r requirements.txt
This installs the dependencies. By copying the requirements and installing them before copying our application code, we take advantage of Docker's layer caching. Since dependencies change infrequently, this layer will be cached and not re-run every time you change your application code, saving significant time during development. -
COPY . .
This copies the rest of your project files (likemain.pyand your model file) into the working directory. This step is placed late in the file because your application code changes frequently, which will invalidate the Docker cache from this point onward. -
EXPOSE 8000
This informs Docker that the container listens on the specified network port at runtime. It's primarily for documentation and doesn't actually publish the port. -
CMD ["uvicorn", "main:app", "--host", "0.0.0.0", "--port", "8000"]
This defines the default command to run when the container starts.main:app: Tells Uvicorn to find theappobject inside themain.pyfile.--host 0.0.0.0: This is critical. It makes the server listen on all available network interfaces inside the container, allowing us to connect to it from outside (from our local machine). The default,127.0.0.1(localhost), would only be accessible from within the container itself.
3. A Modern Shortcut: docker init
While writing a Dockerfile from scratch is a fundamental skill, modern Docker versions offer a convenient command to bootstrap the process. The docker init command can inspect your project and generate the necessary Docker files for you.
The following video demonstrates this powerful feature.
Build an AI app with FastAPI and Docker - Coding Tutorial with Tips
This clip from Patrick Loeber's tutorial "Build an AI app with FastAPI and Docker" shows how to use the docker init command.
Watch from the demo. Focus on how the command interactively asks for the application platform (Python), version, and run command, and then automatically generates a Dockerfile, compose.yaml, and .dockerignore file. This is an excellent way to quickly get started with best practices.
Using docker init is a great way to generate a solid starting point, which you can then customize if needed.
4. Your Turn: Containerize Your Application
It's time to apply these concepts to your project. You'll create a Dockerfile and a .dockerignore file, then build and run your containerized application.
Project Setup
Ensure your project folder has the following structure. You should already have main.py and your model file (e.g., model.pkl) from the previous lesson.
your-project/
├── main.py
├── model.pkl
└── requirements.txt
Instructions:
-
Finalize
requirements.txt: Make sure yourrequirements.txtfile contains all the necessary libraries. It should look something like this (your versions may differ):fastapi uvicorn[standard] scikit-learn joblib pandas numpy -
Create a
.dockerignorefile: In your project's root directory, create a file named.dockerignore. This file tells Docker which files and directories to exclude from the build process, keeping your container clean and small. Add the following content:# Git .git .gitignore # Python __pycache__/ *.pyc .venv/ venv/ # IDE .idea/ .vscode/
-
Create the
Dockerfile: In the same directory, create a file namedDockerfile(no extension) and add the following content. This is the complete recipe based on the best practices we've discussed.# 1. Use an official Python runtime as a parent image FROM python:3.10-slim # 2. Set the working directory in the container WORKDIR /app # 3. Copy the requirements file into the container COPY requirements.txt . # 4. Install any needed packages specified in requirements.txt RUN pip install --no-cache-dir -r requirements.txt # 5. Copy the rest of the application code into the container COPY . . # 6. Make port 8000 available to the world outside this container EXPOSE 8000 # 7. Define the command to run your app CMD ["uvicorn", "main:app", "--host", "0.0.0.0", "--port", "8000"] -
Build the Docker Image: Open your terminal in the project's root directory and run the
docker buildcommand. We'll tag (-t) our image with a name likeml-model-api.docker build -t ml-model-api .(Don't forget the
.at the end, which specifies the current directory as the build context.) -
Run the Docker Container: Now, run the container from the image you just built. We'll use the
-pflag to map port 8000 on your local machine to port 8000 inside the container.docker run -p 8000:8000 ml-model-apiYou should see Uvicorn starting up, indicating your application is running inside the container.
-
Test the Application:
- Open your web browser and navigate to
http://localhost:8000/docs. You should see the interactive FastAPI documentation, now served from the Docker container. - Use the
/docsinterface or a tool likecurlto send a request to your/predictendpoint to verify that the model is working correctly.
- Open your web browser and navigate to
Conclusion
Excellent work! You have successfully packaged your machine learning model and its API into a self-contained, portable Docker container. This is a massive step toward creating a robust and deployable ML service.
Key Takeaways:
- A
Dockerfileis the recipe for creating a container image, defining the base environment, dependencies, and application code.
- Structuring your
Dockerfileto leverage Docker's layer cache (by installing dependencies before copying code) dramatically speeds up development. - The
--host 0.0.0.0argument is essential for making a web service inside a container accessible from the outside. - Commands like
docker buildanddocker runare the core tools for creating and launching your containerized application.
In our next lesson, we will finalize this project by writing comprehensive documentation in your Jupyter Notebook and preparing the entire project for publication on your GitHub portfolio.