Introduction
In our last lesson, we explored Docker's role as a containerization platform, focusing on its client-server architecture and the core components: the Docker Engine, Images, Containers, and Registries. We learned that an Image is a blueprint for a container. Now, we'll dive into how that blueprint is actually written.
This lesson directly addresses the learning outcome: Describe the purpose of a Dockerfile and explain its key instructions (FROM, RUN, COPY, CMD, EXPOSE). We will define what a Dockerfile is, and then meticulously break down the essential instructions you need to know to construct one. Mastering this is fundamental to automating the creation of consistent and portable application environments, a key skill for your exams.
1. What is a Dockerfile?
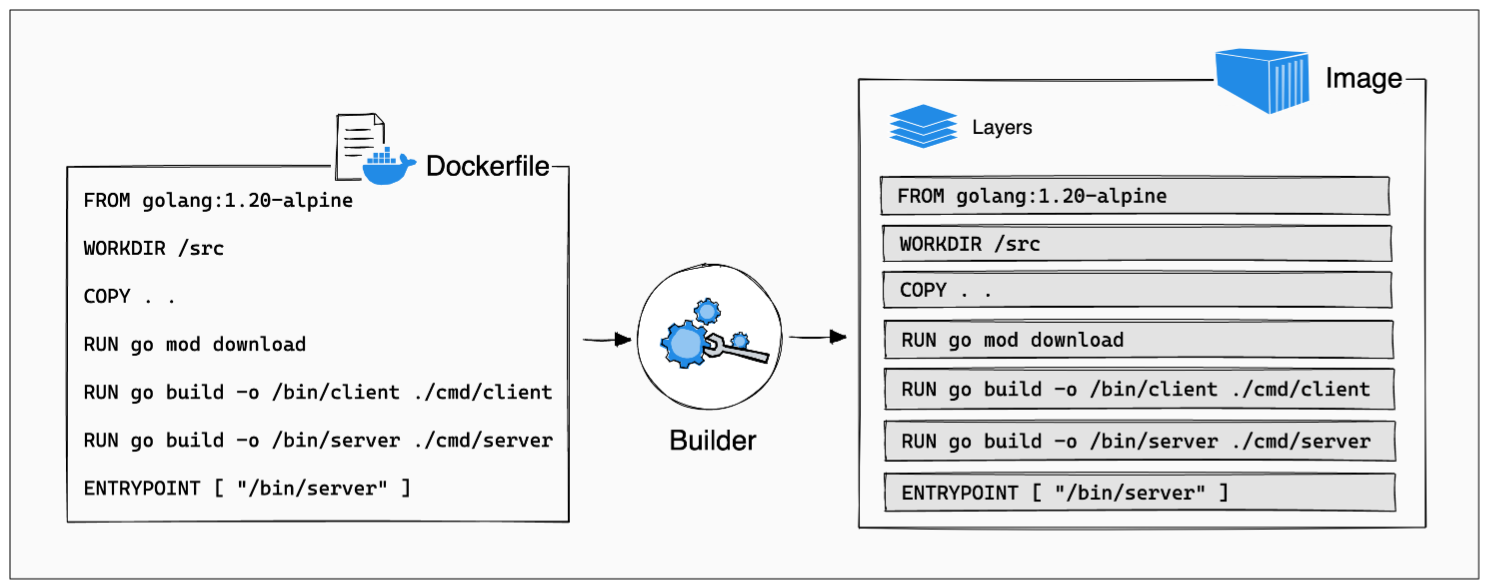
A Dockerfile is a plain text file that contains a series of instructions or commands. The Docker Engine reads these instructions and executes them in sequence to automatically build a Docker image. Think of it as a recipe: the Dockerfile lists the ingredients and steps, and the docker build command is the chef that follows the recipe to bake the cake (the Docker image).
Purpose of a Dockerfile:
- Automation: It automates the process of creating a Docker image, removing manual steps and potential errors.
- Consistency: It ensures that every image built from the same Dockerfile is identical, providing a consistent environment from development to production.
- Documentation: The Dockerfile itself serves as clear documentation for how the application environment is set up.
- Version Control: Since it's a text file, you can track it in version control systems like Git, allowing you to manage changes to your application's infrastructure just like you manage changes to your code.
The diagram below illustrates this build process.
To begin, let's watch a short video that introduces the concept and basic syntax of a Dockerfile.
Dockerfile creation Tutorial - Dockerfile Instructions Explained with example!
The video 'Dockerfile creation Tutorial' by Cloud Champ provides a clear introduction to what a Dockerfile is and its basic syntax.
Watch the first part of the video from 00:00 to 01:58. Focus on understanding that a Dockerfile is a text file with a specific name (Dockerfile) and follows a simple INSTRUCTION argument format.
2. Key Dockerfile Instructions
A Dockerfile is built using a specific set of instructions. For your exams, it is crucial to know the purpose of the most common ones. While there are many instructions, your syllabus requires a deep understanding of FROM, RUN, COPY, CMD, and EXPOSE.
The following table gives a quick overview of these and other common instructions. It's a useful reference for revision.
Docker Build: A Beginner's Guide to Building Docker Images - Stackify
The article 'Docker Build: A Beginner's Guide' provides an excellent summary table of Dockerfile instructions. Review this table to get a high-level sense of the available commands.
Focus on the table under the 'Docker Instructions' heading. Pay special attention to the explanations for FROM, RUN, COPY, EXPOSE, and CMD.
Now, let's examine each of the required instructions in detail.
a) FROM
The FROM instruction is mandatory and must be the first instruction in a Dockerfile. It specifies the base image upon which you are building. This base image could be an operating system (like Ubuntu), a programming language runtime (like Python or Node.js), or another application.
- Purpose: To set the foundation for your image.
- Syntax:
FROM <image>:<tag> - Example:
This instruction tells Docker to use the official Python image with the tagFROM python:3.9-slim3.9-slimfrom Docker Hub as the starting point.
Dockerfile creation Tutorial - Dockerfile Instructions Explained with example!
Let's see a practical demonstration of the FROM instruction.
Watch the segment from 01:58 to 06:09. The presenter explains how FROM sets the base image and demonstrates how to find and specify image tags from Docker Hub.
b) RUN
The RUN instruction executes commands in a new layer on top of the current image and commits the results. These are build-time commands, meaning they are executed only when you are building the image.
- Purpose: To install software packages, run scripts, create directories, or perform any setup needed for the application environment.
- Syntax:
RUN <command>(shell form) orRUN ["executable", "param1", "param2"](exec form). - Example:
This command updates the package list and installs theRUN apt-get update && apt-get install -y curlcurlutility inside the image. EachRUNinstruction creates a new image layer.
Dockerfile creation Tutorial - Dockerfile Instructions Explained with example!
The next segment of the video explains how the RUN instruction is used to execute commands during the image build.
Watch from 06:09 to 08:34. Notice how RUN is used to install a package (apk add curl) inside the Alpine Linux base image. This happens during the docker build process.
c) COPY
The COPY instruction copies files or directories from a source on the host machine (your local filesystem) into the filesystem of the container.
- Purpose: To add your application code, configuration files, or other necessary assets into the image.
- Syntax:
COPY <src> <dest> - Example:
Here, we first set a working directory with# Set the working directory WORKDIR /app # Copy the application file into the container at /app/app.py COPY app.py .WORKDIR(a best practice) and then copyapp.pyfrom the build context (the same directory as the Dockerfile) into the/appdirectory inside the image.
Dockerfile creation Tutorial - Dockerfile Instructions Explained with example!
Watch this segment to understand how COPY is used to get your application code into the image.
Watch from 17:55 to 19:11. The video demonstrates copying a local app.py file into a directory within the image.
Note on COPY vs. ADD: You might also see the ADD instruction. It is similar to COPY but has extra features, like downloading files from a URL and auto-extracting tar files. The general best practice is to prefer COPY because it is more explicit and transparent. Use ADD only if you specifically need its extra features.
d) EXPOSE
The EXPOSE instruction informs Docker that the container listens on the specified network ports at runtime. This instruction does not actually publish the port; it functions as a type of documentation between the person who builds the image and the person who runs the container.
- Purpose: To document which ports inside the container are intended for serving traffic.
- Syntax:
EXPOSE <port>/<protocol> - Example:
This line indicates that the application inside the container will be listening on portEXPOSE 80808080. To make this port accessible from the outside, you still need to use the-por-Pflag with thedocker runcommand (e.g.,docker run -p 8080:8080 my-image).
Dockerfile creation Tutorial - Dockerfile Instructions Explained with example!
This short segment explains the role of the EXPOSE instruction.
Watch from 20:26 to 21:42. The key takeaway is that EXPOSE is metadata; it tells Docker which port the container will listen on, but doesn't map it to the host.
e) CMD
The CMD instruction provides the default command and/or parameters for an executing container. This is a run-time command.
- Purpose: To specify what command should run when the container starts.
- Syntax:
CMD ["executable","param1","param2"](exec form, preferred) - Key Rules:
- A Dockerfile can only have one
CMDinstruction. If you list more than one, only the lastCMDwill take effect. - The
CMDcan be easily overridden by providing a command when you start the container (e.g.,docker run my-image <new_command>).
- A Dockerfile can only have one
- Example:
This sets the default command to runCMD ["python", "app.py"]python app.pywhen the container starts.
RUN vs. CMD - A Critical Distinction for Exams:
RUNexecutes commands when you build the image. It's for setting up the environment.CMDexecutes a command when you run the container. It's for starting the application.

3. Example Dockerfile
Let's bring these instructions together into a single, complete Dockerfile for a simple Python web application.
Application Files:
app.py: A simple Flask web server.requirements.txt: A file listing Python dependencies (e.g.,Flask).Dockerfile: The file we will create.
Dockerfile Content:
# 1. Specify the base image from Docker Hub
FROM python:3.9-slim


# 2. Set the working directory inside the container
WORKDIR /app


# 3. Copy the dependencies file first to leverage Docker's layer caching
COPY requirements.txt .


# 4. Install the dependencies using a RUN command
RUN pip install -r requirements.txt


# 5. Copy the rest of the application code into the working directory
COPY . .


# 6. Expose the port that the application runs on
EXPOSE 5000


# 7. Specify the default command to run when the container starts
CMD ["python", "-m", "flask", "run", "--host=0.0.0.0"]
Explanation:
FROM: Starts with a slim Python 3.9 image.WORKDIR: Sets all subsequent commands to run inside the/appdirectory.COPY requirements.txt .: Copies only the requirements file.RUN pip install ...: Installs the dependencies. This step is done before copying the main code to take advantage of Docker's layer caching. Dependencies don't change often, so this layer won't need to be rebuilt unlessrequirements.txtchanges.COPY . .: Copies the rest of the source code (e.g.,app.py).EXPOSE: Documents that the app inside the container uses port 5000.CMD: Specifies the command to start the Flask application when a container is launched from this image.
Conclusion
In this lesson, we demystified the Dockerfile and its role as the automated recipe for creating Docker images. You now have a solid, exam-ready understanding of the most critical instructions.
Key Takeaways:
- Dockerfile Purpose: A text file with instructions to automate the building of a consistent and portable Docker image.
FROM: Sets the base image; must be the first instruction.RUN: Executes commands during the build process to set up the image environment (e.g., install packages).COPY: Copies files from the host machine into the image's filesystem.EXPOSE: Documents the network port the container will listen on at runtime. It is metadata and does not publish the port.CMD: Specifies the default command to execute when the container runs. It can be overridden.
Preview of the Next Lesson:
Now that we know how to build an image using a Dockerfile, the next logical step is to learn how to share and retrieve these images. In the upcoming lesson, we will focus on this part of your syllabus: Explain the function of a container registry like Docker Hub for storing and distributing container images.