Introduction
Welcome back! In our previous lesson, we established a high-level architectural map of the Linux kernel, identifying its major subsystems like the Process Scheduler, Memory Manager, and Virtual File System (VFS). We discussed how these components interact conceptually and the critical separation between user space and kernel space.
Today, we transition from the abstract blueprint to the physical source code. The learning outcome for this lesson is to navigate the Linux kernel source tree and identify where key subsystems are implemented. This is a fundamental skill for any kernel developer. You will learn how the kernel's logical design is reflected in its directory structure and how to begin exploring this vast codebase using standard tools. This lesson is the bridge between understanding what the kernel does and seeing how it's actually built.
1. Getting and Surveying the Source Tree
Before you can navigate the source, you need to know where to find it and how it's organized at the highest level. The official repository for the Linux kernel is hosted on kernel.org.
The following video provides a concise overview that maps the subsystems we discussed in the last lesson to their corresponding directories in the source tree.
Getting to Know the Linux Kernel: A Beginner's Guide - Kelsey Steele & Nischala Yelchuri, Microsoft
In this segment from 'Getting to Know the Linux Kernel', the speakers will first point you to where the kernel source is hosted and then walk through the top-level directories, connecting them directly to the kernel's major subsystems.
Please watch from 02:26 to 08:06. Focus on two key parts: Subsystem Mapping (02:26 - 05:58): Pay close attention as the speaker links subsystems like memory management, networking, and filesystems to their directory names (mm, net, fs). Getting the Source (05:58 - 08:06): Note the reference to kernel.org as the primary source for the mainline kernel.
To reinforce this and provide a quick reference, the table below summarizes the most important top-level directories and their purpose. This information is also detailed in the "Linux source code layout" section of the Introduction — The Linux Kernel documentation resource we used previously.
| Directory | Purpose |
|---|---|
arch/ |
Contains all architecture-specific code. Each supported CPU architecture (e.g., x86, arm64, riscv) has its own subdirectory here. This is where you'll find code for boot-up, low-level memory management, and interrupt handling. |
kernel/ |
The core of the kernel. This contains the scheduler (sched/), process management (fork.c), locking primitives, tracing (trace/), and timekeeping. |
mm/ |
The Memory Management subsystem. This directory houses the code for virtual memory, page allocation (the buddy allocator), the SLUB/SLAB allocators, and swapping. |
fs/ |
The Virtual File System (VFS) and the various filesystem implementations (e.g., ext4/, btrfs/, nfs/). The system call implementations for file operations (read_write.c, open.c) are here. |
net/ |
The networking stack. It contains the core networking code (core/), protocol implementations like ipv4/, ipv6/, and the socket layer (socket.c). |
drivers/ |
This is the largest part of the kernel, containing all the device drivers. It's organized by device type, such as gpu/, net/, i2c/, usb/, and block/. |
include/ |
Contains the kernel's header files. The include/linux/ subdirectory contains the most important headers that are exposed to the rest of the kernel modules. |
init/ |
Contains the generic kernel initialization code, including the start_kernel() function, which is the main entry point for all architecture-independent setup. |
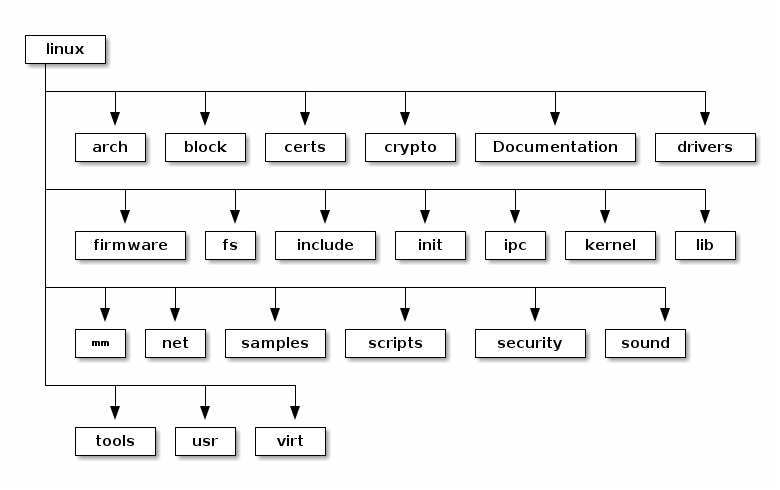
2. A Practical Example: The Anatomy of a Device Driver
Your background is in embedded software development, so let's make this exploration concrete by looking at the drivers/ directory. This directory is not a monolith; it's a collection of subsystems and frameworks that allow drivers to be modular and reusable.
We will now look at how a simple LED driver evolves, and how this evolution corresponds to the kernel's source code organization. This will show you why the source tree is structured the way it is—to promote abstraction and code reuse. The following video provides an excellent, step-by-step demonstration.
Understanding the Structure of a Linux Kernel Device Driver - Sergio Prado, Toradex
In 'Understanding the Structure of a Linux Kernel Device Driver', Sergio Prado builds a driver for an LED, refactoring it through several stages. We will use this as a case study to understand the source tree.
You don't need to watch this entire video straight through, but I encourage you to skim it to see the progression. Focus on these key transformations and think about where the code lives: Standalone Character Driver (10:00 - 18:54): The initial driver is a self-contained character driver. It creates a /dev/my_led file and handles read/write operations itself. Using the LED Framework (32:03 - 36:00): The driver is refactored to use the generic LED framework. The core logic now lives in drivers/leds/ and our driver just provides a simple callback. The user interface is standardized under /sys/class/leds/. Using gpiolib (37:09 - 42:30): Instead of writing to hardware registers directly, the driver is changed to use gpiolib, the standard library for GPIO manipulation. This code lives in drivers/gpio/. Becoming a Platform Driver (46:55 - 51:11): Finally, the driver is decoupled from the hardware description. It becomes a platform_driver that binds to a device defined in the Device Tree. This demonstrates the interaction between drivers/ and arch/<arch>/boot/dts/.
This evolution is a perfect illustration of the kernel's design philosophy. A developer writing a new LED driver doesn't start from scratch. They leverage:
- The LED framework in
drivers/leds/for a standard user interface. - The GPIO library in
drivers/gpio/for hardware abstraction. - The Platform Bus in
drivers/base/platform.cto decouple the driver from specific hardware addresses, which are instead provided by the Device Tree.
This modularity, reflected in the directory structure, is what makes the kernel so powerful and scalable.
3. Your Turn: A Kernel Cartography Challenge
Now it's time for you to become a code archaeologist. The best way to learn the source tree is to explore it yourself with a specific goal. We will use a guided exercise to analyze the block I/O subsystem, which is located in the block/ directory.
This task will require you to use command-line tools that are essential for any kernel developer. If you don't have a copy of the Linux source code, you can clone it using git:git clone git://git.kernel.org/pub/scm/linux/kernel/git/torvalds/linux.git
The most common tools for this kind of exploration are:
find: To locate files based on name or type (e.g.,find block/ -name "*.c").greporrg(ripgrep): To search for text patterns within files (e.g.,grep -r "struct request" block/).wc: To count lines, words, and characters (e.g.,wc -l block/genhd.c).cloc: An excellent tool for counting lines of code across many files.
Exercise 0: Kernel Exploration Challenge
This PDF contains a series of hands-on exercises for learning kernel development. We will focus on the 'Kernel Cartography' task, which is perfectly aligned with our goal for this lesson.
Navigate to 'Task 2: Kernel Cartography' (page 8). Your mission is to perform a detailed analysis of the block/ directory by completing the three sub-tasks: 5.1 Subsystem Statistics: Use the command-line tools mentioned above to find the number of C files, total lines of code, and the largest files. 5.2 Key Components: Use grep or a similar tool to find the definitions of the core data structures struct request and struct bio. Read the surrounding comments to understand their relationship. 5.3 Subsystem Interface: Find functions that are exported from the block layer to other parts of the kernel using EXPORT_SYMBOL. \nDocument your findings as described in the PDF. This exercise will give you direct, practical experience in navigating a core kernel subsystem.
This exercise forces you to do exactly what a kernel developer does when learning a new subsystem: measure its size, identify its core data structures, and find its public interfaces.
Conclusion
In this lesson, we have moved from the conceptual architecture of the kernel to its physical layout in the source code. You've learned how to map the major subsystems to their respective directories and, through a practical example, seen how the directory structure supports the kernel's core design principles of abstraction and modularity. Finally, you undertook a hands-on challenge to explore the block subsystem on your own.
Key Takeaways:
- The Linux kernel source code is logically organized into directories that mirror its subsystems (e.g.,
mm,fs,net,kernel). - The
drivers/directory is the largest and is itself organized into frameworks and subsystems to promote code reuse (e.g.,drivers/leds,drivers/gpio). - The
arch/directory contains all non-portable, CPU-specific code. - Navigating and searching the source tree with tools like
git,grep, andfindis a fundamental skill for kernel development.
In our next lesson, we will put this newfound familiarity with the source tree to use. We will learn how to configure and compile a custom Linux kernel from source, enabling and disabling the features we've just located in the code.