Introduction
Welcome back. In our previous lesson, we mapped the logical subsystems of the Linux kernel to their physical locations within the source code tree. You learned how to navigate this vast codebase and used tools like grep and find to explore the block/ subsystem, just as a kernel developer would when learning a new area of the code.
Today, we move from navigating the code to building it. The learning outcome for this lesson is to configure and compile a custom Linux kernel from source with specific features enabled or disabled. This is a fundamental skill that underpins almost all other kernel development activities, from bug fixing and feature development to performance tuning and security hardening. Mastering this process is a critical step toward contributing to open-source projects.
We will cover:
- The core components of the kernel's build system: Kconfig and Kbuild.
- A step-by-step guide to configuring, compiling, and installing a custom kernel on your host machine.
- A scenario-based look at how this process adapts for cross-compilation, a common requirement in embedded systems development.
1. The Kernel Build System: Kconfig and Kbuild
Before we start issuing make commands, it's important to understand the sophisticated system that manages the build process for a project as large and configurable as the Linux kernel. This system is primarily composed of two parts: Kconfig and Kbuild.
-
Kconfig: This is the configuration system. Its job is to manage the thousands of configuration options available in the kernel. It uses a special language across many
Kconfigfiles in the source tree to define options, their types (boolean, tristate, string, etc.), and their dependencies. When you run a tool likemake menuconfig, you are interacting with a frontend to the Kconfig system. Its ultimate output is the.configfile, which is a simple text file that lists every configuration option and its selected value (e.g.,CONFIG_SMP=y). -
Kbuild: This is the build system itself. It is an elaborate collection of Makefiles that recursively traverse the source tree. Kbuild's job is to read the
.configfile and, based on the options you've selected, compile only the necessary source files and link them together to produce the final kernel image (vmlinux) and any loadable modules.
To get a better sense of how these systems work, please review the following article.
Exploring the Linux kernel: The secrets of Kconfig/kbuild
The article 'Exploring the Linux kernel: The secrets of Kconfig/kbuild' from opensource.com provides a concise yet detailed overview of the kernel's build infrastructure.
Read the sections titled 'Kconfig' and 'kbuild'. Focus on understanding: The role of the various make *config targets (menuconfig, defconfig, etc.). How the Kconfig system processes Kconfig files and an existing .config to generate the final configuration. The concept of 'recursive make' used by Kbuild. How Kbuild uses built-in.a files from different subdirectories to assemble the final vmlinux file. The 'vmlinux overview' diagram is particularly insightful.
The diagram below, taken from the article, visualizes how Kbuild combines components from across the source tree—many of which you identified in our last lesson—into the final uncompressed kernel executable, vmlinux.

2. A Step-by-Step Guide to Building a Custom Kernel
Now, let's walk through the practical process of compiling a kernel for your host machine. We will use a combination of a detailed video walkthrough and a text-based guide for easy reference.
The process can be broken down into four main stages:
- Install Prerequisites
- Configure the Kernel
- Compile the Kernel
- Install the Kernel and Modules
Linux Kernel Programming 01: Compile and Boot
This video from the 'Write your own Operating System' YouTube channel provides a comprehensive, practical demonstration of the entire kernel compilation process, from downloading the source to booting the new kernel.
I recommend watching this video from start to finish (07:04 - 42:44) to see the full, end-to-end workflow. We will break it down into specific steps below, but seeing it all together is very valuable. Pay close attention to the reasoning behind each command.
For a supplementary text-based guide with commands you can easily copy, you can refer to the OneUptime blog post, "How to Compile a Custom Linux Kernel on Ubuntu" (ID: LINK).
Step 2.1: Install Prerequisites
Before you can build the kernel, you need a C compiler (GCC), make, and several other development libraries and tools.
- Action: Install the necessary build dependencies. The video segment "Install required packages" (07:04 - 12:18) and Section "Installing Build Dependencies" in the OneUptime article (LINK, section 0) both cover this. A typical command on a Debian/Ubuntu system would be:
sudo apt update
sudo apt install build-essential libncurses-dev bison flex libssl-dev libelf-dev
Step 2.2: Configure the Kernel
This is the most critical step for customization. Your goal is to create a .config file that reflects the desired features for your new kernel.
- Best Practice: Never start from scratch. The safest and most efficient method is to copy the configuration file from your currently running, working kernel. This ensures that all the necessary drivers for your hardware are already enabled.
# Navigate to your kernel source directory cd linux # Copy the config from your running kernel cp /boot/config-$(uname -r) .config - Update the Configuration: If you are building a newer kernel version than the one you are running, your copied
.configwill be missing entries for new features. You can update it automatically.make oldconfig: This will prompt you for every new option.make olddefconfig: This is non-interactive and will automatically select the default value for all new options. This is usually what you want.
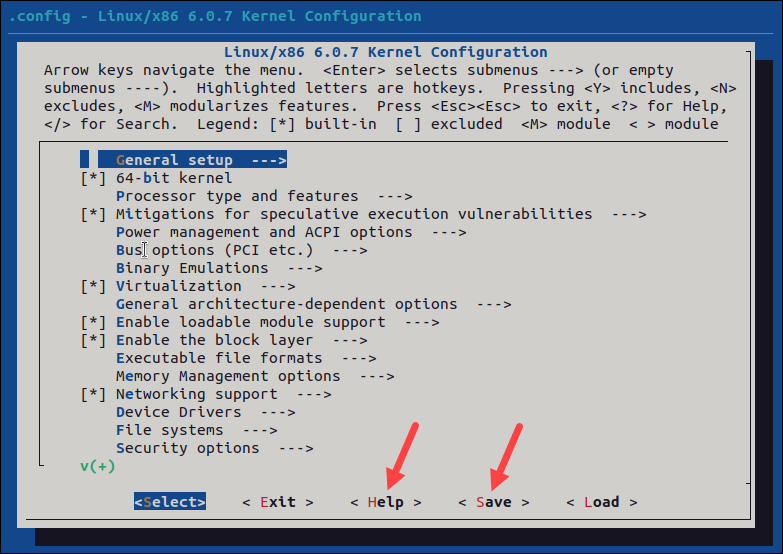
- Customize: Now you can enable or disable specific features using a configuration tool. The most common is
make menuconfig, a text-based user interface.
- Action:
- Copy your existing kernel configuration.
- Run
make olddefconfigto update it for the new kernel version. - Launch
make menuconfig. - Practice: Navigate to File systems and find the entry for a filesystem you don't use (e.g.,
Btrfs,JFS,XFS). If it's enabled (*orM), disable it by pressingn. - Save your changes and exit.
The video segment "The .config file" (12:34 - 21:47) provides an excellent walkthrough of this entire configuration process.
Step 2.3: Compile the Kernel
With your .config file ready, you can start the compilation. This is CPU-intensive and can take a significant amount of time.
- Action: Use the
makecommand with the-jflag to run multiple compilation jobs in parallel. A good practice is to use the number of CPU cores available on your system.# This command builds the kernel image and all modules make -j$(nproc)
This process is shown in the video segment starting at 23:45. The main outputs will be:
vmlinux: The uncompressed, statically linked kernel executable in the root of the source tree.arch/<your_arch>/boot/bzImage(for x86) orImage(for ARM): The compressed, bootable kernel image.
Step 2.4: Install the Kernel and Modules
After the compilation succeeds, you need to install the newly built kernel and its modules onto your system.
- Action: This is a two-step process requiring root privileges.
- Install Modules: This command copies all the compiled modules (files ending in
.ko) to the directory/lib/modules/<your-new-kernel-version>/.sudo make modules_install - Install Kernel: This command copies the compressed kernel image to
/boot/, creates the initial RAM disk (initrd), and—most importantly—updates your bootloader (GRUB) configuration to add an entry for the new kernel.sudo make install
- Install Modules: This command copies all the compiled modules (files ending in
After these commands complete, you can reboot your machine. Your bootloader should now present an option to boot into your custom-built kernel. You can verify it's running with uname -r.
The video demonstrates the installation and GRUB update process from 28:54 to 33:02.
3. Scenario: Cross-compilation for an Embedded Target
As an embedded engineer, you will most often be cross-compiling—building the kernel on your powerful x86 host machine for a different target architecture, like ARM or RISC-V. The fundamental process is the same, but with two key differences: you need a cross-compiling toolchain, and you must explicitly tell Kbuild which architecture and toolchain to use.
The following video demonstrates how to build a kernel for an ARM target and run it in QEMU—a workflow highly relevant to your goals.
QEMU for Linux kernel developers
This video, 'QEMU for Linux kernel developers', walks through the process of cross-compiling an ARM kernel and booting it in an emulator.
Watch the section on compiling the Linux kernel (03:23 - 04:44). As you watch, identify the answers to these questions: How are the target architecture and the cross-compiler specified in the make command? What defconfig is used as the starting configuration, and why is it different from the cp /boot/config... method we used for a native build? After the build is complete, in which subdirectory is the final zImage (compressed ARM kernel) located?
The key insight from this exercise is the use of the ARCH and CROSS_COMPILE environment variables passed to make:ARCH=arm CROSS_COMPILE=<path-to-toolchain>/bin/arm-none-linux-gnueabihf- make ...
This tells Kbuild to use the ARM architecture's defconfig and Makefiles (arch/arm/) and to use the specified ARM cross-compiler instead of the host's native GCC.
Conclusion
In this lesson, you have acquired the essential practical skill of building a custom Linux kernel. You now understand the roles of the Kconfig and Kbuild systems and have walked through the complete workflow of configuration, compilation, and installation.
Key Takeaways:
- The kernel build is managed by Kconfig (for configuration) and Kbuild (for compilation).
- The best practice for configuration is to start with your current system's
.configfile and modify it usingmake menuconfig. - The three main commands for building and installing are
make -j$(nproc),sudo make modules_install, andsudo make install. - Cross-compilation follows the same principles but requires specifying the
ARCHandCROSS_COMPILEvariables.
In our next lesson, we will leverage the kernel we've just built. We will begin to describe the major stages of the Linux boot process, tracing the journey from the moment the bootloader hands control to our kernel's entry point, through architecture-specific setup, and into the generic start_kernel function.