Introduction
Welcome to the final lesson of our module on rendering! In the previous lessons, you've learned how to set up lighting, position a camera, and fine-tune the render settings in Cycles to balance quality and speed. You now have all the components ready to create a beautiful image.
This lesson brings everything together. We'll focus on the learning outcome: render a final still image and save it to a file (e.g., PNG, JPEG). This is the moment where your digital sculpture, existing only within Blender, is transformed into a concrete piece of art that you can share, critique, or use in a portfolio. Think of this as developing the film or making the final print after all the work in the studio. By the end of this lesson, you'll be able to confidently export your sculptures as high-quality images.
1. Setting the Stage: Output Properties
Before you press the "render" button, you need to tell Blender what kind of file you want to create. This is done in the Output Properties panel, which you can find in the Properties editor on the right-hand side. Its icon looks like a small printer.
The Output Properties panel is where you define your image's resolution, file format, and save location.
Let's explore the most important settings here, using a clear article as our guide.
Your First Real Render In Blender
The article "Your First Real Render In Blender" by Samuel Sullins provides a straightforward guide to the final steps of rendering. We'll use it to understand the essential output settings.
Please read the section titled 'Render!'. Focus on how it describes setting the resolution, choosing an output directory, and the default file type.
Based on that reading, let's break down the key choices you need to make:
- Resolution: This determines the dimensions of your image in pixels (e.g., 1920px by 1080px for a standard HD image). For digital display, this is sufficient. If you ever intend to print your work, you would need a much higher resolution.
- File Format: This is the type of image file you'll create. For your purposes as a sculptor showcasing your work, you'll primarily choose between:
- PNG: This format uses lossless compression, meaning it preserves the full quality of your render. It also supports transparency (an "alpha channel"), which is useful if you want to place your rendered sculpture on a different background later. This is generally the best choice for high-quality portfolio pieces.
- JPEG: This format uses "lossy" compression, which makes file sizes smaller but at the cost of some image quality. It's great for quick previews or web images where file size is a concern, but it does not support transparency.
- Output Path: This is crucial. You must tell Blender where to save the file and what to name it. If you skip this, your render might be saved to a temporary folder and could be difficult to find later.
2. The Main Event: Rendering the Image
With your output properties set, you're ready to start the render. This process takes all the information in your scene—your model, materials, lights, and camera view—and uses the Cycles engine to calculate the final image based on the quality settings you learned in the last lesson.
To begin the render, you have two simple options:
- Navigate to the top menu and choose Render > Render Image.
- Use the universal shortcut: F12.
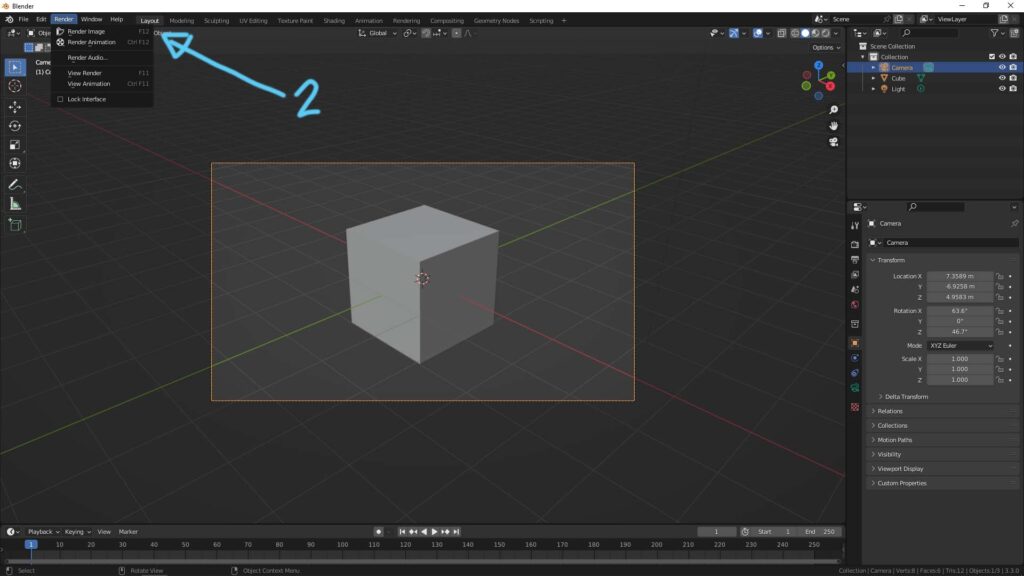
When you start the render, a new window will open, showing the image being built tile by tile. The time it takes will depend on your scene's complexity and the sample/noise settings you chose. It's important not to close this window, as that will cancel the render.
3. Saving Your Masterpiece
Once the render is complete, the image exists in your computer's temporary memory, but it's not yet saved as a permanent file. You must perform one final step.
In the render window, go to the Image menu and select Save As....
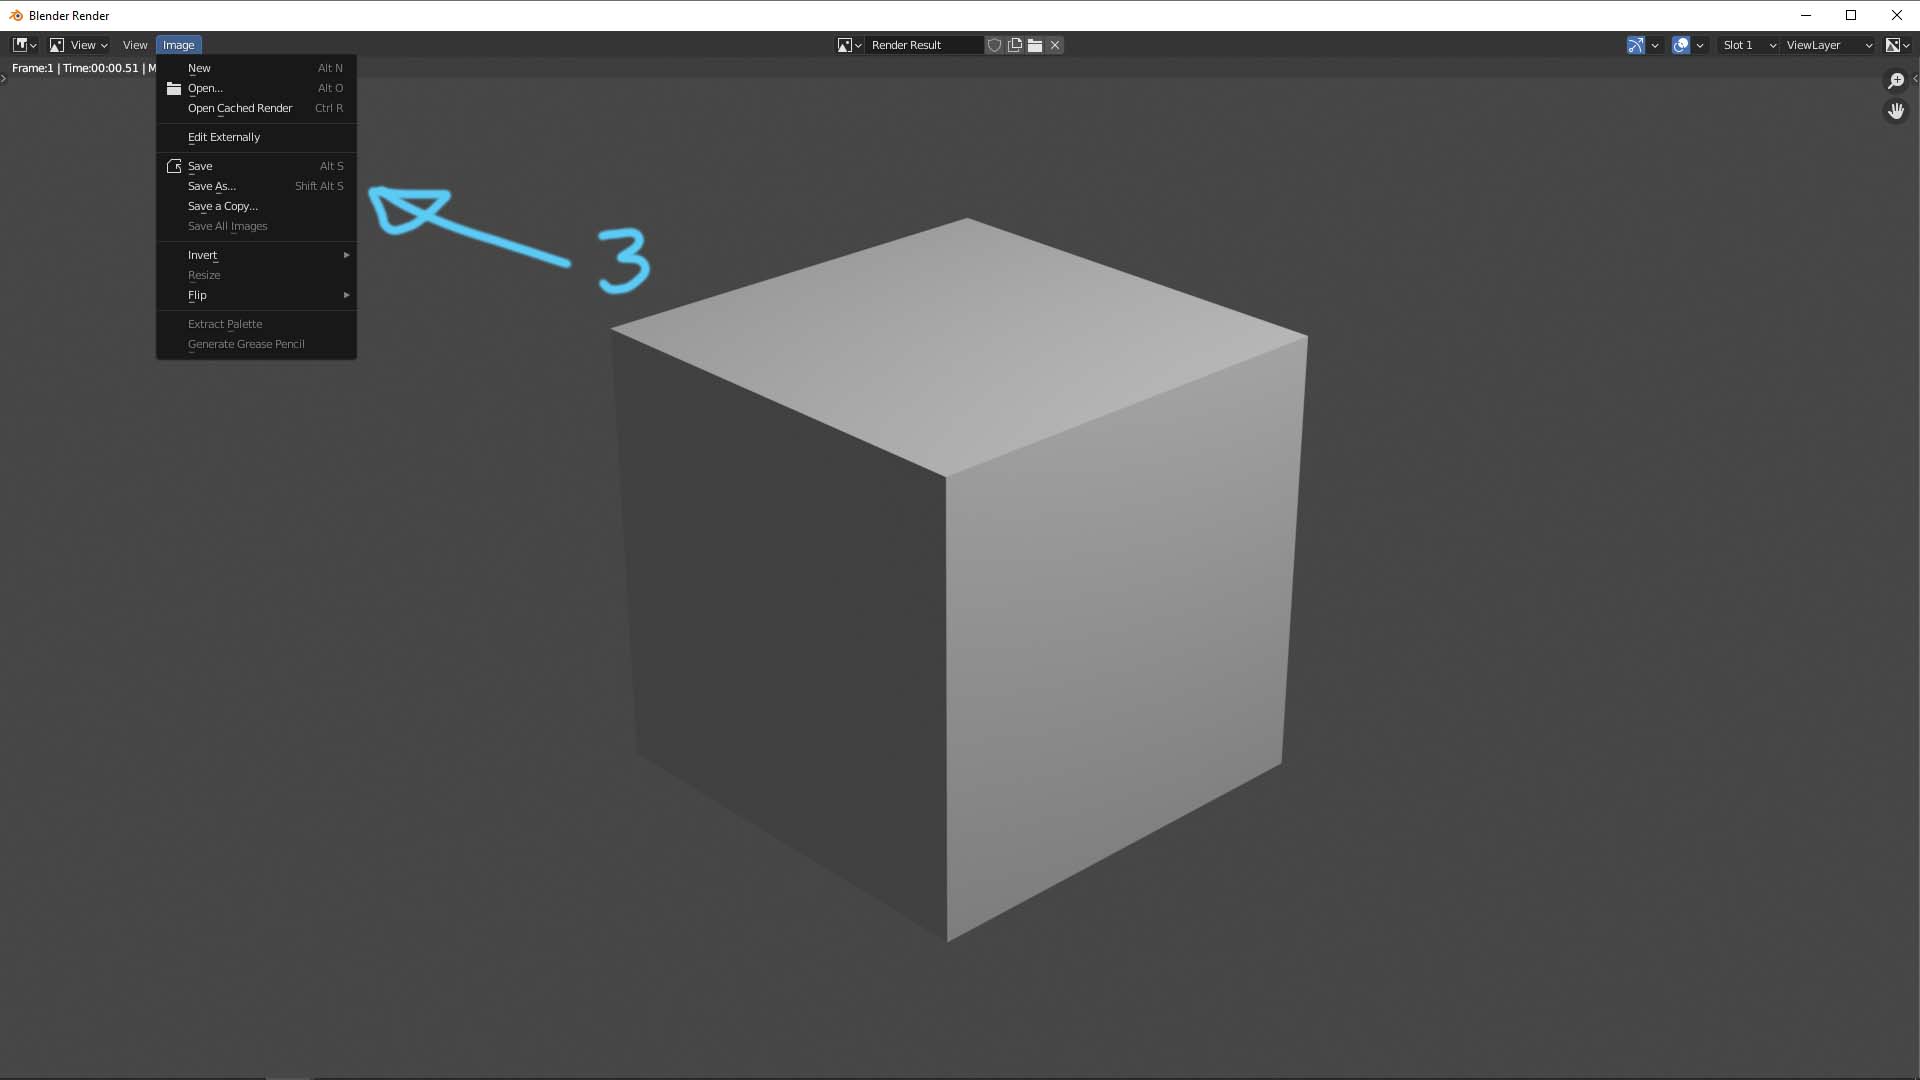
This will open a file browser where you can confirm the location, file name, and format before clicking "Save As Image".
Let's watch a short video that walks through this entire sequence from rendering to saving.
Blender Beginner Tutorial - How to Render in Blender - Blender 3.4
The video "Blender Beginner Tutorial - How to Render in Blender" demonstrates the practical steps of initiating a render and saving the result.
Watch the clip from 07:27 to 07:54. Notice how the presenter first initiates the render with F12, and then, after it's complete, goes to 'Image > Save As' in the new window to save the final file.
4. Your Turn: Create Your First Final Render
It's time to apply what you've learned. Open one of your Blender projects—perhaps the abstract sculpture you've been working on—and follow these steps to create your first official render.
Your Task:
- Open Your Project: Load the
.blendfile containing a sculpture you are proud of. - Check Your Scene: Make sure your lighting and camera are positioned how you want them. Use the Rendered viewport shading mode (
Zkey pie menu) for a quick preview. - Confirm Render Settings: Go to the Render Properties (camera icon).
- Ensure Render Engine is set to
Cycles. - Ensure Device is set to
GPU Compute. - Under
Sampling, check that yourNoise Thresholdis set to a reasonable value for a final image, like0.01, and thatDenoiseis enabled.
- Ensure Render Engine is set to
- Set Output Properties: Go to the Output Properties (printer icon).
- Set the
Resolutionto1920px for X and1080px for Y. - Set the
File FormattoPNG. - Click the folder icon next to the
Outputpath and choose a location you'll remember, like your Desktop. Give your file a name (e.g.,Abstract_Sculpture_01.png).
- Set the
- Render: Press F12 and let your computer work its magic.
- Save: Once the render is finished, go to the render window and use Image > Save As... to save your artwork.
Congratulations! You have successfully created a final, high-quality image of your digital sculpture.
Conclusion
You have now mastered the complete workflow for producing a still image in Blender, from initial setup to the final saved file. This is a milestone that transforms your 3D modeling efforts into tangible, shareable works of art.
Key Takeaways:
- Always configure your desired Resolution, File Format (PNG for quality, JPEG for size), and Output Path in the Output Properties panel before rendering.
- Initiate a render by pressing F12 or going to Render > Render Image.
- After the render completes, you must save the image from the render window via Image > Save As....
- This process combines all your previous work on modeling, materials, lighting, and render settings into a single, final output.
Next Steps
With your ability to create stunning still images now solidified, we can move on to enhancing the presentation. In the next module, "Creating a Final Showcase," we will begin by learning how to build a professional studio environment for your sculptures, starting with a classic photography tool: the seamless "infinity cove" backdrop. This will elevate your renders from simple object showcases to polished, portfolio-ready pieces.