Hello! Welcome back to your Blender sculpting journey.
In our last lesson, you made your first marks in digital clay using the essential Draw, Clay Strips, and Smooth brushes. You learned the fundamental actions of adding material, subtracting it with the Ctrl key, and blending it with the Shift key.
This lesson is the next logical step. Now that you know what the brushes do, we will focus on how to control them. A sculptor doesn't use the same tool and the same pressure for every task. You need to switch from making broad, form-defining changes to etching the most delicate details. This lesson is all about mastering that control.
Our goal is to learn how to adjust brush size and strength to control sculpting effects. By the end of this session, you will be able to fluidly change your brush's size and intensity, giving you a vastly greater range of expression in your sculpting.
1. The Two Pillars of Brush Control: Radius and Strength
Every sculpting brush in Blender has two primary properties that you will constantly adjust:
- Radius: This is simply the size of your brush. A large radius affects a wide area, perfect for making big changes or smoothing large surfaces. A small radius affects a tiny area, which you'll use for fine details. Think of this as the difference between shaping clay with the palm of your hand versus the tip of a needle.
- Strength: This is the intensity or power of the brush stroke. A high strength will push or pull the mesh dramatically with a single pass. A low strength will make very subtle changes, allowing you to gradually build up or reduce forms. This is analogous to how hard you press your tool into physical clay.
You can find the sliders for these settings in the header of the 3D Viewport when you are in Sculpt Mode.
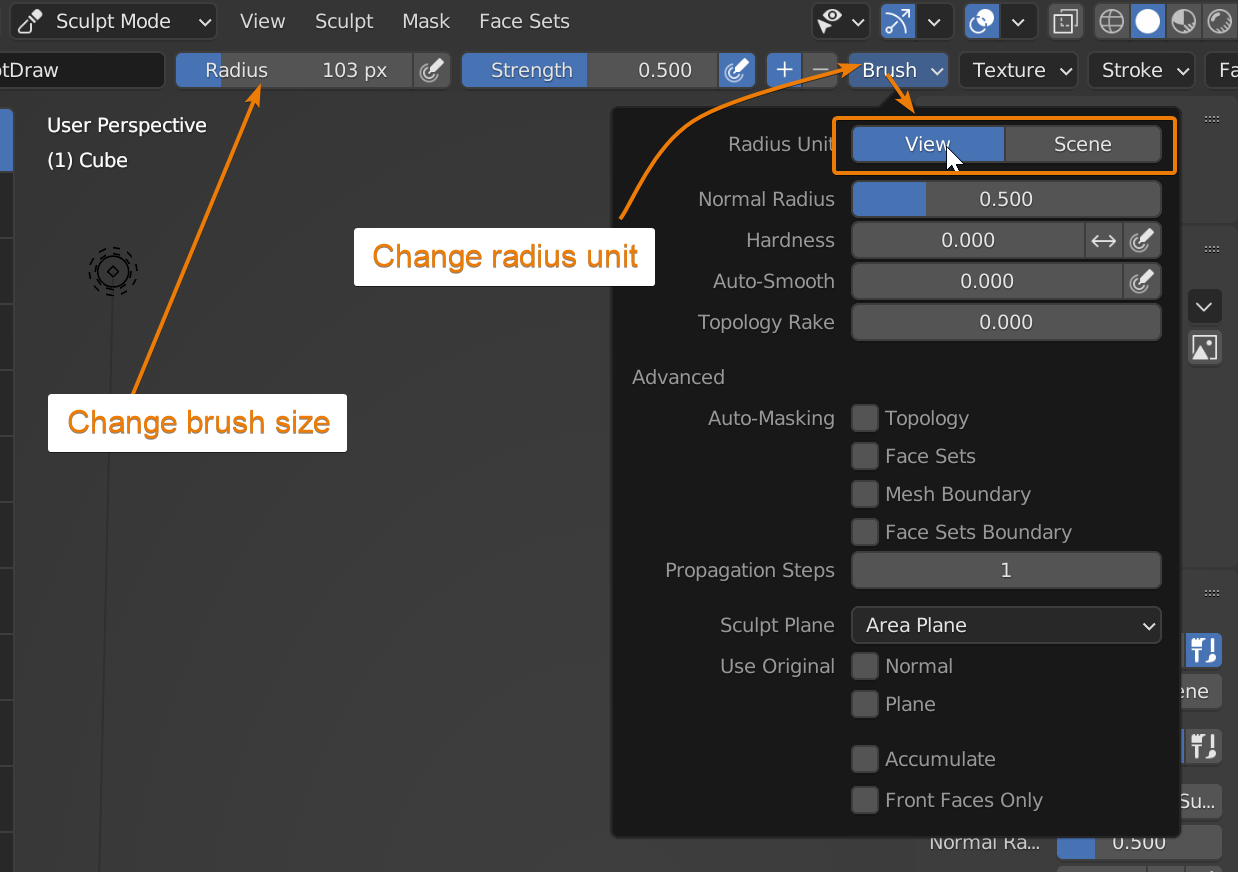
While these sliders are useful for seeing the current values, interacting with them with your mouse is slow and breaks the flow of sculpting. Instead, we'll focus on the much faster professional workflow: using hotkeys.
2. The Professional Workflow: Hotkeys for Speed
To sculpt fluidly, you need to be able to change your brush size and strength without moving your hand from your pen or mouse to click on a slider. The following two shortcuts are among the most important in all of sculpting.
- To change Brush Size (Radius): Press the
Fkey.- Move your cursor left or right to decrease or increase the size.
- Click to confirm the new size.
- To change Brush Strength: Press
Shift + F.- Move your cursor left or right to decrease or increase the strength.
- Click to confirm the new strength.
Let's see this in action.
Sculpting for Complete Beginners! (Blender Tutorial)
The video 'Sculpting for Complete Beginners!' by Ryan King Art provides an excellent, clear demonstration of adjusting the Radius and Strength using both the sliders and, more importantly, the hotkeys.
Watch from 08:37 to 09:54. Pay close attention to how the F and Shift + F keys allow for immediate, on-the-fly adjustments right where the sculpting is happening.
As you can see, the hotkey method is far more efficient. It allows you to stay focused on your model. This is the workflow you should aim to make second nature.
For a quick written reminder of these shortcuts, the following resource is very helpful.
Introduction to Sculpting in Blender
The article 'Introduction to Sculpting in Blender' has a concise list of the essential controls for sculpting.
Read the bulleted list under the section 'Essential Controls for Sculpting'. The last two points cover the F and Shift – F hotkeys. This is a great page to bookmark for reference.
3. The Sculptor's Touch: Using Pen Pressure
Here is where your experience with physical art-making connects directly to the digital world. A graphics tablet can detect how hard you press the pen onto its surface. Blender can use this pressure information to control your brush, most commonly its strength or size. This allows for a much more intuitive and organic sculpting experience.
Next to the Radius and Strength sliders, you'll see small icons that look like a pen tip. Clicking these toggles pressure sensitivity for that property.

- Pressure for Strength (Most Common): When enabled, pressing lightly will create a subtle effect (low strength), and pressing harder will create a more dramatic effect (high strength). This is fantastic for creating varied and natural-looking strokes.
- Pressure for Radius: When enabled, pressing lightly will create a small stroke, and pressing harder will create a larger one.
Let's see how to enable and use this feature.
Sculpting for Complete Beginners! (Blender Tutorial)
Let's return to the 'Sculpting for Complete Beginners!' video. The next section gives a perfect demonstration of enabling and using pen pressure.
Watch from 09:54 to 11:28. The video shows how to turn on pressure sensitivity for Strength and Radius. The creator shares his personal preference (pressure on for Strength, off for Radius), which is a very common professional setup. Experiment to find what feels right for you.
Hands-On Practice: Gaining Control
Let's put this all together. Open Blender and get a subdivided sphere ready for sculpting (if you need a reminder: Shift + A > Icosphere, set Subdivisions to 6, then go to the Sculpting workspace).
-
Practice Size Control:
- Select the Draw brush.
- Press
F, make the brush very large, and click. Pull out a large, soft lump from your sphere. - Press
Fagain, make the brush very small, and click. Draw a few thin, spaghetti-like lines on the surface. - Practice this
F-click->sculptrhythm until it feels comfortable.
-
Practice Strength Control:
- Press
Fto set a medium brush size. - Press
Shift + F, set the strength to1.0(the maximum), and click. Draw a line. It should be very prominent. - Now, press
Shift + F, set the strength to around0.1, and click. Draw a line next to the first one. It should be very faint.
- Press
-
Practice with Pen Pressure:
- In the top header, make sure pen pressure is off for Radius but on for Strength (click the pen icon next to Strength so it is highlighted blue).
- Select the Clay Strips brush.
- Draw a continuous line on your sphere, but consciously vary the pressure. Start light, press hard in the middle, and end light again. You should see a stroke that swells in intensity and then fades out. This is the control that makes digital sculpting feel truly expressive.
Spend about 10-15 minutes on this. Don't try to make a finished sculpture. The goal is to build muscle memory for the F and Shift + F hotkeys and to get a feel for how pen pressure translates your physical touch into digital form.
Conclusion
You have now learned one of the most important skills in digital sculpting: controlling your tools. Mastering brush size and strength is what separates rough blocking from detailed refinement.
Key Takeaways:
- Radius (Size) and Strength (Intensity) are the core properties of every brush.
- The
Fkey is the fastest way to change your brush size. - The
Shift + Fkey is the fastest way to change your brush strength. - Using a graphics tablet with pen pressure (especially for strength) provides an intuitive and organic workflow, mimicking the feel of traditional sculpting.
Next Steps
So far, we've focused on brushes that add or subtract material. But what if you want to change the fundamental pose or silhouette of your model without adding or removing clay? In our next lesson, we'll introduce the Grab brush, a powerful tool for making large-scale changes to a model's form, much like bending the wire armature of a physical sculpture.