Hello! Welcome back to your exploration of digital sculpture in Blender.
In the last lesson, we focused on controlling your tools, learning to adjust brush size and strength with hotkeys and pen pressure. You now have the fine motor skills needed to make both bold and subtle marks. Today, we shift our focus from adding and subtracting material to shaping the mass itself.
This lesson is all about making large-scale changes to your model's form. In physical sculpture, this is like bending the wire armature or pushing around a large volume of clay to define the primary gesture and proportions before any detail work begins. In Blender, our primary tool for this is the Grab brush.
Our goal is to use the Grab brush to make large-scale changes to a model's silhouette. By the end of this lesson, you'll understand how to block out the fundamental shape of your sculptures, a crucial first step for both the abstract and hard-surface forms you're interested in creating.
1. The Sculptor's Hand: Introducing the Grab Brush
The brushes we've used so far—Draw, Clay Strips, Smooth—all modify the surface by adding, removing, or averaging vertices. The Grab brush is different. It doesn't add or remove material. It simply moves the existing vertices that are under its influence.
Think of it as reaching into your digital clay and literally grabbing and pulling a section of it. This makes it the perfect tool for establishing your sculpture's main forms and, most importantly, its silhouette.
To get a formal introduction, please read the short section on this brush from the official Blender training guide.
Basic Sculpting - Blender Fundamentals 4.5 LTS
The 'Basic Sculpting' guide from Blender Studio provides a clear and concise introduction to finding and using the Grab brush.
Please read the section titled 'Changing the Overall Shape'. It shows you where to find the Grab brush in the toolbar and explains its primary purpose. Don't worry about the video in the resource for now, we'll get to that.
As the guide mentions, brushes that move the mesh are typically color-coded yellow. When you select the Grab brush, you can use a large radius (F key) to pull, push, and twist your mesh into a new overall shape.
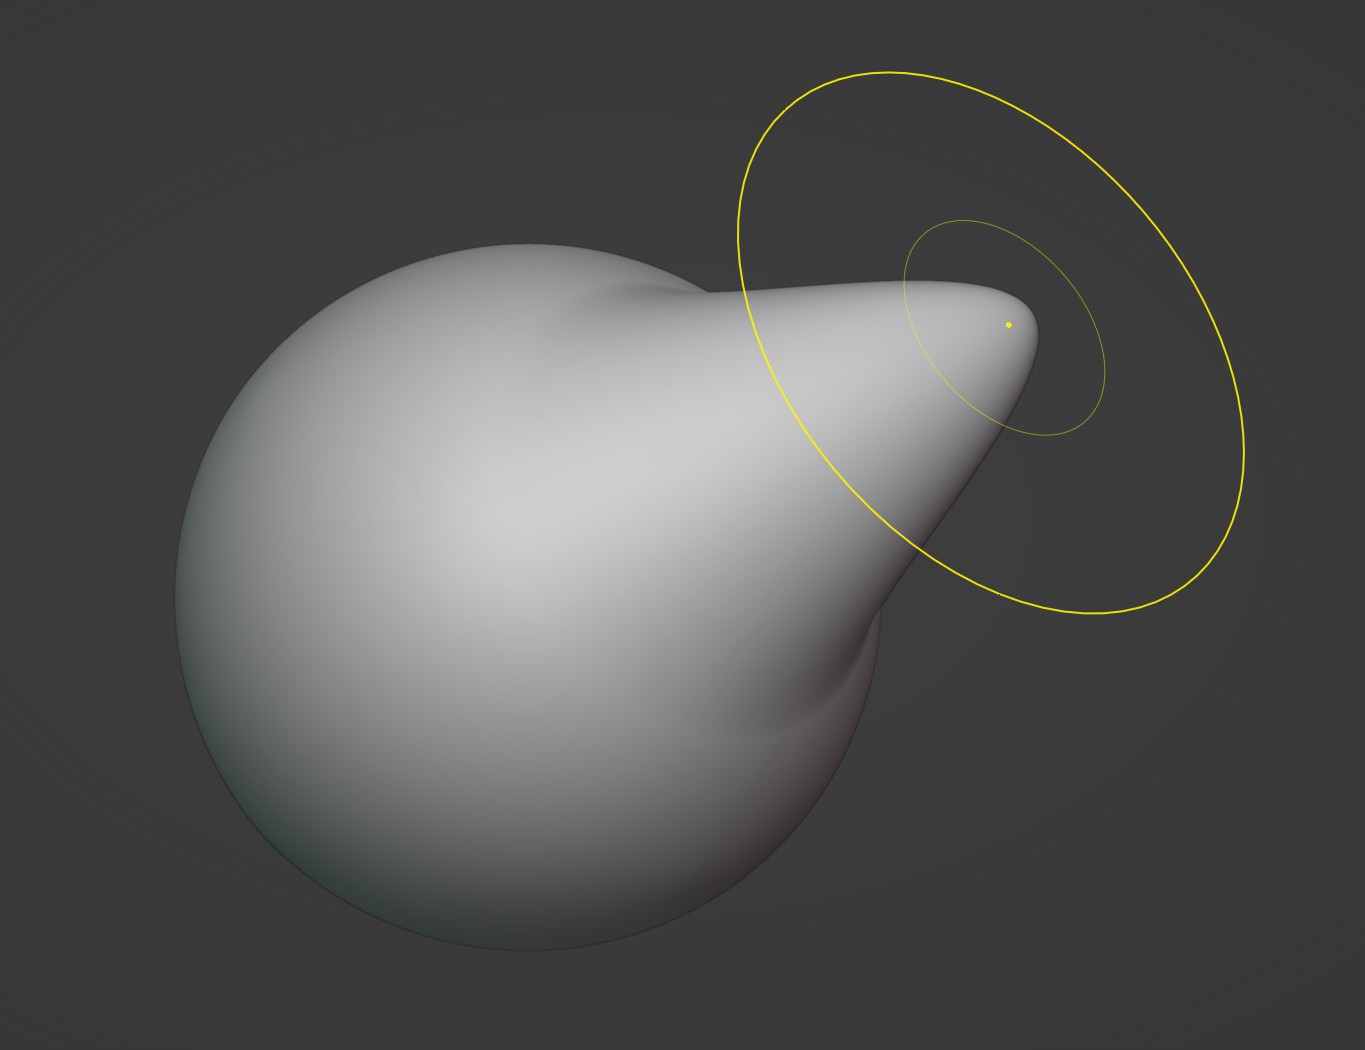
2. The Grab, Stretch, and Remesh Workflow
When you use the Grab brush to pull a form out a long way, you'll notice the underlying geometry (the polygons) gets very stretched. This is a natural consequence of moving vertices without adding new ones. Once the polygons are stretched, you lose the ability to sculpt fine details in that area.
The common workflow to solve this is to periodically regenerate the mesh to have a more uniform distribution of polygons. We will cover the different techniques for this in detail later, but for now, it's useful to see the basic rhythm of sculpting with the Grab brush. The most common method you'll see is "Remeshing."
This video from Grant Abbitt demonstrates the Grab brush and this essential workflow.
Master Blender Sculpting: Every Brush Explained
In 'Master Blender Sculpting: Every Brush Explained', Grant Abbitt provides a clear demonstration of using the Grab brush and the necessity of remeshing.
Watch the section from 00:19:47 to 00:20:45. Notice how he pulls out a form with the Grab brush, the mesh becomes stretched, and he uses a hotkey (Ctrl + R) to 'Remesh' it, which redistributes the polygons so he can continue sculpting. This 'pull -> remesh -> smooth -> pull again' cycle is fundamental.
Don't worry too much about the details of Remeshing just yet. The key takeaway is recognizing that when your mesh gets stretched, there's a simple step to fix it so you can keep shaping your form.
3. Advanced Control for Silhouette and Form
While the standard Grab brush is your main tool for blockouts, Blender provides a few powerful variations and settings that give you more precise control, which are especially useful for your interests in abstract and hard-surface forms.
Let's watch two quick tips that demonstrate these advanced features.
28 Tips to BOOST Sculpting in Blender #b3d #sculpting
The '28 Tips to BOOST Sculpting in Blender' video by CG Boost has excellent, concise explanations for two powerful Grab brush features.
Please watch two short segments from this video: Grab Silhouette (00:24:50 - 00:25:21): This shows how a special mode of the Grab brush can manipulate just the outline of your shape without affecting nearby geometry. This is incredibly useful for refining a silhouette. Projected Falloff (00:27:46 - 00:28:48): This demonstrates a setting that makes the Grab brush affect the mesh all the way through from your viewpoint. This is a fantastic technique for making large, clean changes to a form, almost like cutting through it with a wire tool, and is very relevant for hard-surface blockouts.
These two options—Grab Silhouette and Projected Falloff—elevate the Grab brush from a simple pulling tool to a sophisticated shaping instrument.
Hands-On Practice: Blocking Out Forms
It's time to put this into practice. The goal here isn't to create a finished piece, but to get a feel for how the Grab brush handles.
Setup:
- Open Blender and start a new Sculpting template file. This will give you a subdivided cube.
- Enable X-axis symmetry. In the header at the top right of the viewport, make sure the 'X' button is enabled in the symmetry options.
Exercise 1: Organic Blockout (15 minutes)
Your goal is to turn the starting shape into a simple, abstract creature bust. Think of a head, neck, and shoulders.
- Use a large Grab brush (
Fkey to resize) to pull out the major forms. - Pull down to create a neck and broaden the base for the shoulders.
- Pull out a chin and shape the back of the head.
- Constantly rotate your view (
MMB drag) to see the silhouette from all angles (front, side, top, three-quarters). A sculpture must work in the round! - If the mesh gets too stretched in one area, press
Ctrl + Rto remesh it, then use the Smooth brush (Shiftkey) to soften the area before continuing. - Focus only on the overall shape and silhouette. Do not add any details like eyes or mouths.
Exercise 2: Projected Shaping (10 minutes)
This exercise uses the "Projected Falloff" setting to explore a different way of shaping, one that's very useful for hard-surface and abstract work.
- Undo (
Ctrl + Z) your work until you are back to the basic starting shape. - In the Tool settings (Properties Panel on the right, under the active tool tab), find the Falloff section for the Grab brush and change the Shape from
SpheretoProjected. - Look at your object from the side view (
Numpad 3). - Use the Grab brush to push and pull the mesh. Notice how it now moves the front and back sides together, affecting the entire object from your point of view.
- Try to create some sharp, planar-like changes in the form. This technique is great for quickly blocking out mechanical or architectural shapes.
Spend about 25 minutes on these exercises. The goal is to build an intuitive understanding of how to move large masses of digital clay.
Conclusion
You have now added the most important blockout tool to your digital toolkit. While the Draw and Clay brushes are for building up and carving into a surface, the Grab brush is for defining the foundation upon which that surface rests.
Key Takeaways:
- The Grab brush is used to make large-scale changes to a model's silhouette by moving vertices without adding or removing material.
- A common workflow is to use the Grab brush to pull out forms and then use Remesh (
Ctrl+R) to fix any stretched geometry. - The Grab brush has powerful variations, including Grab Silhouette for precise outline control and Projected Falloff for making changes through the entire mesh from your viewpoint.
- Constantly rotating the view is essential to ensure your form works from all angles.
Next Steps
You've probably felt the limitations of a fixed-resolution mesh. When you pull a form with the Grab brush, you run out of polygons to work with. While Remeshing helps, there's an even more fluid and dynamic way to work. In the next lesson, we will introduce Dynamic Topology (Dyntopo). This exciting feature automatically adds and removes geometry under your brush as you sculpt, giving you the freedom to add infinite detail wherever and whenever you want.