Hello! Welcome back to your course on building a personal finance dashboard.
In our last lesson, we set up the essential architecture for our workbook by creating nine distinct worksheets. This "separation of concerns" is the professional standard for building robust and maintainable Excel models.
Today, we'll build on that foundation by establishing clear and consistent naming conventions. While it might seem like a small detail, a standardized naming system is one of the most impactful habits you can adopt. It makes your formulas intuitive to read, dramatically reduces errors, and makes managing your dashboard much easier as it grows in complexity. By the end of this lesson, you will be able to apply standardized names to your worksheets and create and manage named ranges for your data.
Part 1: Naming Your Worksheets
We've already created our nine sheets, but let's formalize the rules and best practices for naming them. Excel has specific rules about what is and isn't allowed in a sheet name.
Rules for Naming Microsoft Excel Worksheets - Keynote Support
The article 'Rules for Naming Microsoft Excel Worksheets' from Keynote Support is a perfect reference for this. It covers all the technical constraints.
Please read the section 'Excel Worksheet Naming Rules and Tips'. Pay close attention to the character limits, the list of forbidden characters (like \ / ? * [ ]), and the special reserved name 'History'.
Based on these rules, here are the key takeaways for our project:
- Be Descriptive but Concise: The names we chose (
Dashboard,Transactions,Price_Input, etc.) are clear and short enough to be fully visible in the tab bar. - Consistency is Key: We've used a consistent style (PascalCase or with underscores). Let's stick with the names from the previous lesson:
Dashboard,Calculations,Lists,Transactions,Investments_Log,Price_Input,Liabilities,Assets_NonInvest, andREADME. - No Spaces: While spaces are allowed if you wrap the name in single quotes in formulas (e.g.,
'My Data'!A1), it's simpler to avoid them altogether. Using underscores (Price_Input) or PascalCase (PriceInput) are common and effective alternatives.
Part 2: Introducing Named Ranges
Now for one of the most powerful features in Excel for organization: Named Ranges.
A named range allows you to assign a memorable, human-readable name to a single cell, a range of cells, a constant value, or even a formula.
Instead of writing a formula like:=SUM(Transactions!D2:D1000)
You could write:=SUM(Trx_Expenses)
The benefit is immediate: the formula's purpose is instantly clear. For a complex dashboard where you'll be pulling data from many different sheets, this is not just a convenience—it's essential for keeping your work understandable and error-free.
For a great overview of named ranges and their benefits, please read the first few sections of the article 'Excel Named Ranges Explained'.
Read the sections 'What Are Named Ranges?', 'Benefits of Using Named Ranges', and 'Tips for Best Practices with Named Ranges'. This will solidify your understanding of why we are about to make them a core part of our project.
Part 3: How to Create and Manage Named Ranges
Excel gives you a few ways to create named ranges and a central location to manage them.
- The Name Box: The quickest way for simple cases. Select a cell or range, then type the name into the Name Box (to the left of the formula bar) and press Enter.
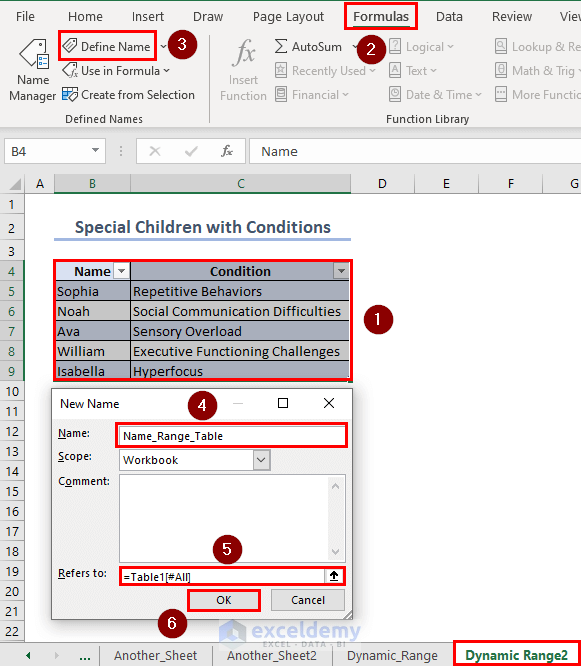
- Define Name: Found on the Formulas tab, this opens a dialog box with more options, including setting the scope.
- Name Manager: Also on the Formulas tab (shortcut:
Ctrl+F3), this is your command center. Here you can view, edit, delete, and filter all the named ranges in your workbook.
Let's watch a short video that demonstrates how to use these tools, including a particularly useful feature for financial models: named constants.
Top Tips for Using Named Ranges in Excel
The video 'Top Tips for Using Named Ranges in Excel' from TeachExcel provides a quick, practical demonstration of these features.
Please watch two segments: 02:24 - 03:44: This introduces the Name Manager and the concept of 'scope' (whether a name is available to the whole workbook or just one sheet). 09:43 - 11:53: This demonstrates creating a 'named constant' for a value like a tax rate. This is perfect for managing financial assumptions in your dashboard.
For our project, we will almost always use the Workbook scope. This allows a formula on the Dashboard sheet to easily reference a named range from the Transactions sheet.
Part 4: A Naming Convention for Your Dashboard
This is the most critical part of this lesson. Just creating named ranges isn't enough; we need a system. Without one, you could end up with ambiguous names like "Date" or "Amount" that could refer to data on multiple sheets.
Our convention will be simple and powerful: Prefix_DataDescription
- The Prefix will be a short, 2-4 letter code for the worksheet where the data lives.
- The DataDescription will be a clear name for the data itself.
Here are the prefixes we'll use for our project:
Trx_for the Transactions sheetInvLog_for the Investments_Log sheetPrice_for the Price_Input sheetLiab_for the Liabilities sheetAsset_for the Assets_NonInvest sheetList_for the Lists sheetCalc_for the Calculations sheetConst_for constant values (like a target savings rate)
Examples:
Trx_Date(the date column on the Transactions sheet)Trx_Amount(the amount column on the Transactions sheet)InvLog_Ticker(the stock ticker column on the Investments_Log sheet)List_ExpenseCategory(the list of expense categories on the Lists sheet)Const_TargetSavingsRate(a constant value representing your goal)
This system makes it impossible to mix up your data and makes your formulas self-documenting.
Learn How To Master Named Ranges In Excel In Just 35 Minutes [Full Course]
To see why this convention is so important, watch this segment from the video 'Learn How To Master Named Ranges In Excel'. The instructor explains this exact concept with a clear example.
Watch from 14:30 to 16:15. The instructor explicitly states the importance of using a good naming policy, starting with the sheet or table name. This is the core principle we are adopting for our dashboard.
Practical Application
Let's put this into practice.
- Go to your Lists worksheet.
- In cell A1, type the header
ExpenseCategory. - In cells A2 through A6, enter a few sample expense categories you use, for example:
- Groceries
- Rent
- Utilities
- Transport
- Entertainment
- Now, select the range of cells containing your categories (A2:A6).
- Go to the Formulas tab and click Define Name.
- In the 'New Name' dialog box:
- For Name:, type
List_ExpenseCategories - Ensure Scope: is set to
Workbook. - The Refers to: box should already be filled with
=Lists!$A$2:$A$6.
- For Name:, type
- Click OK.
You have now created your first standardized named range! When we build our data entry sheet later, we can use List_ExpenseCategories to create a dropdown menu, ensuring your expense data is always consistent.
Test your understanding!
You plan to have a column on your Investments_Log sheet to record the number of shares you buy or sell. According to our naming convention, what would be the proper name for this range?
Show answer
A perfect name would be InvLog_Quantity or InvLog_Shares. The InvLog_ prefix clearly identifies that the data belongs to the Investments_Log sheet, and Quantity or Shares describes the data itself.
Conclusion
You've now established a robust and professional naming system for your entire workbook. This investment in organization will pay huge dividends as we move forward, making your formulas cleaner, your logic clearer, and your dashboard easier to build and maintain.
Key Takeaways:
- Worksheet names have specific rules and should be kept concise and descriptive.
- Named Ranges give human-readable names to cells, ranges, or constants, dramatically improving formula clarity.
- A standardized naming convention is crucial for complex workbooks. Our system will be
Prefix_DataDescription. - The Name Manager (
Ctrl+F3) is your central hub for managing all named ranges.
In our next lesson, we will introduce another powerhouse Excel feature: Tables. You'll see how Tables can automatically manage the size of your data ranges and how they integrate perfectly with the naming conventions we've established today. This will set us up to start building our transaction tracker.