In the previous lesson, you mastered the Linux command line, learning how to navigate and manage your file system. That was the first step in setting up your professional developer environment. Now, we will build directly on those skills to tackle one of the most critical tools in modern software engineering: Git.
This lesson addresses the learning outcome: Initialize a Git repository and manage code versions using the commit, branch, and merge workflow on GitHub. This is the core of what the Infilect job description means by "comfortable with code management" and "product versioning." In any collaborative software team, Git is the system of record that tracks every change, enables developers to work in parallel, and ensures code quality. Mastering this workflow is non-negotiable for a backend engineer.
We will cover the entire lifecycle of a code change: creating a local repository to track your work, saving snapshots of your progress, using branches to work on features in isolation, and using GitHub to collaborate with a team through Pull Requests.
1. What Are Git and GitHub?
At its heart, Git is a Version Control System (VCS). Imagine working on a project and saving files like project_v1.py, project_v2_final.py, and project_v2_final_for_real.py. Git automates this process, creating a structured history of your project that you can navigate, compare, and revert to at any point. It's like an infinitely detailed logbook for your code.
It's crucial to understand the distinction between Git and GitHub:
- Git is the command-line tool installed on your local machine that does the actual version tracking.
- GitHub is a web-based hosting service for Git repositories. It acts as a central cloud location for your code, enabling backup, sharing, and, most importantly, collaboration.
The fundamental workflow in Git involves four conceptual areas. Understanding this sequence is key to mastering Git.
- Working Directory: Your project folder, where you actively edit your files.
- Staging Area (or Index): A waiting area where you group together related changes you want to save.
- Local Repository: The permanent history of your project, stored in a hidden
.gitfolder on your computer. A "commit" moves changes from the Staging Area to here. - Remote Repository: The copy of your repository hosted on GitHub, which you sync with your local repository.
The following reading provides an excellent, detailed explanation of these core concepts.
Learn How to Use Git and GitHub – A Beginner-Friendly Handbook
This handbook from freeCodeCamp provides a clear and comprehensive introduction to Git. We'll start with the "why" and then look at the architecture.
First, read the introductory section to grasp the problem Git solves. Next, carefully study the section on Git Architecture. Focus on understanding the flow from the Working Directory, to the Staging Area, to the Local Repository, and finally to the Remote Repository (GitHub).
2. Getting Your Project Under Version Control
There are two primary ways to start working with Git:
git init: Initialize Git in an existing project folder on your local machine.git clone: Create a local copy of a project that already exists on a remote server like GitHub.
Before you make your first commit, you need to introduce yourself to Git. This is a one-time configuration per machine. Git embeds this information in every commit you make, which is crucial for tracking who changed what in a collaborative project.
The following video provides a concise walkthrough of installing and configuring Git, then initializing your first repository.
Git and GitHub Tutorial for Beginners
This tutorial by Kevin Stratvert is an excellent visual guide to the initial setup and the first steps of using Git.
First, watch the section on configuring your name and email. You only need to do this once on your computer. Next, watch how to initialize a repository and use git status to see untracked files. Finally, see how to add all files to staging and prepare them for your first commit.
As you saw in the video, the commands are straightforward:
git config --global user.name "Your Name"git config --global user.email "youremail@example.com"git init(run inside your project directory)
3. The Core Local Workflow: Add, Commit, Log
Once your repository is initialized, you'll fall into a simple, three-step rhythm for saving your work. This cycle is what you'll be doing dozens of times a day as a developer.
- Modify: You make changes to files in your working directory.
- Stage (
git add): You select the changes you want to save and add them to the staging area. You can add a specific file (git add <filename>) or all changes in the current directory (git add .). - Commit (
git commit): You take the "snapshot" of the staged files and permanently save it to your local repository's history with a descriptive message. A good commit message is vital for team collaboration.
This cycle is visualized well in the standard Git workflow diagram.
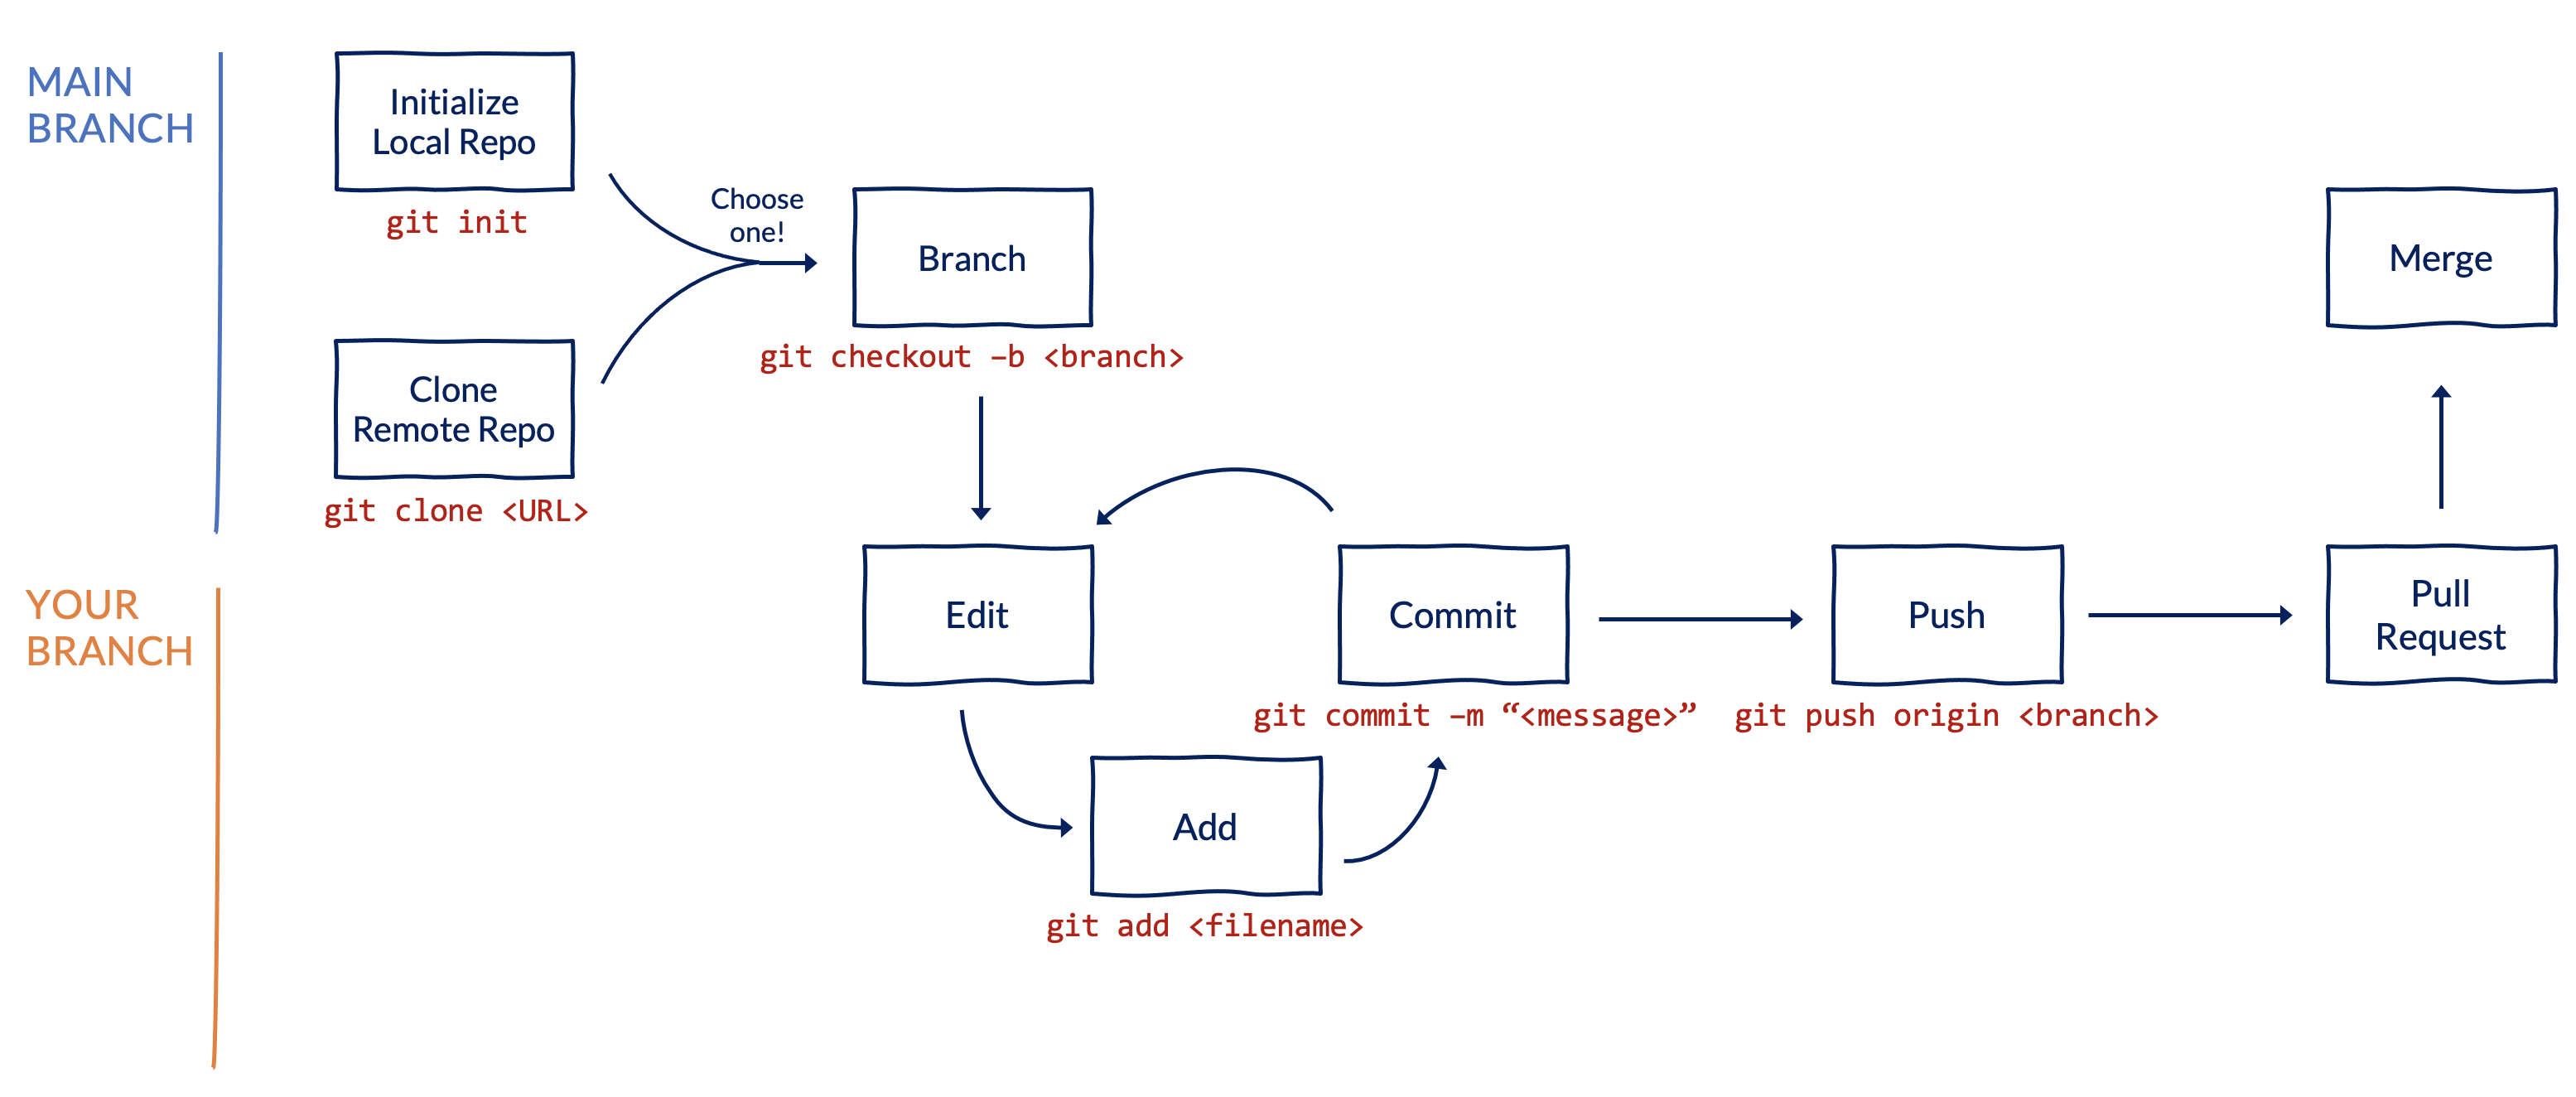
Let's continue with the freeCodeCamp handbook to see these commands in action.
Learn How to Use Git and GitHub – A Beginner-Friendly Handbook
This guide will now walk you through the practical steps of tracking, staging, and committing your changes.
Read this section to understand how git status is your primary tool for seeing the state of your repository. Next, study the section on git add. Pay close attention to the differences between git add ., git add -A, and adding specific files. For now, using git add . from your project's root directory is a safe and common practice. Finally, read about git commit. This is the command that saves your snapshot. Notice the importance of the commit message (-m).
4. Branching and Merging: Working in Parallel
So far, all our work has been on a single timeline, usually called the main branch. This is fine for solo projects, but in a team, it's a recipe for disaster. What if you're working on a long-term feature and an urgent bug needs to be fixed now? This is where branching becomes essential.
A branch is an independent line of development. You can create a new branch to work on a feature, and all your commits will be isolated there, leaving the main branch clean and stable. Once your feature is complete and tested, you can merge it back into main.
This workflow allows multiple developers to work on different features simultaneously without interfering with each other. It's the foundation of all modern collaborative development.

The concepts of branching and merging can be tricky at first. The following tutorial provides a very clear, dedicated explanation.
Git Branching and Merging - Detailed Tutorial
This "SuperSimpleDev" tutorial is one of the clearest explanations of branching and merging available. It will give you a solid mental model for this crucial concept.
Watch the introduction to understand the problem that branching solves. Follow along as the video shows you how to create and switch branches (git branch, git checkout). See how to add commits to a feature branch, isolating your work. Observe how you can switch back to the main branch to do separate work, like a bug fix. Finally, watch the detailed explanation of merging, which combines the work from your feature branch back into the main branch.
5. Collaborating with GitHub: The Professional Workflow
Now it's time to connect your local repository to the outside world using GitHub. This enables collaboration, code reviews, and provides a safe backup of your project.
The process involves:
- Creating a new, empty repository on GitHub.
- Linking your local repository to this remote one using
git remote add. - Pushing your local branches and commits to GitHub (
git push). - Creating a Pull Request (PR) on GitHub. This is a formal request to merge your feature branch into the
mainbranch. It's where code review happens. Your teammates can comment on your code, suggest changes, and finally approve the merge. - Merging the PR on the GitHub website.
- Pulling the updated
mainbranch from GitHub back to your local machine to stay in sync (git pull).
This push -> PR -> merge -> pull cycle is the daily reality for professional software teams.
An Intro to Git and GitHub for Beginners (Tutorial)
This HubSpot tutorial provides a great walkthrough of the GitHub-specific parts of the workflow, including creating a remote repo and using Pull Requests.
Read Step 6 to learn how to create a remote repository on GitHub and link it to your local project. Follow Step 7 to see how to push your branch from your local machine to the remote repository. Finally, read through Steps 8 and 9, which cover creating and merging a Pull Request. This is the central mechanism for code review and collaboration. Then, see how to use git pull in Step 10 to sync the changes back to your computer.
6. Hands-On Practice
Let's put all these pieces together. Open your terminal and follow these steps to simulate a complete, professional workflow.
-
Setup:
- Navigate to your projects directory:
cd ~/path/to/your/projects - Create a new project folder and enter it:
mkdir git_practice && cd git_practice
- Navigate to your projects directory:
-
Local Work:
- Initialize a Git repository:
git init - Create your first file:
echo "# My Awesome Project" > README.md - Stage and commit the file:
git add README.mdgit commit -m "Initial commit"
- Create a feature branch and switch to it:
git checkout -b add-user-feature - Add a new feature:
echo "User profile logic" > user_feature.py - Stage and commit the new feature:
git add user_feature.pygit commit -m "feat: Add user profile feature"(Using "feat:" is a common convention for commit messages).
- Initialize a Git repository:
-
GitHub Collaboration:
- Go to GitHub and create a new, empty repository named
git_practice. Do not initialize it with a README or .gitignore. - Copy the HTTPS URL of your new repository.
- Link your local repo to the remote:
git remote add origin <PASTE_YOUR_URL_HERE> - Push your
mainbranch to GitHub:git push -u origin main(The-uflag sets the upstream for the first time). - Push your feature branch:
git push origin add-user-feature
- Go to GitHub and create a new, empty repository named
-
Code Review and Merge:
- Go back to your repository on GitHub. You should see a prompt to create a Pull Request for the
add-user-featurebranch. Click it. - Give your PR a title and description, then create it.
- On the PR page, imagine you are your own teammate. Review the "Files changed" tab.
- Since it looks good, click "Merge pull request" and confirm.
- Go back to your repository on GitHub. You should see a prompt to create a Pull Request for the
-
Syncing:
- Now that the feature is merged into
mainon GitHub, your localmainbranch is out of date. - Switch back to your local main branch:
git checkout main - Pull the latest changes from GitHub:
git pull origin main - Check your directory. You should now see both
README.mdanduser_feature.py. - View your project's history:
git log --oneline --graph. You'll see the commits from both branches and the merge commit.
- Now that the feature is merged into
Conclusion
In this lesson, you've learned the fundamental workflow that powers nearly all modern software development. This process directly addresses the "code management" and "product versioning" requirements for the role at Infilect.
Key Takeaways:
- Git is the local tool; GitHub is the cloud collaboration platform.
- The core local cycle is modify ->
git add->git commit. - Branches (
git branch,git checkout) are essential for isolating work and enabling parallel development. - Merging (
git merge) integrates completed features back into the main codebase. - The professional collaborative loop is
git push-> Create Pull Request -> Review -> Merge on GitHub ->git pull.
In our next lesson, we'll address another critical part of the developer environment: creating and managing isolated Python virtual environments using venv. This will allow us to install project-specific packages without affecting your system's global Python installation, a crucial practice for building clean, reproducible backend applications.