Welcome to the next lesson in our journey to becoming a backend engineer. In the last session, you mastered Git and GitHub, learning how to manage your code history professionally. Now, we'll focus on managing your code's dependencies—the external libraries and packages your projects rely on.
This lesson addresses the learning outcome: Create and manage isolated Python virtual environments using venv. This is a foundational skill for any Python developer and directly supports the Infilect job description's emphasis on building scalable, maintainable backend systems. Without isolated environments, managing different projects with conflicting requirements becomes nearly impossible, a situation often called "dependency hell."
By the end of this lesson, you will understand why virtual environments are essential and be able to create, activate, and manage them for your projects, ensuring each one has a clean, reproducible, and isolated set of dependencies.
1. The Problem: Dependency Conflicts
Imagine you are working on two different projects.
- Project A is an older application that relies on version 1.5 of a library, let's say
pandas. - Project B is a new project that needs the latest features from
pandasversion 2.1.
If you install packages globally on your system, you can only have one version of pandas installed at a time. Installing version 2.1 for Project B would likely break Project A. This is a classic dependency conflict.
Virtual environments solve this by creating isolated "bubbles" for each project. Each bubble contains its own Python interpreter and its own set of installed packages, completely separate from other projects and your main system.
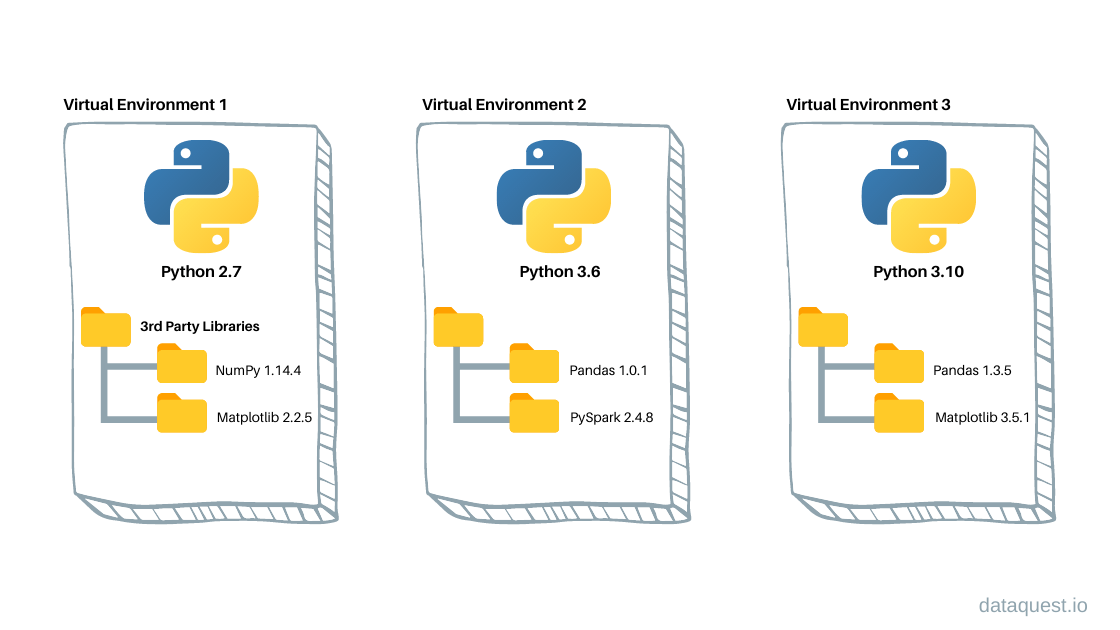
2. What Is a Virtual Environment?
A virtual environment is essentially a self-contained directory that houses a specific Python installation and all the third-party packages required for a single project. The official Python documentation provides a concise introduction to this concept.
12. Virtual Environments and Packages
This excerpt from the official Python tutorial clearly defines what virtual environments are and the problem they solve.
Read the Introduction section to understand the formal definition and purpose of a virtual environment.
The problems solved by virtual environments are critical in professional development. The following article delves deeper into the specific issues you'll avoid.
Python Virtual Environments: A Primer
This Real Python article provides excellent, practical examples of why virtual environments are indispensable.
Read the section titled Why You Need Virtual Environments. Focus on the subsections "Sidestep Dependency Conflicts" and "Minimize Reproducibility Issues," as these are the exact challenges you will face when building complex backend applications like those at Infilect.
At a high level, a virtual environment created with venv consists of a few key components within its folder:

3. The venv Workflow in Action
Now, let's move from theory to practice. Python's built-in venv module provides everything you need to create and manage virtual environments. The workflow consists of four main steps: creating, activating, using, and deactivating the environment.
The following video provides a clear walkthrough of this entire process. It shows the commands for both Windows and Mac/Linux, so you can follow along on your system.
Python Virtual Environments - Full Tutorial for Beginners
This tutorial by Tech With Tim is a concise and practical guide to using venv. It demonstrates the complete lifecycle of a virtual environment.
First, watch how to create an environment. The command is python -m venv <environment_name>. It's a common convention to name the environment venv or .venv. Next, see how to activate and deactivate it. The activation command is slightly different for Windows (venv\Scripts\activate) versus Mac/Linux (source venv/bin/activate). The deactivate command is the same for all systems.
4. Managing Dependencies with pip and requirements.txt
Once your virtual environment is active, any packages you install with pip will be placed inside that environment's isolated site-packages directory. This is how you build up your project's specific dependencies.
But how do you share your project with others, or deploy it to a server? You can't just send them your venv folder. Instead, you create a manifest of your dependencies in a file conventionally named requirements.txt. This file allows anyone to perfectly replicate your project's environment.
Let's continue with the same video to see this crucial part of the workflow.
Python Virtual Environments - Full Tutorial for Beginners
This section of the video covers the essential pip commands for managing your project's dependencies and ensuring reproducibility.
Watch from installing packages to creating a requirements file. This part covers the three most important pip commands in this workflow: pip install <package-name>: To add a new library to your active environment. pip freeze > requirements.txt: To generate a list of all installed packages and their exact versions, and save it to requirements.txt. pip install -r requirements.txt: To read the requirements.txt file and install all the listed packages into a new environment.
This cycle—installing packages and then freezing them into requirements.txt—is fundamental to professional Python development. It ensures your application is reproducible, a key aspect of reliable deployment and collaboration.
5. Hands-On Practice
It's time to put this all together. Open your terminal and follow these steps to simulate a full development cycle.
-
Create a Project Directory:
mkdir my_app cd my_app -
Create and Activate a Virtual Environment:
- On Mac/Linux:
python3 -m venv venv source venv/bin/activate - On Windows:
python -m venv venv
.\venv\Scripts\activate
After activation, you should see
(venv)at the beginning of your command prompt. - On Mac/Linux:
-
Install Packages:
Let's installrequests, a popular library for making HTTP requests.pip install requests -
Verify the Installation:
Check the packages installed in your environment. You'll seerequestsand its dependencies.pip list -
Create a
requirements.txtFile:
Now, let's "freeze" our dependencies into a file.pip freeze > requirements.txtYou can open
requirements.txtin a text editor to see its contents. It will list the exact versions ofrequestsand its dependencies. -
Deactivate and Simulate a Fresh Start:
Virtual environments are disposable. Let's prove it.deactivateNow, delete the
venvdirectory entirely.- On Mac/Linux:
rm -rf venv - On Windows:
rmdir /s /q venv
- On Mac/Linux:
-
Recreate the Environment from
requirements.txt:
Imagine you've just cloned this project on a new machine. All you have is therequirements.txtfile.- First, create a fresh, empty virtual environment and activate it again (using the commands from Step 2).
- Now, install everything from your requirements file:
pip install -r requirements.txt - Finally, run
pip listagain. You'll see thatrequestsand all its dependencies have been perfectly restored.
This exercise demonstrates the power of treating your environment as reproducible code. The venv folder itself is temporary; the requirements.txt file is the permanent record of your project's dependencies. This is why you should always add your virtual environment folder (e.g., venv/) to your .gitignore file, as we discussed in the previous lesson.
Conclusion
In this lesson, you've taken a crucial step in setting up a professional Python development environment. You now understand how to isolate project dependencies to prevent conflicts and ensure your work is reproducible.
Key Takeaways:
- A virtual environment is an isolated directory containing a project-specific Python interpreter and its libraries.
- The primary goal is to solve dependency conflicts between different projects.
- The core workflow is: create (
python -m venv venv), activate (source venv/bin/activateorvenv\Scripts\activate), use (pip install), and deactivate. - The
requirements.txtfile, created withpip freeze, is the key to creating reproducible environments, which is essential for collaboration and deployment. - Virtual environments are disposable and should never be committed to version control.
In our next lesson, we will build directly on this foundation as we dive deeper into managing third-party dependencies with pip. We'll explore techniques for pinning package versions more flexibly and discuss strategies for handling more complex dependency trees, giving you even finer control over your project's environment.