Welcome back! In our last lesson, you implemented rate limiting, a crucial step in protecting your API from being overwhelmed. You've built a defense mechanism. Now, let's switch from defense to offense and focus on making your application dramatically faster and more scalable.
This lesson addresses a core principle of building high-performance systems: caching. You'll learn how to configure and apply caching strategies using Redis to significantly reduce the load on your database. This directly supports the Infilect job description's need for engineers who can "build scalable backend/cloud applications" and have experience with "system and product development at scale." An application that can't efficiently manage its data access will never be able to scale.
By the end of this lesson, you will be able to integrate Redis as a cache backend for your Django application, apply caching to API endpoints, and implement strategies for both public and user-specific data to drastically improve performance.
1. Why Cache? The 100x Performance Gain
In a typical web application, the database is often the primary bottleneck. Every time a user requests a list of products, your application queries the database, the database finds the data on disk, processes it, and sends it back. This can take hundreds ofmilliseconds. Now imagine a thousand users requesting the same list. That's a thousand slow, repetitive database queries.
Caching solves this by storing the results of expensive operations (like database queries) in a much faster, in-memory data store. For subsequent requests, the application can retrieve the data from the cache in just a few milliseconds, bypassing the database entirely.

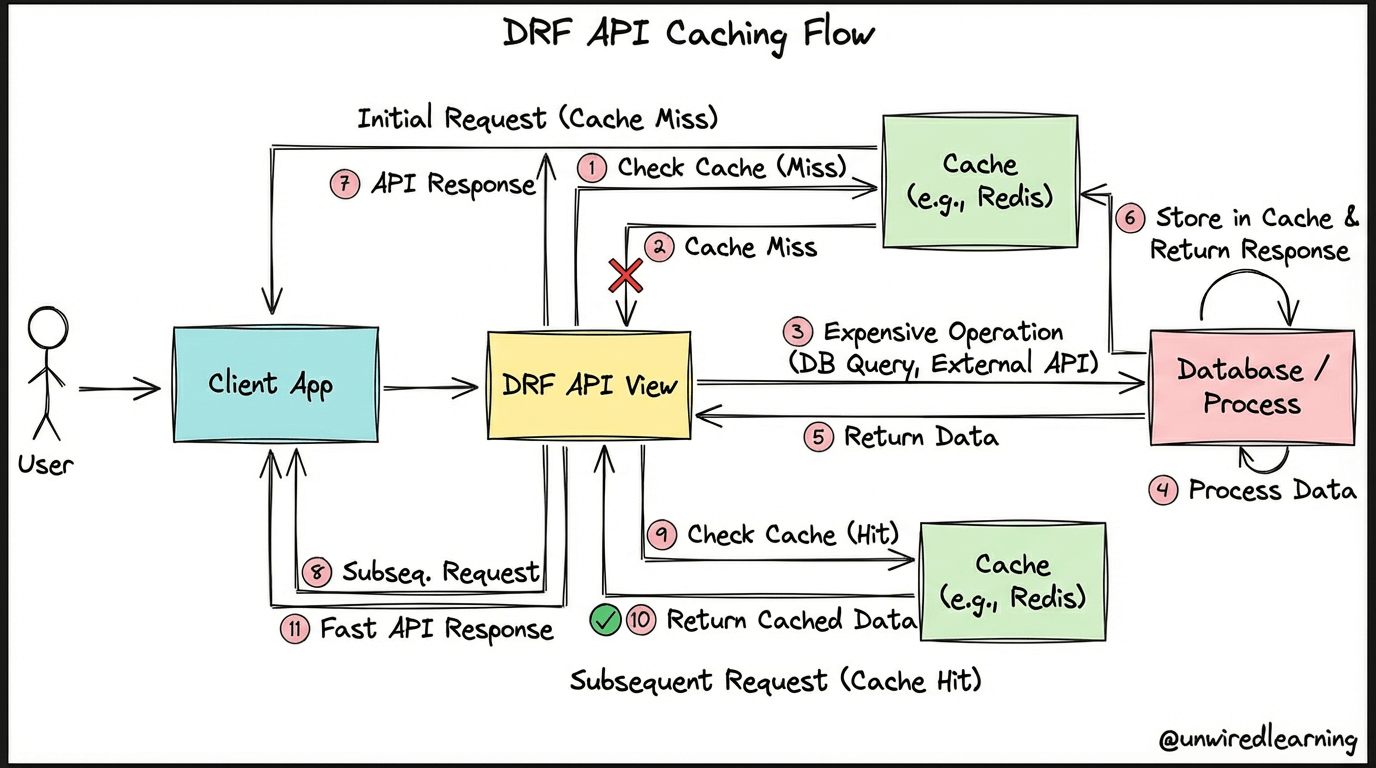
The most common caching strategy is called cache-aside. The logic is straightforward:
- When a request comes in, first check if the data exists in the cache.
- Cache Hit: If it does, return the data directly from the cache. Fast!
- Cache Miss: If it doesn't, perform the expensive operation (e.g., query the database), store the result in the cache for future requests, and then return the data.
The flowchart below visualizes this exact process for a DRF API. We will be implementing this pattern throughout the lesson.
2. Setting Up Redis and Django
To use Redis with Django, we need to install Redis itself, add a Python library to communicate with it, and configure Django to use it as its cache backend.
The following article provides a complete guide. We will follow its first three steps to get our project set up.
Django + Redis: The Complete Caching Guide That ...
This Medium article by Sizan Mahmud provides an excellent, practical guide to integrating Redis with Django. We'll use it to set up our environment.
Please read and follow the instructions in the first three sections: Step 1: Install Redis. You can follow the instructions for your OS. However, since we are using Docker in this course, I recommend running Redis in a container. You can achieve this with a single command: docker run --name infilytics-redis -p 6379:6379 --restart always -d redis. This is the same approach shown in the BugBytes video we'll see later. Step 2: Install Python Dependencies. Make sure your virtual environment is activated and add django-redis to your requirements.txt file. Step 3: Configure Django Settings. This is the most important part. Copy the CACHES dictionary into your infilytics/settings.py file.
Let's break down the configuration you just added to settings.py:
# in infilytics/settings.py

CACHES = {
    "default": {
        "BACKEND": "django_redis.cache.RedisCache",
        "LOCATION": "redis://127.0.0.1:6379/1", # Use DB 1 for cache
        "OPTIONS": {
            "CLIENT_CLASS": "django_redis.client.DefaultClient",
        },
        "KEY_PREFIX": "infilytics" # Good practice for multi-app environments
    }
}


# Also, move session storage to Redis to reduce DB load
SESSION_ENGINE = "django.contrib.sessions.backends.cache"
SESSION_CACHE_ALIAS = "default"
BACKEND: Tells Django to use thedjango-redislibrary.LOCATION: Specifies the address of your Redis server. The/1at the end selects the second database inside Redis (they are 0-indexed), which is good practice to keep your cache data separate from other potential uses of Redis (like Celery, which often uses DB 0).KEY_PREFIX: Prevents key collisions if multiple applications were to share the same Redis instance.SESSION_ENGINE: This is a bonus optimization. By changing this, you are telling Django to store user session data in Redis instead of the database, further reducing database load for authenticated user actions.
3. Caching an API View (Per-View Caching)
Now for the exciting part. Let's apply caching to an API endpoint and see the performance difference. We'll target the product list endpoint (/api/products/), which is a perfect candidate as it's public data that doesn't change too frequently.
The following video provides a fantastic walkthrough of the entire process, from setting up Redis with Docker to applying the cache decorator and seeing the result.
Caching with Redis and Django!
This video from BugBytes is a perfect practical demonstration of everything we've discussed so far.
Please watch the following segments. The code in the video is very similar to what you will be writing. Setting up Redis with Docker. This is the Docker-based approach I recommended earlier. Configuring Django. This covers installing the packages and setting up the CACHES dictionary in settings.py. Caching the Product List View. This is the core of our task. It shows how to use the @cache_page decorator and simulates a slow database query with time.sleep() to make the caching benefit obvious.
Task: Cache the Product List View
Inspired by the video, let's implement this in your infilytics project.
-
Simulate a Slow Query: Open your
products/views.pyfile. To make the impact of caching obvious, let's add atime.sleep()in theProductViewSet. This simulates a slow database operation.# in products/views.py import time from rest_framework import viewsets # ... other imports class ProductViewSet(viewsets.ModelViewSet): queryset = Product.objects.all() serializer_class = ProductSerializer def get_queryset(self): # Simulate a slow database query time.sleep(2) return super().get_queryset() -
Run and Test (Before): Start your server (
python manage.py runserver). Navigate tohttp://127.0.0.1:8000/api/products/. Notice it takes 2 seconds to load. Refresh the page. It takes another 2 seconds. Every request is slow. -
Apply the
@cache_pageDecorator: Now, let's add the cache. Django's@cache_pagedecorator is the easiest way to implement per-view caching. We'll apply it to thedispatchmethod of our class-based view.# in products/views.py import time from django.utils.decorators import method_decorator from django.views.decorators.cache import cache_page from rest_framework import viewsets # ... other imports @method_decorator(name='dispatch', decorator=cache_page(60 * 15)) # Cache for 15 mins class ProductViewSet(viewsets.ModelViewSet): # ... (rest of the class is the same) queryset = Product.objects.all() serializer_class = ProductSerializer def get_queryset(self): # Simulate a slow database query time.sleep(2) return super().get_queryset()Note: We are applying the decorator to the
dispatchmethod because it's the entry point for all requests to thisViewSet. -
Run and Test (After): Restart your server. Navigate to
http://127.0.0.1:8000/api/products/again.- The first request will take 2 seconds. This is a cache miss. DRF is running your view, hitting the
time.sleep(), generating the response, and storing it in Redis. - Refresh the page. It loads instantly! This is a cache hit. Django intercepted the request, found a cached version for this URL in Redis, and returned it immediately, never even calling your
get_querysetmethod.
- The first request will take 2 seconds. This is a cache miss. DRF is running your view, hitting the
You have just implemented caching and witnessed the dramatic performance improvement firsthand.
4. Cache Invalidation: Keeping Data Fresh
We have a fast API, but we also have a new problem: what if a product's name is updated, or a new product is added? The cache is now stale, serving old data for the next 15 minutes. This is unacceptable.
The solution is cache invalidation: we must programmatically delete the relevant cache entries whenever the underlying data changes. Django signals are perfect for this.
The BugBytes video you watched earlier demonstrates exactly how to solve this.
Caching with Redis and Django!
Now, let's focus on the crucial part of making our cache correct: invalidation.
Watch this final segment of the video, which explains how to use post_save and post_delete signals to clear the cache whenever a product is created, updated, or deleted. Pay close attention to the use of cache.delete_pattern. Cache Invalidation with Signals
Task: Implement Cache Invalidation
-
Create
signals.py: In yourproductsapp directory, create a new filesignals.py. -
Define the Signal Handler: Add the code to listen for
post_saveandpost_deleteon theProductmodel and clear the cache.# in products/signals.py from django.core.cache import cache from django.db.models.signals import post_save, post_delete from django.dispatch import receiver from .models import Product @receiver([post_save, post_delete], sender=Product) def invalidate_product_cache(sender, instance, **kwargs): """ Invalidates the cache for the product list view when a product is created, updated, or deleted. """ # The pattern needs to match how django-redis constructs keys. # It's usually: <prefix>:1:views.decorators.cache.cache_page.* # Our KEY_PREFIX is 'infilytics'. We'll clear anything related to views caching. # A more specific pattern could be used if needed. cache.delete_pattern("infilytics:1:views.decorators.cache.cache_page.*") print(f"Cache invalidated for products.")The
cache.delete_patternfunction is a powerful feature fromdjango-redis. It deletes all keys that match a certain pattern. This is essential because@cache_pagecreates keys that include URL query parameters, so a simplecache.delete('key')wouldn't be enough to clear all variations (e.g., paginated pages). -
Register the Signals: Open
products/apps.pyand register your signals in theready()method.# in products/apps.py from django.apps import AppConfig class ProductsConfig(AppConfig): default_auto_field = 'django.db.models.BigAutoField' name = 'products' def ready(self): import products.signals -
Test Invalidation:
- Restart your server and load
http://127.0.0.1:8000/api/products/. The first load is slow (2s), subsequent loads are fast. - Now, go to your Django admin
http://127.0.0.1:8000/admin/, log in, and add a new product or change an existing one. - Go back to the product list API and refresh. The page now takes 2 seconds to load again! Your signal handler worked, invalidated the cache, and forced the view to re-fetch from the database. The next refresh will be fast again, with the fresh data.
- Restart your server and load
5. Advanced: Per-User Caching
Caching public data is relatively simple. Caching data that is specific to a user, like their order history, is more complex and dangerous if done incorrectly.
The Problem: Imagine you cache the /api/orders/ endpoint. User A requests their orders, the response is cached. Then User B requests their orders. If the cache key is just based on the URL, the cache will incorrectly serve User B the cached response belonging to User A. This is a critical data leak.
The Solution: We need to tell the cache to create different versions of the cached page based on a request header, specifically the Authorization header that contains the user's token. The vary_on_headers decorator is designed for this.
Django & Redis - Vary Headers to Control Caching Behavior
This next video from BugBytes explains this problem and demonstrates the solution beautifully.
Please watch these segments carefully: The problem with caching user-specific data: This demonstrates the data leak scenario. Introducing vary_on_headers: Shows the decorator that solves the problem. Demonstrating the correct behavior: Confirms that different users now get their own correct, cached data.
Task: Implement Per-User Caching on Orders
Assuming you have an OrderViewSet for an Order model linked to a user, you can apply this pattern.
# in an orders/views.py for example


# ... imports
from django.utils.decorators import method_decorator
from django.views.decorators.cache import cache_page
from django.views.decorators.vary import vary_on_headers


# ...

@method_decorator(name='dispatch', decorator=cache_page(60 * 15))
@method_decorator(name='dispatch', decorator=vary_on_headers('Authorization'))
class OrderViewSet(viewsets.ModelViewSet):
    serializer_class = OrderSerializer
    permission_classes = [IsAuthenticated]

    def get_queryset(self):


        # Return orders only for the current user
        return Order.objects.filter(user=self.request.user)
By adding @vary_on_headers('Authorization'), you instruct Django's caching system to consider the content of the Authorization header when creating the cache key. This ensures that every unique user (with their unique token) gets their own separate cache entry, preventing data leaks while still providing a significant performance boost.
Conclusion
In this lesson, you've taken a massive step towards building a truly scalable application. You've gone beyond just making your code work; you've made it performant.
Here are the key takeaways:
- Caching is essential for scalability, reducing database load and dramatically improving response times.
- Redis is an excellent choice for a cache backend due to its speed as an in-memory key-value store.
- Per-view caching using
@cache_pageis a powerful and easy way to cache public API endpoints. - Cache invalidation is not optional; you must have a strategy (like using signals) to clear stale data and ensure correctness.
- Per-user caching requires extra care. Use
vary_on_headers('Authorization')to prevent dangerous data leaks when caching user-specific content.
You have made your application both faster and more efficient. However, as our system grows more complex with load balancers, multiple instances, and caches, how do we keep track of what's happening inside? In the next lesson, we will address this by setting up centralized logging with AWS CloudWatch, moving from performance to observability—another critical pillar of production-ready systems.