Welcome back. In our previous lesson, you implemented robust caching strategies with Redis, a critical step for improving your application's speed and scalability. By reducing database load, you've made your system more efficient. Now, we'll shift our focus from performance to observability—another pillar of production-grade software.
This lesson is dedicated to setting up centralized logging for your Django application using AWS CloudWatch. When your application is running inside ephemeral Docker containers, especially across multiple services like a web server and a background worker, understanding what's happening becomes a major challenge. Centralized logging solves this by collecting all log streams into a single, searchable location. This directly supports the Infilect job description's requirement for engineers who are "comfortable with...deployment and monitoring" and have "experience with public cloud services like AWS."
By the end of this lesson, you will be able to configure your containerized Django application to send all its logs to AWS CloudWatch, allowing you to monitor, search, and analyze application behavior in a production environment.
1. The Need for Centralized Logging
In a simple, single-server setup, you might check logs by connecting to the machine and running a command like tail -f /var/log/app.log. This approach breaks down completely in a modern, containerized architecture.
- Ephemeral Containers: Docker containers are designed to be disposable. If a container crashes or is replaced during a deployment, its local logs are lost forever.
- Distributed Services: Your system consists of multiple services (e.g., the Django
apiservice, thecelery_workerservice). To debug a request that involves multiple services, you would need to find and piece together logs from several different containers, which is nearly impossible.
Centralized logging solves this by creating a single "source of truth." All services stream their logs to a dedicated log management service. For our AWS-based deployment, the natural choice is AWS CloudWatch Logs.
The architecture we will implement is simple and powerful: the Django application writes its logs to the standard output (stdout). The Docker daemon on the EC2 host captures this output and, using a special logging driver, forwards it directly to CloudWatch.
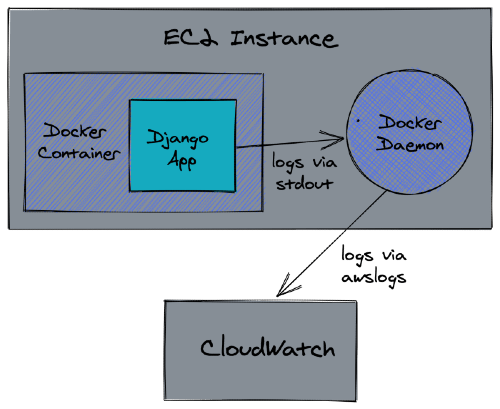
2. The Cloud-Native Approach: Docker's awslogs Driver
The cleanest and most robust way to integrate our containerized application with CloudWatch is by using Docker's built-in awslogs logging driver. This method is ideal because it requires zero changes to our application code to make it "CloudWatch-aware." The application simply logs to the console, and the underlying infrastructure (Docker and EC2) handles the routing.
The following article from TestDriven.io provides an excellent step-by-step guide for this exact process. We will follow its main steps to configure our system.
Centralized Logging with Django, Docker, and CloudWatch
This article provides a concise and practical walkthrough for integrating a containerized Django application with AWS CloudWatch using the awslogs driver. It covers all the necessary AWS and Docker configuration.
Please read through the following sections to understand the end-to-end setup. We will implement these steps in our task. IAM Role Creation: First, read the section Create IAM Role. This is the most critical step for security. It explains how to create an IAM role that grants the EC2 instance permission to write to CloudWatch, avoiding the need for hardcoded access keys. Attaching the Role: Next, review Attach IAM Role. This shows how to associate the role you just created with your EC2 instance. CloudWatch Setup: Read the brief section on creating a log group. This is the destination where our logs will be stored. Django Configuration: Focus on the Django Logging configuration. This LOGGING dictionary in settings.py is essential. It tells Django to stop writing to files and instead direct all log output to the console (stderr), where Docker can capture it. Docker Compose Update: Finally, study the Update Docker Compose section. This shows how to modify your docker-compose.yml file to instruct your services to use the awslogs driver and specify the correct region and log group.
Let's summarize the key steps from the article.
Step 1: Grant Permissions with an IAM Role
Instead of placing AWS access keys in your code or environment variables, the best practice is to assign an IAM Role to the EC2 instance itself. This role grants the instance (and the Docker daemon running on it) temporary credentials to access other AWS services.
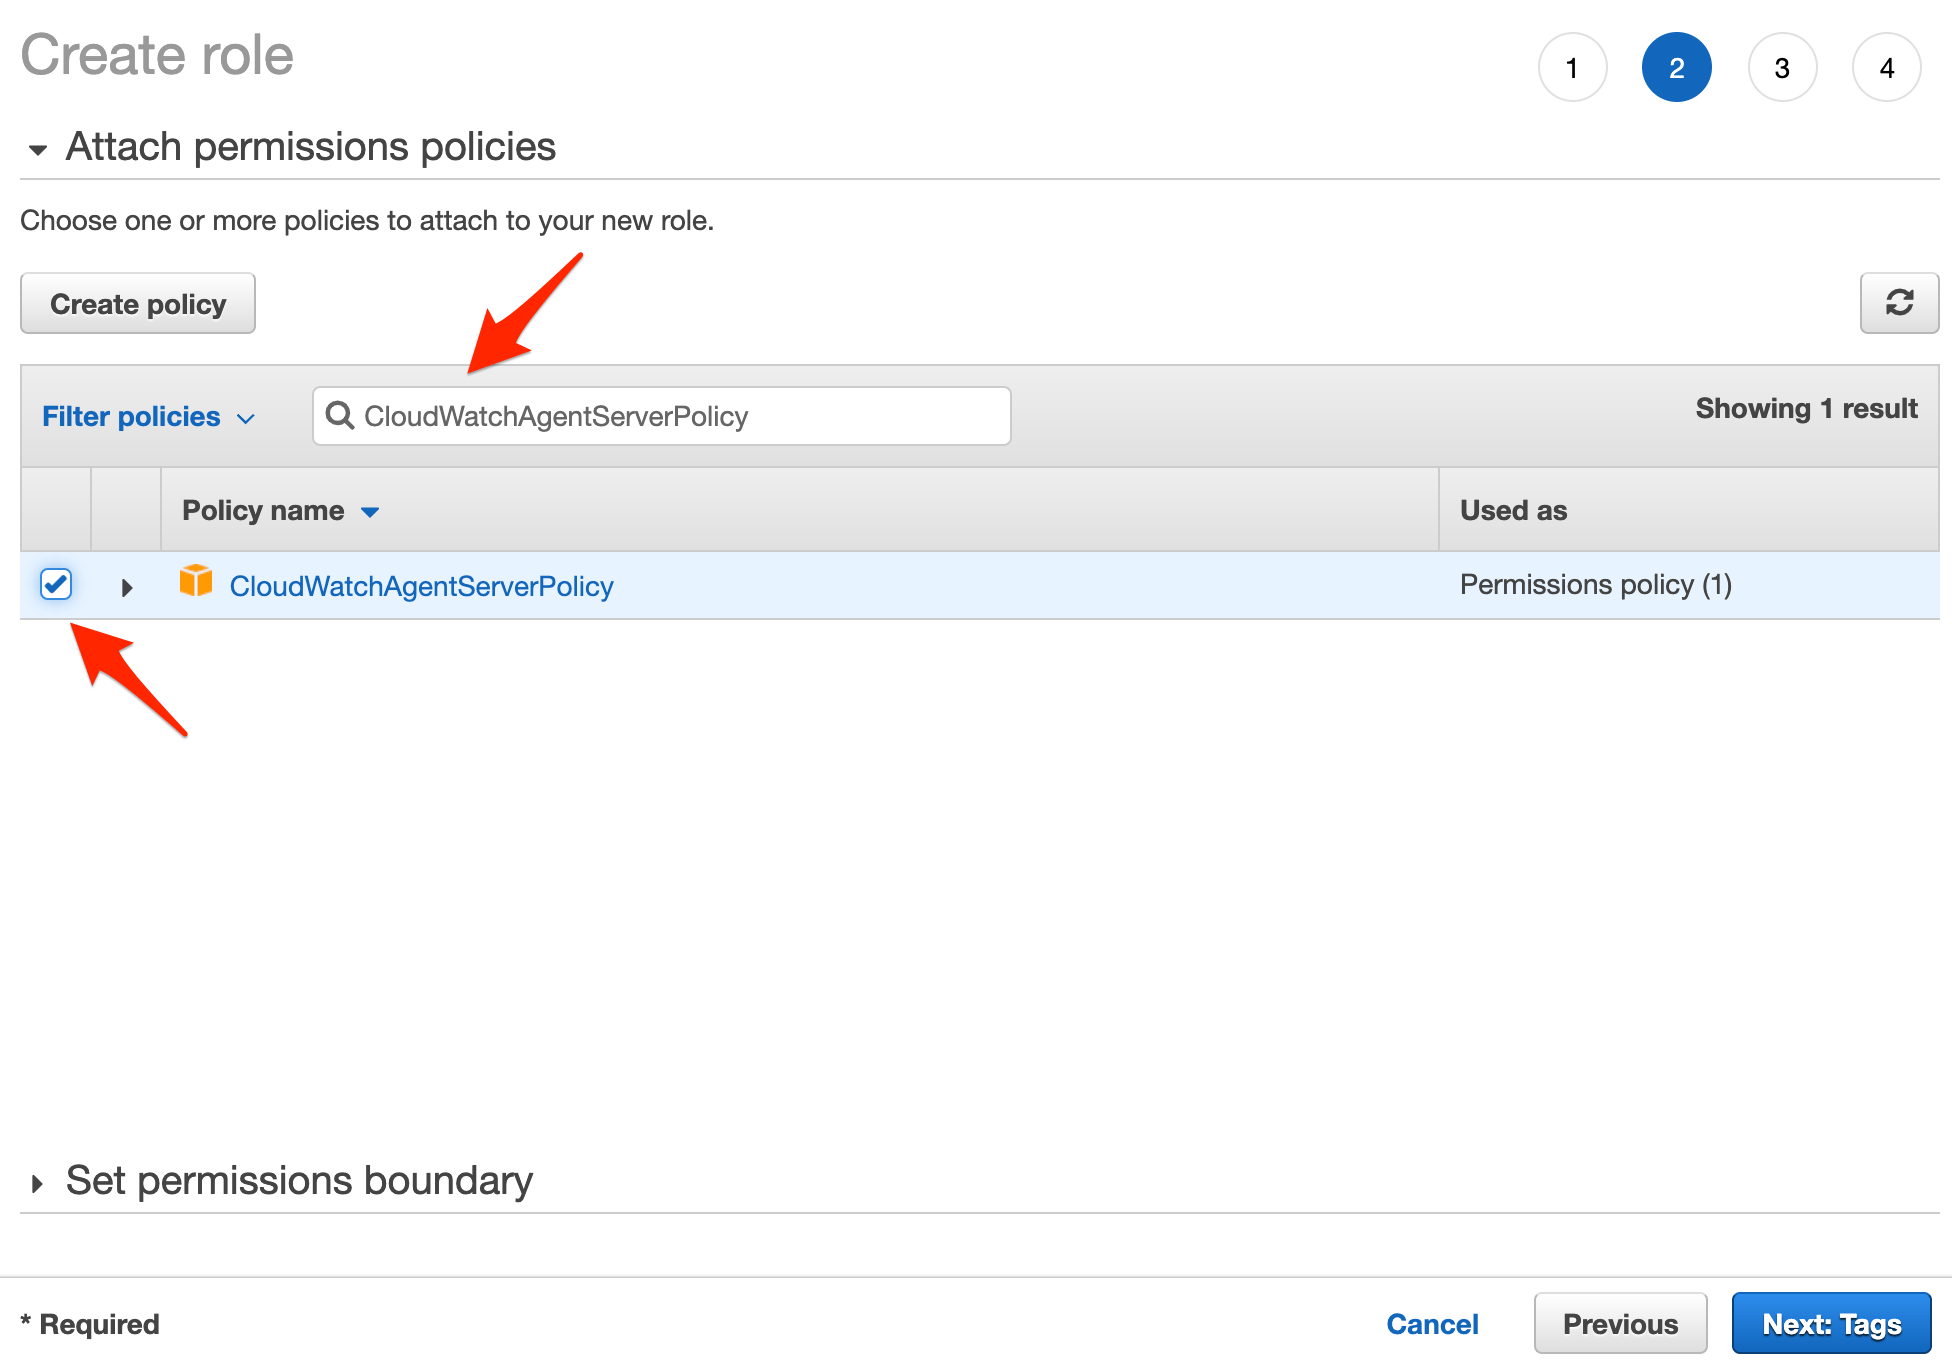
You will create a role and attach the AWS-managed policy named CloudWatchAgentServerPolicy. This policy contains the necessary permissions (like logs:CreateLogStream and logs:PutLogEvents) for sending logs to CloudWatch.
Step 2: Configure Django to Log to the Console
For the Docker awslogs driver to work, your Django application must send its logs to standard output (stdout) or standard error (stderr). We can configure this in infilytics/settings.py. The configuration from the article is a great starting point.
# in infilytics/settings.py

LOGGING = {
    'version': 1,
    'disable_existing_loggers': False,
    'handlers': {
        'console': {
            'class': 'logging.StreamHandler'  # Sends logs to stderr
        },
    },
    'loggers': {
        '': {  # This is the 'root' logger
            'handlers': ['console'],
            'level': 'INFO',  # Log INFO level and above (INFO, WARNING, ERROR, CRITICAL)
        },
    },
}
This configuration ensures that any log message with a level of INFO or higher, from anywhere in your Django project, will be printed to the console.
Step 3: Update docker-compose.yml
This is the final piece of the puzzle. You'll add a logging section to each service in your docker-compose.yml file that you want to send logs from.
# in docker-compose.yml

services:
  api:


    # ... other service config ...
    logging:
      driver: "awslogs"
      options:
        awslogs-region: "ap-south-1"         # Your AWS region
        awslogs-group: "/infilytics/api"     # The log group you created
        awslogs-stream-prefix: "api"         # Helps identify logs from this service

  celery_worker:


    # ... other service config ...
    logging:
      driver: "awslogs"
      options:
        awslogs-region: "ap-south-1"
        awslogs-group: "/infilytics/celery" # A separate group for workers
        awslogs-stream-prefix: "worker"
With this, when you run docker-compose up, Docker will automatically route the console output of the api and celery_worker containers to the specified CloudWatch log groups.
3. An Alternative: Application-Level Logging with Watchtower
While the awslogs driver is recommended for our setup, it's valuable to know about another approach: application-level logging. Libraries like Watchtower integrate directly with Python's logging module to send logs to CloudWatch from within the application code.
This method is configured entirely within Django and doesn't depend on the Docker daemon's logging driver.
This post describes how to get Django log messages into Cloudwatch.
This Medium article by Jordan Haines demonstrates the Watchtower approach. It's a good way to deepen your understanding of Django's logging system, even if we don't use this method for our primary task.
First, skim the section on configuring Django logging with Watchtower. Notice how much more complex the LOGGING dictionary becomes. You need to install boto3 and watchtower, and then define a new handler that points to the library. Next, read the fantastic overview titled An aside on Django Logging. This section clearly explains the roles of the four key components: Loggers, Handlers, Filters, and Formatters. Understanding this hierarchy is key to mastering logging in any complex Python application.
The Watchtower approach gives you more granular control within the application but couples your code to AWS. For our use case, letting the infrastructure handle log shipping via the awslogs driver is a cleaner separation of concerns.
4. Hands-On Task: Implement Centralized Logging
It's time to put theory into practice. You will now configure your infilytics project to send its logs to AWS CloudWatch.
Your Goal: Make it so that any log message from your running Django and Celery containers appears automatically in the CloudWatch console.
Instructions:
-
Create and Attach IAM Role:
- Go to the AWS IAM console. Create a new Role.
- Select "AWS service" as the trusted entity and "EC2" as the use case.
- On the permissions page, search for and attach the
CloudWatchAgentServerPolicy. - Give the role a name, like
InfilyticsEC2LogRole, and create it. - Navigate to your EC2 instance in the AWS console, select "Actions" -> "Security" -> "Modify IAM role", and attach the
InfilyticsEC2LogRoleyou just created.
-
Create CloudWatch Log Groups:
- Go to the AWS CloudWatch console. In the navigation pane, choose "Log groups".
- Create a log group named
/infilytics/api. - Create another log group named
/infilytics/celery. Using a forward slash/helps organize them into a folder-like structure in the UI.
-
Configure Django's
LOGGINGSetting:- Open your
infilytics/settings.pyfile. - Add the
LOGGINGdictionary shown in Step 2 of this lesson to configure console logging. Set the level toINFO.
- Open your
-
Update
docker-compose.prod.yml:- Open your production docker-compose file.
- For both the
apiandcelery_workerservices, add theloggingconfiguration block as shown in the example in Step 2. - Make sure to replace
"ap-south-1"with your actual AWS region. - Point the
apiservice to the/infilytics/apilog group and thecelery_workerservice to the/infilytics/celerygroup.
-
Deploy and Verify:
- Commit your changes to Git and push them.
- SSH into your EC2 instance and pull the latest changes.
- Re-build and restart your services:
docker-compose -f docker-compose.prod.yml up -d --build. - Make a few requests to your API endpoints.
- Go back to the CloudWatch console and navigate to your log groups. You should see new log streams containing the output from your containers, including Django's request logs and any output from your Celery workers! Try searching your logs for a specific URL or error message.
Conclusion
Congratulations! You have successfully implemented centralized logging, a cornerstone of any production-ready monitoring strategy. Your application is no longer a "black box" once deployed; you now have the visibility needed to debug issues, monitor activity, and understand system behavior at scale.
Here are the key takeaways from this lesson:
- Centralized logging is essential for containerized and distributed systems, and AWS CloudWatch is the go-to service for this on AWS.
- The Docker
awslogsdriver provides a clean, infrastructure-level solution that keeps your application code decoupled from the logging provider. - Using IAM Roles for permissions is the secure and standard way to grant AWS resources access to each other.
- A correctly configured Django
LOGGINGdictionary that writes to the console (StreamHandler) is the necessary prerequisite for Docker-based log shipping.
Now that you are collecting logs, the next logical step is to use them. In our next and final lesson of this module, we will leverage CloudWatch to build a monitoring dashboard and create alarms that can automatically notify you when things go wrong, such as a spike in server errors or high CPU usage. This moves us from passive observation to proactive monitoring.