Welcome back! In our last session, you masterfully transitioned from abstract business requirements to a concrete database blueprint—a normalized Entity-Relationship Diagram (ERD). You now have a logical, structured plan for the data in our retail analytics system.
This lesson is where the blueprint becomes reality. We will translate that ERD directly into Python code using Django Models. This process is the heart of Django's Object-Relational Mapper (ORM), a powerful abstraction that lets you interact with your database using Python objects instead of raw SQL. Mastering this is a foundational skill for any backend engineer and directly supports the job description's demand for "extensive experience in Django/Python/backend stack."
By the end of this lesson, you will be able to:
- Explain the role of Django's ORM in mapping Python classes to database tables.
- Implement one-to-many relationships using
models.ForeignKey. - Implement many-to-many relationships using
models.ManyToManyField. - Create explicit junction tables with extra data using the
throughoption. - Generate and apply database migrations to build your schema.
1. The ORM: Bridging Code and Data
At its core, an Object-Relational Mapper (ORM) is a bridge. It translates the object-oriented world of your application (Python classes) into the relational world of your database (SQL tables). The ERD you designed in the last lesson represents the relational side. Django Models, which are Python classes, represent the object-oriented side. The ORM connects them.
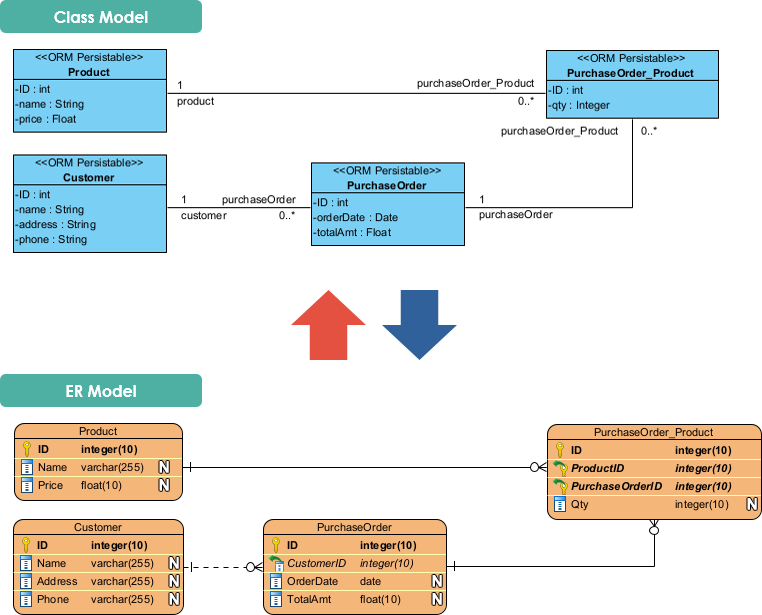
Let's begin by understanding the basic structure of a Django model.
Django Tutorial Part 3: Using models - Learn web development
The Mozilla Developer Network (MDN) provides an excellent, thorough introduction to Django Models. It covers the core concepts of defining models, fields, and metadata.
Please read the following sections: The Overview, which explains what models are. Designing models and the Model primer, which covers the process of thinking about models and the basic syntax of defining a model class, its fields, and its metadata. Focus on understanding how a class becomes a model and the purpose of different field types.
2. Translating the ERD into models.py
Now, let's get practical. We will create the models.py file for an app in our project, which we can call retail. We'll take the entities from our ERD one by one and convert them into Django model classes.
Recall our ERD entities: Category, Product, Store, Sale, SaleItem, ShelfImage, and ImageAnnotation.
One-to-Many Relationships with ForeignKey
Let's start with the simplest relationships. In our ERD, a Product belongs to one Category, and a Category can have many Products. This is a classic one-to-many relationship.
In Django, we implement this using models.ForeignKey. The ForeignKey field is always placed on the "many" side of the relationship. So, our Product model will have a ForeignKey to the Category model.
This video gives a clear demonstration of setting up these relationships.
Database Relationships | One To Many & Many to Many | Django (3.0) Crash Course Tutorials (pt 6)
Dennis Ivy's crash course provides a very practical walkthrough of creating database relationships in Django.
Watch the segment from creating a one-to-many relationship. Pay close attention to how he adds the models.ForeignKey field and the explanation of the on_delete parameter. This is a crucial concept for data integrity.
Here's how we'd write the code for our Category and Product models, implementing that ForeignKey relationship.
# retail/models.py

from django.db import models

class Category(models.Model):
    name = models.CharField(max_length=100, unique=True)

    def __str__(self):
        return self.name

class Product(models.Model):
    name = models.CharField(max_length=200)
    description = models.TextField(blank=True)
    standard_price = models.DecimalField(max_digits=10, decimal_places=2)
    category = models.ForeignKey(Category, on_delete=models.PROTECT)

    def __str__(self):
        return self.name
Notice the on_delete=models.PROTECT. This tells Django to prevent the deletion of a Category if any Product is still linked to it. This is a good choice for data integrity, as it prevents us from orphaning products. Other options include CASCADE (deleting the category would also delete all its products) and SET_NULL (the product's category field would be set to NULL).
We would apply the same logic for our other one-to-many relationships:
- A
ShelfImagewill have aForeignKeytoStore. - A
Salewill have aForeignKeytoStore.
Many-to-Many Relationships and Junction Tables
Now for the more complex relationships. Our ERD identified two many-to-many relationships that required junction tables because we needed to store extra information about the relationship itself:
- Sales and Products: A
Salecan have manyProducts, and aProductcan be in manySales. TheSaleItemjunction table stores thequantityandprice_at_time_of_salefor each specific product in a specific sale. - Images and Products: An
Imagecan contain manyProducts, and aProductcan appear in manyImages. TheImageAnnotationjunction table stores thebounding_boxcoordinates for each product identified in an image.
When you have a many-to-many relationship that needs extra data, you must create a Django model for the junction table itself and use the through argument in a ManyToManyField.
This is a critical concept, and the following video explains it exceptionally well.
Django ManyToManyFields and Through-Models for many-to-many relationships
This BugBytes tutorial is a deep dive into Django's many-to-many relationships and is perfect for our use case.
Please watch the following key segments: Introduction to M2M: A quick refresher on what many-to-many relationships are. Implicit Junction Tables: See how Django automatically creates a junction table when you use a simple ManyToManyField. This is what happens when you don't need extra data. Introducing 'Through' Models: This is the most important part for us. It explains exactly why and how to create your own model for the junction table to store extra data. Creating Associations with 'Through' Models: See how to work with these custom junction tables, including adding the extra data when you create a relationship.
3. Assembling the Complete models.py
Armed with this knowledge, we can now write the complete models.py file for our retail app. This code is the direct translation of the ERD we designed in the previous lesson.
# retail/models.py

from django.db import models
import uuid


# --- Core Entities ---

class Category(models.Model):
    """e.g., 'Beverages', 'Snacks', 'Dairy'"""
    name = models.CharField(max_length=100, unique=True)

    class Meta:
        verbose_name_plural = "Categories"

    def __str__(self):
        return self.name

class Store(models.Model):
    """A physical retail location."""
    name = models.CharField(max_length=100)
    location = models.CharField(max_length=255)

    def __str__(self):
        return self.name

class Product(models.Model):
    """A specific product that the company sells."""
    name = models.CharField(max_length=200)
    description = models.TextField(blank=True, null=True)
    standard_price = models.DecimalField(max_digits=10, decimal_places=2)
    category = models.ForeignKey(Category, related_name='products', on_delete=models.PROTECT)


    # M2M relationship to ShelfImage, with extra data in ImageAnnotation
    shelf_images = models.ManyToManyField('ShelfImage', through='ImageAnnotation', related_name='products')


    # M2M relationship to Sale, with extra data in SaleItem
    sales = models.ManyToManyField('Sale', through='SaleItem', related_name='products')

    def __str__(self):
        return self.name

class Sale(models.Model):
    """A single sales transaction at a store."""
    id = models.UUIDField(primary_key=True, default=uuid.uuid4, editable=False)
    store = models.ForeignKey(Store, related_name='sales', on_delete=models.CASCADE)
    sale_timestamp = models.DateTimeField(auto_now_add=True)

    def __str__(self):
        return f"Sale {self.id} at {self.store.name}"

class ShelfImage(models.Model):
    """An image of a shelf taken at a specific store."""
    id = models.UUIDField(primary_key=True, default=uuid.uuid4, editable=False)
    store = models.ForeignKey(Store, related_name='shelf_images', on_delete=models.CASCADE)
    image_url = models.URLField()
    capture_timestamp = models.DateTimeField()

    def __str__(self):
        return f"Image {self.id} from {self.store.name}"


# --- Junction Models ('through' models for M2M relationships) ---

class SaleItem(models.Model):
    """
    Junction table between Sale and Product.
    Stores details for one line item in a sale.
    """
    sale = models.ForeignKey(Sale, on_delete=models.CASCADE)
    product = models.ForeignKey(Product, on_delete=models.PROTECT)
    quantity = models.PositiveIntegerField(default=1)
    price_at_time_of_sale = models.DecimalField(max_digits=10, decimal_places=2)

    class Meta:
        unique_together = ('sale', 'product') # A product can only appear once per sale

    def __str__(self):
        return f"{self.quantity}x {self.product.name} in Sale {self.sale.id}"

class ImageAnnotation(models.Model):
    """
    Junction table between ShelfImage and Product.
    Stores the location of a detected product in an image.
    """
    image = models.ForeignKey(ShelfImage, on_delete=models.CASCADE)
    product = models.ForeignKey(Product, on_delete=models.CASCADE)


    # Storing bounding box as a simple JSON field for flexibility
    bounding_box = models.JSONField(help_text="Coordinates of the product in the image, e.g., {'x1': 100, 'y1': 120, 'x2': 150, 'y2': 180}")

    class Meta:
        unique_together = ('image', 'product')

    def __str__(self):
        return f"{self.product.name} found in Image {self.image.id}"
4. Activating the Schema: Migrations
We've written the Python code, but how does the database learn about this new structure? The answer is migrations. Migrations are Django's way of propagating changes you make to your models (like adding a field, deleting a model, etc.) into your database schema. Think of it as version control for your database.
The process has two main steps:
makemigrations: This command scans your models for changes and creates new migration files—Python scripts that describe the changes.migrate: This command applies the pending migration files to the database, altering the tables, columns, and constraints to match your models.
Django Tutorial Part 3: Using models - Learn web development
Let's refer back to the MDN tutorial for the final step.
Read the short section Re-run the database migrations. It shows the exact commands you need to run to apply your new models to the database.
Go to your terminal, navigate to your project directory (where manage.py is), and run these commands:
python manage.py makemigrations retail
python manage.py migrate
After running these commands, Django will have created a set of tables in your database that perfectly match the models you just defined. You have successfully turned your ERD blueprint into a functioning database schema!
As a final piece of inspiration, take a look at this complex ERD for a full e-learning platform.

Conclusion
In this lesson, you took a significant step from being a designer to a builder. You translated a conceptual data model into a concrete, working database schema using the power of the Django ORM. This is a fundamental workflow in backend development.
Key Takeaways:
- Django Models are Python classes that map to database tables.
- The
models.ForeignKeyfield implements a one-to-many relationship. Theon_deleteargument is critical for maintaining data integrity. - The
models.ManyToManyFieldfield is used for many-to-many relationships. - When a many-to-many relationship needs to store extra data, you must define the junction table as its own model and connect it using the
throughargument. - Migrations (
makemigrationsandmigrate) are the mechanism for applying your model definitions to the database schema.
In our next lesson, we will focus on performance. A well-designed schema is only half the battle; it must also be fast. We will explore how to create and apply database indexes to our Django models to accelerate query performance, ensuring our retail analytics system can handle data efficiently.