Hello! Welcome back to our course.
In our last lesson, we built a crucial skill for any backend developer: writing resilient code using try-except blocks. We learned how to anticipate and handle errors gracefully. However, just catching an error is not enough. In a production system like Infilect's, running on servers you can't physically watch, you need a way to record what's happening—successes, failures, and everything in between. This is where logging comes in.
This lesson directly addresses that need. We'll explore Python's built-in logging module, which is the industry standard for tracking application events and errors. You'll learn how to move beyond simple print() statements to a structured, configurable logging system. This is a fundamental skill that directly supports the "deployment and monitoring" requirements of your target role. We will start with the basics and progressively build up to the professional, multi-part configuration used in complex applications.
1. From print() to Basic Logging
At its simplest, logging can seem like a glorified print() statement. However, it offers far more power and control, which is essential for a backend system. With print(), you have no control over the message's importance, no automatic timestamp, and no easy way to turn messages on or off. Logging solves all these problems.
The logging module provides five standard levels of severity, allowing you to categorize your messages:
- DEBUG: Detailed information, typically of interest only when diagnosing problems.
- INFO: Confirmation that things are working as expected.
- WARNING: An indication that something unexpected happened, but the software is still working as expected.
- ERROR: Due to a more serious problem, the software has not been able to perform some function.
- CRITICAL: A very serious error, indicating that the program itself may be unable to continue running.
By default, Python's logger will only show messages of WARNING level and above. To see everything, we need to configure it.
Corey Schafer's video provides an excellent introduction to these basic concepts. You'll see how to set the logging level, redirect logs to a file, and customize the message format.
Python Tutorial: Logging Basics - Logging to Files, Setting Levels, and Formatting
This video covers the fundamentals of the logging module, from levels to file output and formatting.
Please watch the following segments to get a solid foundation: Logging Levels: Understand the five standard levels and see why DEBUG and INFO messages don't appear by default. Changing the Level: Learn how to use logging.basicConfig(level=logging.DEBUG) to enable lower-level messages. Logging to a File: See how to add the filename argument to basicConfig to save logs persistently, a crucial feature for server applications. Customizing the Format: Learn to use the format argument to add valuable context like timestamps (asctime), log levels (levelname), and the message itself.
Let's consolidate what you've just seen. The logging.basicConfig() function is a quick way to set up logging for a simple script. Here is a configuration that includes all the key elements:
import logging

logging.basicConfig(
    level=logging.DEBUG,
    filename='app.log',
    filemode='w', # 'w' for write (overwrite), 'a' for append
    format='%(asctime)s - %(levelname)s - %(message)s'
)

logging.debug("This is a debug message.")
logging.info("Application is running smoothly.")
logging.warning("The disk is 90% full.")
logging.error("Failed to connect to the database.")
logging.critical("Catastrophic failure. Shutting down.")
If you run this code, it won't print anything to the console. Instead, it will create a file named app.log with formatted, timestamped entries for all the messages.
2. Logging Exceptions
This is where logging connects directly with our previous lesson. When you catch an exception in a try...except block, you should almost always log it. This provides a permanent record of the failure, complete with the context of what went wrong.
The logging module makes this extremely easy. When you're inside an except block, you can use logging.exception() or pass exc_info=True to another logging function.
The Real Python article has a concise section on how to properly capture and log stack traces.
Find the section titled "Capturing Stack Traces". Pay close attention to the two ways of logging an exception: using logging.error("...", exc_info=True) and the more convenient shortcut, logging.exception("...").
Here's an example that combines our knowledge from the last lesson with today's topic:
import logging


# Basic configuration
logging.basicConfig(level=logging.INFO, format='%(asctime)s - %(name)s - %(levelname)s - %(message)s')

def divide(x, y):
    try:
        result = x / y
        logging.info(f"Division successful: {x}/{y} = {result}")
        return result
    except ZeroDivisionError:


        # logging.exception() automatically logs at ERROR level and includes the stack trace.
        logging.exception("Attempted to divide by zero.")
        return None

divide(10, 2)
divide(10, 0)
Running this script will produce the following output:
2023-10-27 10:30:00,123 - root - INFO - Division successful: 10/2 = 5.0
2023-10-27 10:30:00,124 - root - ERROR - Attempted to divide by zero.
Traceback (most recent call last):
  File "<stdin>", line 3, in divide
    result = x / y
ZeroDivisionError: division by zero
This is an incredibly powerful debugging tool. You get your custom message and the full technical traceback that led to the error.
3. The Professional Setup: Loggers, Handlers, and Formatters
While basicConfig() is great for single-file scripts, it has a major flaw: it configures the root logger. In a larger application with multiple modules (like a Django project), different parts of the code might try to configure the root logger, leading to unpredictable behavior where one module's settings overwrite another's.
The professional solution is to create named loggers for different parts of your application and configure them with specific Handlers and Formatters.
- Logger: The object you interact with in your code (
logger.info(),logger.error(), etc.). You get one usinglogging.getLogger(__name__). The__name__convention automatically gives the logger a name corresponding to the Python module it's in. - Handler: Determines where the log messages are sent. For example, a
StreamHandlersends logs to the console, and aFileHandlersends them to a file. A single logger can have multiple handlers. - Formatter: Controls the string format of the log messages. You can have different formatters for different handlers (e.g., a simple format for the console and a detailed one for the file).
This architecture gives you immense flexibility.

Corey Schafer's advanced logging video is the best resource to understand why this modular setup is necessary and how to implement it.
Python Tutorial: Logging Advanced - Loggers, Handlers, and Formatters
This video is a masterclass in setting up a robust, modular logging system.
This is a critical video to understand professional logging practices. Please watch these parts carefully: The Problem with the Root Logger: This demonstrates exactly why using basicConfig() in a multi-module project fails. Getting a Specific Logger: Learn how to create a named logger with logging.getLogger(__name__). Handlers and Formatters: This is the core of the lesson. See how to create a FileHandler, create a Formatter, and attach them to your new logger, completely bypassing basicConfig. Independent Module Logging: This shows the payoff—two separate modules, each with its own logger, own format, and own log file, working together without conflict. Handler-Specific Levels and Exception Logging: Learn how to set different log levels on different handlers (e.g., show everything on console, but only errors to a file). Adding Multiple Handlers: See how to add a StreamHandler to log to the console at the same time as a FileHandler logs to a file.
Logger and Handler Level Interaction
A key concept is the interaction between the logger's level and its handlers' levels.
- A message is first checked against the logger's level. If the message's severity is too low (e.g., a
DEBUGmessage on a logger set toINFO), it is discarded immediately. - If it passes the logger's check, the message is then passed to all of the logger's handlers.
- Each handler then checks the message against its own level. If the message is too low for a specific handler, that handler ignores it.
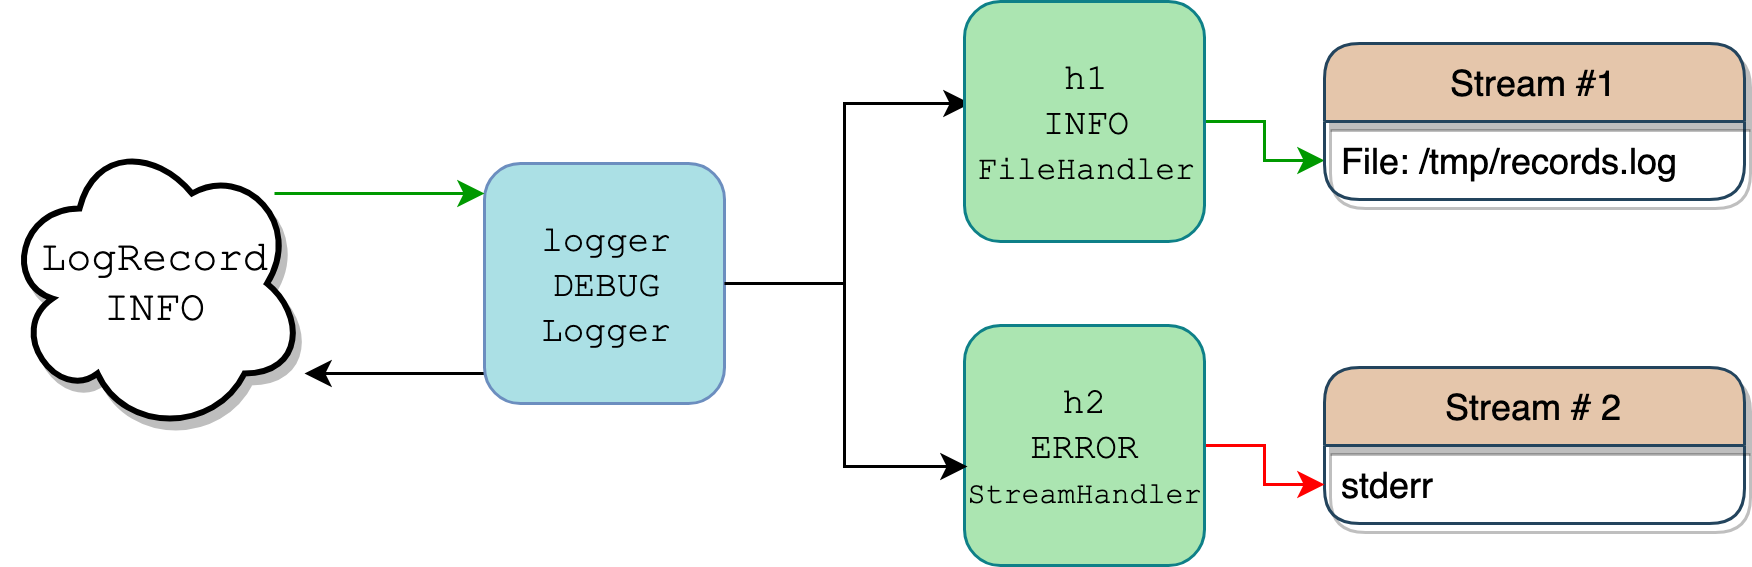
This hierarchy is powerful. A common pattern is to set the main logger's level very low (e.g., DEBUG) and then control what gets outputted by setting more restrictive levels on the handlers. For example:
- A
StreamHandler(console) set toINFOfor general progress messages during development. - A
FileHandlerset toWARNINGto create a production log file that only contains important issues.
Hands-On Task: Configure a Modular Logger
Now, let's practice this professional setup. Create a new Python file and implement the following:
- Get a logger for the current module using
logging.getLogger(__name__). - Set the logger's level to
logging.DEBUG. - Create a
StreamHandlerfor console output. Set its level tologging.INFO. - Create a
FileHandlerto write to a file namedapp_errors.log. Set its level tologging.ERROR. - Create a
Formatterwith the format%(asctime)s - %(name)s - %(levelname)s - %(message)s. - Set this formatter on both the
StreamHandlerand theFileHandler. - Add both handlers to your logger.
- Write five log messages, one for each level (
DEBUG,INFO,WARNING,ERROR,CRITICAL).
When you run your script, you should see the INFO, WARNING, ERROR, and CRITICAL messages on your console, but only the ERROR and CRITICAL messages should appear in the app_errors.log file.
Click here to see the solution.
import logging


# 1. Get a logger
# The __name__ variable will be '__main__' when this file is run directly.
logger = logging.getLogger(__name__)


# 2. Set logger's level to the lowest possible, to pass all messages to handlers.
logger.setLevel(logging.DEBUG)


# 3. Create a StreamHandler for console output
console_handler = logging.StreamHandler()


# Set its level to INFO to show general messages
console_handler.setLevel(logging.INFO)


# 4. Create a FileHandler for file output
file_handler = logging.FileHandler('app_errors.log')


# Set its level to ERROR to only log serious problems
file_handler.setLevel(logging.ERROR)


# 5. Create a Formatter
formatter = logging.Formatter('%(asctime)s - %(name)s - %(levelname)s - %(message)s')


# 6. Set the formatter for both handlers
console_handler.setFormatter(formatter)
file_handler.setFormatter(formatter)


# 7. Add both handlers to the logger
logger.addHandler(console_handler)
logger.addHandler(file_handler)


# 8. Log messages
logger.debug("This is a detailed debug message. It won't be seen on console or file.")
logger.info("The application started.") # Will appear on console
logger.warning("Configuration file is missing, using defaults.") # Will appear on console
logger.error("Could not establish a connection to the database.") # Will appear on console AND file
logger.critical("The entire system is on fire.") # Will appear on console AND file
Conclusion
You've now covered one of the most practical and essential skills for a backend developer. Effective logging transforms your application from a black box into a transparent system that tells you exactly what it's doing.
Key Takeaways:
- Logging over
print(): Provides levels, formatting, timestamps, and destination control. basicConfig(): Quick and easy for simple scripts but problematic for larger projects.- Professional Structure: Use named loggers (
getLogger), Handlers (destinations), and Formatters (layouts) for modular, conflict-free logging. - Hierarchical Levels: The logger acts as a primary filter, and each handler can apply a secondary, more specific filter.
- Log Exceptions: Always use
logging.exception()within anexceptblock to capture the full error context.
This skill will be indispensable as we move forward. In our next lesson, we will begin our journey into automated testing with pytest. You'll see that logging can even be a valuable tool in testing, allowing you to assert that certain events were logged as expected during a test run.