Welcome back! In our previous lesson, we established a robust logging system, which is vital for understanding what your application is doing in a live environment. Logging is about observing behavior after the fact. Today, we shift our focus from observation to prevention. We will learn how to write automated tests to ensure our code behaves correctly before it ever reaches production.
This lesson introduces pytest, the de facto standard testing framework in the Python ecosystem. You will learn to write unit tests for both simple functions and more complex classes. Mastering testing is a non-negotiable skill for a professional backend engineer, as it is the foundation for building reliable and scalable applications—a key requirement for the role at Infilect. By writing tests, you create a safety net that allows you to refactor code and add new features with confidence.
1. Why Test? The Pytest Philosophy
Before writing code, let's understand the "why." Automated tests verify that your code works as you expect. When you make changes, you can run your tests to instantly see if you've broken anything. This is far more efficient and reliable than manual testing.
pytest makes this process straightforward and powerful. Some of its key advantages, which you'll appreciate as you build more complex systems, are:
- Simple Syntax: It uses Python's built-in
assertstatement, making tests clean and easy to read. You don't need to learn special methods likeself.assertEqual(). - Test Autodiscovery: It automatically finds your test files and functions as long as you follow a simple naming convention.
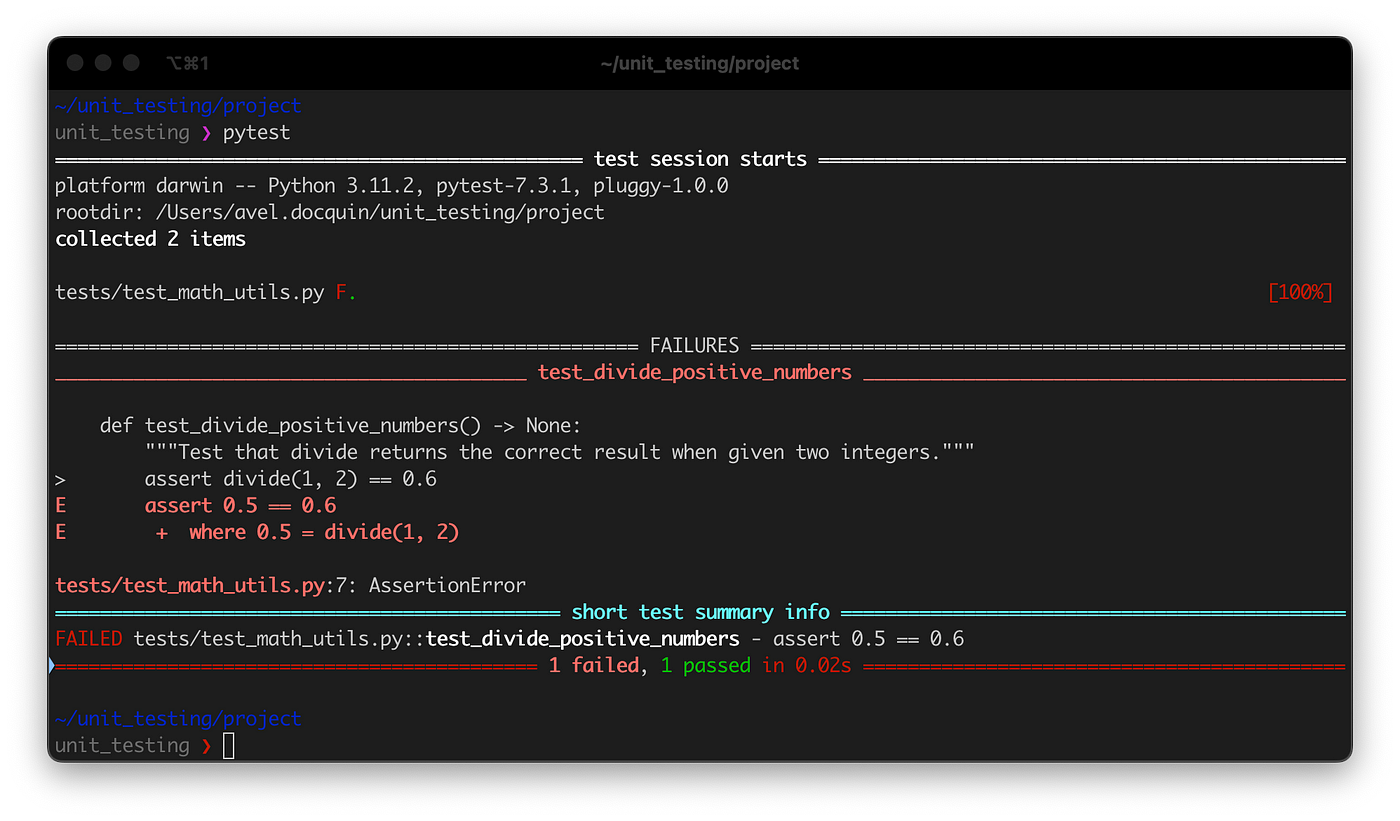
- Rich Failure Reports: When a test fails,
pytestprovides a detailed report showing exactly what went wrong, which dramatically speeds up debugging.
The screenshot below shows a typical pytest failure. Notice how clearly it displays the failed assertion, the actual value (0.5), and the expected value (0.6). This immediate, clear feedback is one of pytest's most powerful features.
2. Your First Test: Functions and Assertions
Getting started with pytest involves two main conventions: file naming and function naming.
- Test files should be named
test_*.pyor*_test.py. - Test functions inside those files should be named
test_*().
Your project structure should separate application code from test code. A common and highly recommended practice is to have a dedicated tests/ directory at the root of your project.

Let's see this in action. The following video provides a fantastic, hands-on introduction to writing your first test functions.
Pytest Tutorial – How to Test Python Code
This section from a freeCodeCamp.org tutorial will walk you through installing pytest, creating your first functions to test, and writing the corresponding test functions.
Please watch from the beginning of the coding section up to the point where testing for strings is complete. Focus on these key steps: Installation and Setup: See how to install pytest and create the initial project files (my_functions.py and test_my_functions.py). Writing a Simple Test: Observe how a test for an add function is written using assert and how pytest reports both success and failure. Testing for Expected Errors: This is a critical part. Learn how to use with pytest.raises() to verify that your code correctly raises an exception, such as when dividing by zero. This directly builds on our last lesson about error handling.
To recap, the fundamental structure of a test follows the Arrange-Act-Assert pattern:
- Arrange: Set up the necessary preconditions and inputs.
- Act: Call the function or method you want to test.
- Assert: Check that the outcome is what you expect.
Here is a simple example based on the video:
# my_app/calculator.py
def add(a, b):
    return a + b

def divide(a, b):
    if b == 0:
        raise ValueError("Cannot divide by zero")
    return a / b


# tests/test_calculator.py
import pytest
from my_app.calculator import add, divide

def test_add():


    # Arrange
    a, b = 5, 10
    expected = 15


    # Act
    result = add(a, b)


    # Assert
    assert result == expected

def test_divide_by_zero_raises_error():


    # Arrange
    a, b = 10, 0


    # Act & Assert
    with pytest.raises(ValueError):
        divide(a, b)
Notice how test_divide_by_zero_raises_error confirms that our error handling is working correctly. This is just as important as testing for correct results.
3. Testing Classes
Testing a class is a natural extension of testing functions. You need to verify that:
- The object is initialized correctly (the
__init__method works). - The object's methods produce the correct results.
- The object behaves correctly when compared to others (if you've implemented methods like
__eq__).
The following article provides a clear, step-by-step guide to testing a Python class.
Introduction to pytest: A Beginner's Guide - The Teclado Blog
This guide demonstrates testing a Reply class, covering initialization, method behavior, and object equality. It's a perfect example of how to apply the Arrange-Act-Assert pattern to classes.
Please read the following two sections: Start at the section titled "How to write Pytest tests". This introduces the Reply class and the Given-When-Then (another name for Arrange-Act-Assert) structure for testing its __init__ method. Continue reading through "Testing for expected exceptions" and "Testing the equality of two objects". This will show you how to test other methods and the crucial __eq__ implementation that allows for meaningful assertions like object1 == object2.
The key takeaway is that for each test, you first create an instance of the class (Arrange), then call the method you're interested in (Act), and finally assert something about the instance's state or the method's return value (Assert).
4. Keeping Tests DRY with Fixtures
As you write more tests for a class, you'll notice yourself writing the same setup code over and over again—specifically, creating an instance of the class. This violates the "Don't Repeat Yourself" (DRY) principle.
pytest solves this with fixtures. A fixture is a function that provides a baseline set of data or objects for your tests. You can think of it as a reusable "Arrange" step.
The video below gives an excellent explanation of how fixtures work and how to use them to clean up your test code.
Pytest Tutorial – How to Test Python Code
This part of the tutorial introduces fixtures, one of pytest's most powerful features for managing test setup and teardown.
Watch the segment on fixtures carefully: Introducing Fixtures: The video demonstrates a test_rectangle file with duplicated setup code and then shows how to refactor it using a fixture decorated with @pytest.fixture. Sharing Fixtures with conftest.py: Learn how to move fixtures into a special file named conftest.py to make them available across your entire test suite. This is standard practice in larger projects.
Let's refactor our Reply example from the article using a fixture.
Before fixtures (Repetitive):
import datetime
from reply import Reply

def test_init():


    # Arrange
    reply = Reply(body="Hello", user="user1", created=datetime.datetime.now())


    # ... asserts ...

def test_repr():


    # Arrange
    reply = Reply(body="Hello", user="user1", created=datetime.datetime.now())


    # ... asserts ...
After fixtures (Clean and Reusable):
import pytest
import datetime
from reply import Reply

@pytest.fixture
def sample_reply():
    """A fixture that returns a sample Reply instance for tests."""
    return Reply(body="Hello", user="user1", created=datetime.datetime.now())

def test_init(sample_reply):


    # The 'sample_reply' argument is automatically provided by pytest.
    # The "Arrange" step is now done by the fixture.
    assert sample_reply.body == "Hello"
    assert sample_reply.user == "user1"

def test_repr(sample_reply):


    # We get a fresh instance of the reply for this test too.
    expected_repr = f"<Reply from user1 on {sample_reply.created.strftime('%Y-%m-%d %H:%M')}>"
    assert repr(sample_reply) == expected_repr
By using a fixture, we've centralized the creation of our test object. If we need to change how a Reply is created for our tests, we only need to update the fixture in one place.
Hands-On Task: Test a Simple Inventory System
Now it's your turn to put all these concepts together. You will create and test a simple Inventory management class.
-
Create the Application Code:
In your project, create a new filemy_app/inventory.py. Inside it, define two classes:# my_app/inventory.py class Product: """Represents a product with a name and price.""" def __init__(self, name: str, price: float): if not name or price < 0: raise ValueError("Invalid product data") self.name = name self.price = price def __eq__(self, other): return isinstance(other, Product) and self.name == other.name class Inventory: """Manages a collection of products and their stock levels.""" def __init__(self): self.stock = {} # {product_name: quantity} def add_product(self, product: Product, quantity: int): if not isinstance(product, Product) or quantity < 0: raise TypeError("Invalid input for adding product") self.stock[product.name] = self.stock.get(product.name, 0) + quantity def get_stock(self, product_name: str) -> int: if product_name not in self.stock: raise KeyError(f"{product_name} not found in inventory") return self.stock[product_name] -
Create the Test File:
Create a new filetests/test_inventory.py. -
Write the Tests:
Intest_inventory.py, write the following tests. Use fixtures where appropriate to avoid repetition!- A test for
Inventory.add_productthat verifies a new product is added correctly. - A test that verifies adding an existing product correctly increases its quantity.
- A test for
Inventory.get_stockthat returns the correct quantity for a product. - A test using
pytest.raises(KeyError)to verify thatget_stockfails correctly for a non-existent product. - A test using
pytest.raises(TypeError)to verify thatadd_productfails if you try to add something that isn't aProductinstance.
- A test for
Click here to see a possible solution.
# tests/test_inventory.py
import pytest
from my_app.inventory import Product, Inventory

@pytest.fixture
def product_laptop():
    """Fixture for a sample Product instance."""
    return Product("Laptop", 1200.00)

@pytest.fixture
def empty_inventory():
    """Fixture for a new, empty Inventory instance."""
    return Inventory()

def test_add_new_product(empty_inventory, product_laptop):


    # Arrange is done by fixtures
    # Act
    empty_inventory.add_product(product_laptop, 10)


    # Assert
    assert empty_inventory.get_stock("Laptop") == 10

def test_add_existing_product(empty_inventory, product_laptop):


    # Arrange
    empty_inventory.add_product(product_laptop, 5)


    # Act
    empty_inventory.add_product(product_laptop, 3)


    # Assert
    assert empty_inventory.get_stock("Laptop") == 8

def test_get_stock_for_nonexistent_product(empty_inventory):
    with pytest.raises(KeyError):
        empty_inventory.get_stock("Desktop")

def test_add_invalid_item_type(empty_inventory):
    with pytest.raises(TypeError):
        empty_inventory.add_product("not-a-product", 5)
Conclusion
You have just taken a significant step toward writing professional-grade Python code. Automated testing is a discipline that pays dividends throughout the entire lifecycle of a project. It ensures quality, builds confidence, and serves as living documentation for your code.
Key Takeaways:
- Structure: Organize tests in a
tests/directory withtest_*.pyfiles andtest_*()functions. - Core Mechanics: Use the
assertstatement for verification andpytest.raisesto test for expected errors. - Pattern: Follow the Arrange-Act-Assert pattern to structure your tests logically.
- Efficiency: Use
@pytest.fixtureto create reusable setup code, keeping your tests clean and maintainable.
You have now completed Module 3, solidifying your core Python skills in OOP, error handling, logging, and testing. This powerful toolkit is the prerequisite for everything that follows. In our next lesson, we will begin Module 4: Django Framework Foundations, where you will see how these Python principles are applied to build your very first web application. You'll learn how to set up a Django project and define the data models that will power your backend.