Welcome to Module 9. In the previous module, we focused on the final stage of the machine learning pipeline: serving a pre-trained model through a robust, asynchronous API. You learned to handle long inference times, timeouts, and failures, and, crucially, how to test this complex logic by mocking the model itself. This skill set is vital for building reliable ML-powered applications.
Now, we shift our focus to an earlier, but equally critical, part of the process: managing the data that fuels these models. The job description you're targeting at Infilect explicitly mentions experience with "dataset annotation pipelines, dataset management, and dataset storage." This module is dedicated to building exactly that. In this first lesson, we will lay the foundation for our entire annotation system by designing and implementing the database schema using Django models.
By the end of this lesson, you will be able to:
- Explain the purpose and components of an image annotation pipeline.
- Design a relational database schema for storing images, labels, and annotations.
- Implement this schema as a set of interconnected Django models.
- Use Django's migration system to create the corresponding database tables.
What is an Image Annotation Pipeline?
Before we write any code, let's understand the problem we're solving. Companies like Infilect use computer vision to analyze images from retail stores—identifying products, checking stock levels, and reading price tags. To train a machine learning model to do this, it first needs to learn from thousands of examples. This is where human annotators come in.
An annotation pipeline is the system that manages this entire workflow:
- Ingestion: Raw images are uploaded into the system.
- Annotation: Human operators use a tool to draw bounding boxes around objects in an image and assign labels to them (e.g., "Coca-Cola 330ml Can," "7UP 2L Bottle").
- Review: The created annotations are reviewed for quality.
- Export: The approved, labeled data is exported in a format that a machine learning model can be trained on.
As a backend engineer, you would be responsible for building the system that powers this entire process.

This is an example of an image annotation tool's user interface. As a backend engineer, your job is to build the system that stores, manages, and serves the data for such a tool, including the images, the list of available labels (like "Car" and "Person"), and the saved bounding box annotations with their attributes.
Designing the Database Schema
Our first step is to design the database schema. This means identifying the core pieces of information, or "entities," and defining the relationships between them. For our pipeline, the main entities are:
- Image: The image file itself, along with its metadata (like height, width, and filename).
- Label: A category for an object we want to identify (e.g., 'Product', 'Price Tag').
- Annotation: The core of our system. It connects a specific bounding box on a specific
Imagewith a specificLabel.
The relationships are as follows:
- An
Imagecan have manyAnnotations. - A
Labelcan be applied to manyAnnotations. - An
Annotationbelongs to exactly oneImageand has exactly oneLabel.
This "one-to-many" relationship is a fundamental concept in database design. To solidify your understanding of how these relationships work conceptually, watch the following video from Dennis Ivy.
Database Relationships | One To Many & Many to Many | Django (3.0) Crash Course Tutorials (pt 6)
This video provides a clear, conceptual explanation of database relationships, which is essential before we translate them into Django code.
Focus on these two parts: The explanation of one-to-many relationships, which is exactly the structure we need for our Image-to-Annotation and Label-to-Annotation connections. The demonstration of how to implement this relationship in Django using models.ForeignKey.
From Schema to Django Models
With a clear schema in mind, we can now translate it into Django models. A Django model is a Python class that inherits from django.db.models.Model. Each attribute of the class represents a database field. Django's Object-Relational Mapper (ORM) handles the work of translating this Python code into database tables and SQL commands.
To get a comprehensive overview of Django models, their fields, and the migration process, please read through the following guide.
This article provides a solid foundation on Django models, covering the core concepts you'll need for our task.
Please read through the following sections: The introduction to understand the role of models. The section on Creating a Django Model to see the basic syntax. The explanation of Applying Migrations, which is the process of synchronizing your models with the database. The lists of Model Field Types and Relationship Fields. Pay close attention to CharField, ImageField, and ForeignKey. Finally, review the section on Field Options like default, null, and blank.
Hands-On: Implementing the Annotation Models
Let's put this theory into practice. First, create a new Django app to house our data management logic. In your terminal, at the root of your project (where manage.py is), run:
python manage.py startapp datasets
Don't forget to add 'datasets', to the INSTALLED_APPS list in your project's settings.py file.
Now, open datasets/models.py and replace its contents with the following code. We will define our three models: Label, Image, and Annotation.
# datasets/models.py

from django.db import models

class Label(models.Model):
    """Represents a single category or class of object for annotation."""
    name = models.CharField(max_length=100, unique=True, help_text="The name of the label (e.g., 'Coca-Cola Can').")
    description = models.TextField(blank=True, help_text="An optional description for the label.")

    def __str__(self):
        return self.name

class Image(models.Model):
    """Represents an image uploaded for annotation."""
    image_file = models.ImageField(upload_to='images_to_annotate/')
    # We will configure media file handling in a later module.

    height = models.PositiveIntegerField(editable=False)
    width = models.PositiveIntegerField(editable=False)

    uploaded_at = models.DateTimeField(auto_now_add=True)

    # We'll add a method to populate height and width automatically later.

    def __str__(self):
        return str(self.image_file.name)

class Annotation(models.Model):
    """Represents a single bounding box annotation on an image."""
    image = models.ForeignKey(Image, on_delete=models.CASCADE, related_name='annotations')
    label = models.ForeignKey(Label, on_delete=models.PROTECT, related_name='annotations')

    # Bounding box coordinates, stored as normalized values [0, 1]
    x_min = models.FloatField(help_text="Normalized x-coordinate of the top-left corner.")
    y_min = models.FloatField(help_text="Normalized y-coordinate of the top-left corner.")
    x_max = models.FloatField(help_text="Normalized x-coordinate of the bottom-right corner.")
    y_max = models.FloatField(help_text="Normalized y-coordinate of the bottom-right corner.")

    created_at = models.DateTimeField(auto_now_add=True)
    updated_at = models.DateTimeField(auto_now=True)

    def __str__(self):
        return f"Annotation for {self.label.name} on {self.image.pk}"
Let's break down some key decisions in this code:
-
ForeignKeyandon_delete:Annotation.image: We useon_delete=models.CASCADE. This means if anImageis deleted, allAnnotationsassociated with it are automatically deleted as well. This makes sense; annotations are useless without their image. Therelated_name='annotations'allows us to easily get all annotations for an image object, likemy_image.annotations.all().Annotation.label: We useon_delete=models.PROTECT. This prevents you from deleting aLabelif it's currently being used by anyAnnotation. This protects data integrity, forcing you to re-assign or delete annotations before removing a label.
-
Bounding Box Coordinates:
- We are storing four floating-point numbers (
x_min,y_min,x_max,y_max). - Crucially, these are normalized coordinates. This means their values will always be between 0.0 and 1.0, representing a percentage of the image's total width and height. For example,
x_min=0.5means the box starts halfway across the image. - Storing normalized coordinates is a best practice because it makes the annotation data independent of the image's resolution. You can resize the image, and the annotation remains valid.
- We are storing four floating-point numbers (
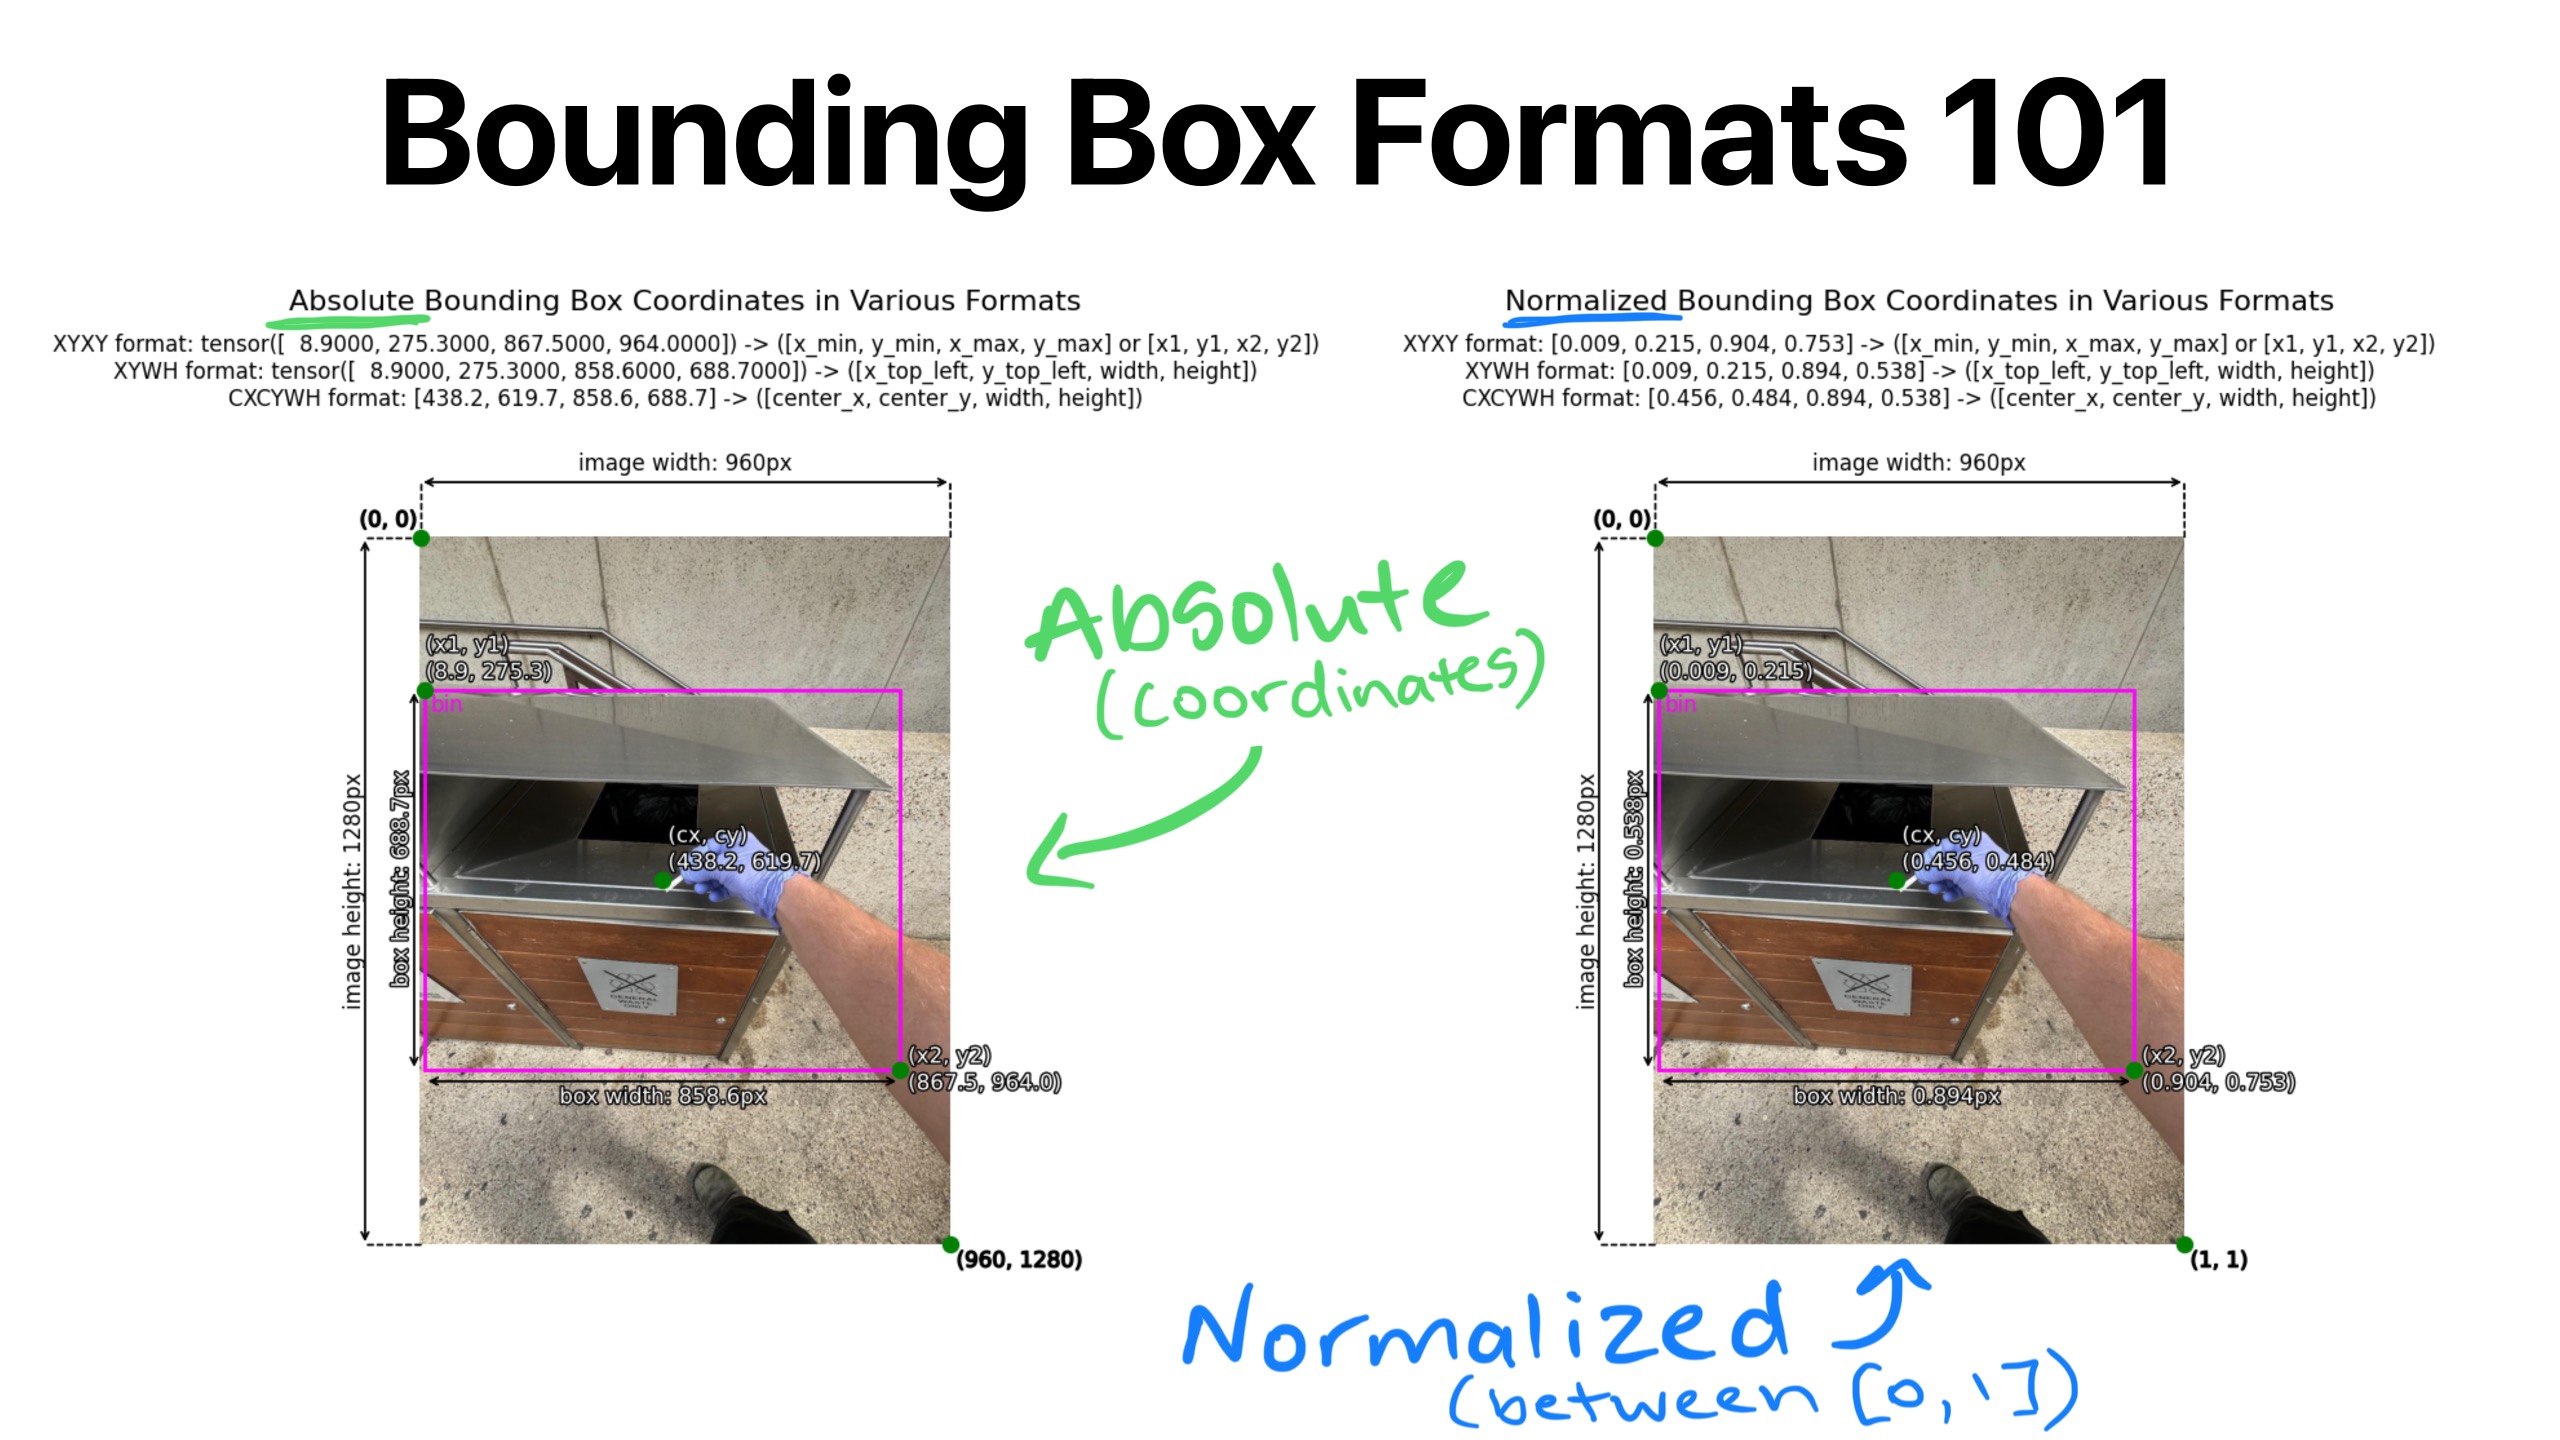
This image illustrates the difference between absolute pixel coordinates (left) and normalized coordinates (right). Our model design uses the normalized approach, which is more flexible and scalable.
Applying the Schema to the Database
You have now defined the models in Python. The final step is to instruct Django to create the corresponding tables in your database. This is a two-step process called migration.
Python Django Models and Migrations
This video by Dave Gray demonstrates the makemigrations and migrate workflow practically.
Watch the segment from the model completion to applying the final migration. This will show you exactly what to expect when you run the commands.
Now, run the commands yourself in the terminal:
-
python manage.py makemigrations datasets
This command inspects yourdatasets/models.pyfile, detects the new models you've created, and generates a new "migration file" indatasets/migrations/. This file contains Python code that describes the changes to be made to the database schema. -
python manage.py migrate
This command takes all unapplied migration files (including the one you just created) and executes them, applying the changes to your database. It will create thedatasets_label,datasets_image, anddatasets_annotationtables with all the correct columns, types, and relationships.
You can also register these models in datasets/admin.py to interact with them via the Django admin panel, which is a great way to verify your work.
# datasets/admin.py
from django.contrib import admin
from .models import Label, Image, Annotation

admin.site.register(Label)
admin.site.register(Image)
admin.site.register(Annotation)
Conclusion
Congratulations! You have just designed and built the foundational data layer for a sophisticated image annotation pipeline. This is a significant step and directly addresses a core competency required for the backend role you are targeting.
Key Takeaways:
- Data modeling is the crucial first step in building a robust backend system. Thinking about entities and relationships upfront saves significant time later.
- Django models provide a powerful and Pythonic way to define your database schema through the ORM.
ForeignKeyis the field used to establish one-to-many relationships between models.- The
on_deleteargument is a critical tool for maintaining data integrity when related objects are deleted. - The
makemigrationsandmigratecommands are the standard workflow for keeping your Python models and your database schema in sync.
You have laid a solid foundation. However, tables in a database are of little use without data. In our next lesson, we will address this by learning how to write a custom Django management command to batch-import image metadata into the Image table you just created.