Welcome back! In our last lesson, you successfully loaded a pre-trained machine learning model from a file into a Python script. You now have a diabetes_model.joblib file and a Python object in memory capable of making predictions. While this is a crucial first step, a model running in a local script is isolated. To make it useful, we need to expose its predictive power to the outside world.
This lesson bridges that gap. We will take your loaded model and wrap its inference logic inside a Django REST Framework (DRF) API endpoint. By the end of this lesson, you will have a functioning web API that can receive patient data via an HTTP request and return a diabetes prediction in a JSON response. This is a core skill for any backend engineer working on ML-powered applications and directly addresses your goal of building systems that implement logic driven by machine learning models.
The Architectural Goal: From Request to Prediction
Before we write any code, let's visualize the end-to-end flow we are about to build. A client (which could be a frontend application, a mobile app, or another backend service) needs a prediction. It will send the input features for the model as a structured HTTP request to our Django server. Our Django application will then:
- Receive the request at a specific URL endpoint.
- Parse the incoming data.
- Pass this data to our pre-loaded machine learning model.
- Execute the model's
predict()function. - Take the model's output (the prediction).
- Format it into a JSON response and send it back to the client.
The following diagram illustrates this high-level architecture:
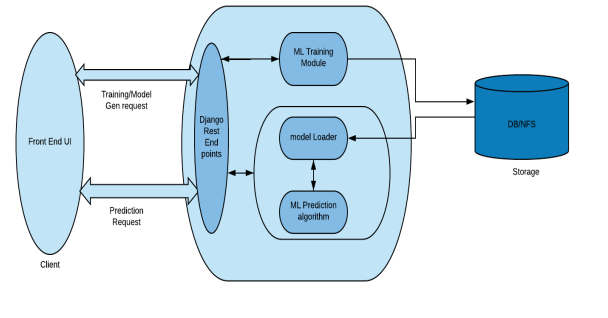
This diagram shows the flow we are building. The "Client" sends a "Prediction Request" to the "Django Rest End points." Our code will then use the "model Loader" and "ML Prediction algorithm" to generate a response.
Loading the Model Efficiently in Django
In the previous lesson, you loaded the model directly in a script. In a web server context, we must answer a critical question: when should we load the model? Loading a multi-megabyte model file from disk and deserializing it can take time. Doing this for every single API request would make our API incredibly slow and inefficient.
The professional standard is to load the model once when the Django application starts up and keep it in memory, ready to serve all subsequent requests. The ideal place to put this one-time loading logic is in the apps.py file of a Django app.
The article "Build a Machine Learning API With Django Rest Framework" provides a clear walkthrough of this pattern. We will adapt its approach for our project.
Build a Machine Learning API With Django Rest Framework: - DEV Community
This section from the DEV Community article explains how to load your serialized model within the apps.py configuration. This ensures the model is loaded only once at server startup.
Focus on the part of the article under the heading "Load Model through apps.py". You'll see how it defines a path to the model file and uses joblib.load() inside an AppConfig class. We will implement this exact pattern.
Creating the Prediction API View
With the model loaded, we now need to create the API endpoint that will use it. In DRF, we can use a class-based APIView to handle incoming requests. We will create a view that accepts POST requests, as clients will be sending data to us for prediction.
Inside the post method of our view, we will perform the core logic:
- Access the incoming data from
request.data. - Extract the features needed by our model.
- Ensure the data is in the correct format and order that the model expects (e.g., a list or a NumPy array of numbers).
- Call the
predict()method on our globally loaded model object. - Package the prediction into a dictionary and return it as a DRF
Response.
The same article provides a great example of this.
Build a Machine Learning API With Django Rest Framework: - DEV Community
This section shows the implementation of the Prediction class, an APIView that takes request data, feeds it to the loaded model, and returns a prediction.
Read the code under the heading "Edit views.py". Notice how it retrieves each feature from request.GET (we will use request.data for POST), passes them to dtree.predict(), and constructs a response_dict. This is the blueprint for our own view.
For a more in-depth look at this process, the "REST API Guide" by Datagraphi offers another excellent, detailed example using a different dataset. It reinforces the same core concepts of loading the model in apps.py and using it within a class-based view.
This guide provides another complete example of building a prediction API, reinforcing the concepts with different code.
Focus on the sections titled "Creating our Prediction API View in Django". Pay attention to how it accesses the loaded classifier from the PredictionConfig class and transforms the incoming data into a NumPy array before calling .predict(). This data transformation step is crucial.
Hands-On Task: Build the Diabetes Prediction API
It's time to bring everything together. You'll continue with your Django project and integrate the diabetes prediction model from the last lesson.
Prerequisites: Ensure you have Django and Django REST Framework installed in your virtual environment.pip install django djangorestframework scikit-learn joblib
Step 1: Organize Your Project
- In your Django project's root directory (where
manage.pyis), create a new directory namedml_models. - Move the
diabetes_model.joblibfile you created in the last lesson into this newml_modelsdirectory. - Create a new Django app for our predictions. From the root directory, run:
python manage.py startapp predictions - Add
rest_frameworkand your newpredictionsapp toINSTALLED_APPSin your project'ssettings.py.
Step 2: Load the Model on Startup
-
Open
your_project/settings.pyand add the following line at the bottom to tell Django where to find your model files:# your_project/settings.py import os MODELS_DIR = os.path.join(BASE_DIR, 'ml_models') -
Now, open
predictions/apps.pyand modify it to load the model.# predictions/apps.py import os import joblib from django.apps import AppConfig from django.conf import settings class PredictionsConfig(AppConfig): default_auto_field = 'django.db.models.BigAutoField' name = 'predictions' # Path to the model file MODEL_FILE = os.path.join(settings.MODELS_DIR, "diabetes_model.joblib") # Load the model model = joblib.load(MODEL_FILE) -
In
predictions/__init__.py, set the default app config:# predictions/__init__.py default_app_config = 'predictions.apps.PredictionsConfig'
Step 3: Create the Prediction APIView
-
Open
predictions/views.pyand create the view that will handle prediction requests.# predictions/views.py from rest_framework.views import APIView from rest_framework.response import Response from .apps import PredictionsConfig # Import your app's config class DiabetesPredictionAPIView(APIView): def post(self, request): # The model expects 8 features, you'll get them from the request # For example: ['preg', 'plas', 'pres', 'skin', 'test', 'mass', 'pedi', 'age'] data = request.data # Ensure the features are in the correct order features = [ data.get('preg'), data.get('plas'), data.get('pres'), data.get('skin'), data.get('test'), data.get('mass'), data.get('pedi'), data.get('age') ] # Get the loaded model from the app config model = PredictionsConfig.model # Make a prediction # The model expects a 2D array, so we wrap our features in another list prediction_result = model.predict([features]) # The output is an array (e.g., [1]), we take the first element prediction = prediction_result[0] # Create a response dictionary response_dict = {"prediction": "Diabetic" if prediction == 1 else "Not Diabetic"} return Response(response_dict, status=200)
*Note: This view is simplified and lacks error handling (e.g., for missing data). We will add robustness in later lessons.*
Step 4: Configure URLs
- Create a
predictions/urls.pyfile:# predictions/urls.py from django.urls import path from .views import DiabetesPredictionAPIView urlpatterns = [ path('diabetes/', DiabetesPredictionAPIView.as_view(), name='diabetes-prediction'), ] - Include this new URL file in your main project's
urls.py:# your_project/urls.py from django.contrib import admin from django.urls import path, include urlpatterns = [ path('admin/', admin.site.urls), path('api/predict/', include('predictions.urls')), # Add this line ]
Step 5: Test Your API
Run your Django development server: python manage.py runserver.
Navigate to http://127.0.0.1:8000/api/predict/diabetes/ in your browser. You should see the DRF browsable API interface. Because our view only defines a post method, you'll see a message "GET method not allowed."
This is expected! Now, use the form at the bottom of the page to send a POST request. In the "Content" text area, enter your feature data in JSON format. Use the example data from the previous lesson:
{
    "preg": 6,
    "plas": 148,
    "pres": 72,
    "skin": 35,
    "test": 0,
    "mass": 33.6,
    "pedi": 0.627,
    "age": 50
}
Click "POST". If everything is set up correctly, you should receive a 200 OK response with the prediction!

Your test in the DRF browsable API should look similar to this, showing the input JSON and the JSON response containing the prediction.
Conclusion
Congratulations! You have successfully built your first machine learning API. You've taken a static, pre-trained model and exposed its functionality over the web, a foundational skill for building intelligent backend systems.
Key Takeaways:
- You can serve a machine learning model's predictions through a Django REST Framework APIView.
- For efficiency, models should be loaded once when the server starts, typically within the app's
AppConfigclass inapps.py. - The API view is responsible for parsing incoming request data, transforming it into the format the model requires, calling the
.predict()method, and formatting the output into a JSONResponse. - The DRF browsable API is a powerful tool for testing your endpoints directly.
This synchronous API works well for fast models. However, what if your model takes several seconds (or even minutes) to run? Making a user wait that long for an HTTP response is not a viable solution. In our next lesson, we will solve this exact problem by offloading the ML model execution to a background task using Celery, making our API responsive and robust.