Welcome back. In our last lesson, you successfully wrapped a pre-trained machine learning model in a synchronous Django REST Framework API. While functional, this approach has a critical flaw: if the model takes a few seconds to run, the user's request will be blocked, leading to a poor experience and potential server timeouts. For a company like Infilect, which processes large amounts of data for ML, such synchronous operations are not scalable.
This lesson directly tackles that problem by introducing you to asynchronous processing. You will learn how to offload the ML model's execution to a background task using Celery, a powerful distributed task queue. By the end of this lesson, your API will respond instantly, acknowledging that the prediction task has been queued, while the heavy lifting of running the model happens in the background. This is a fundamental pattern for building scalable, responsive, and robust backend systems, especially those driven by machine learning.
The Problem with Synchronous Execution
When a user makes a request to your current API, the Django application is tied up until the model finishes its prediction and a response is sent. This is synchronous processing. Imagine not one, but hundreds of users making requests simultaneously to a model that takes five seconds per inference. The server would quickly become overwhelmed, and users would face long waits or timeouts.
The article "Designing and Deploying a Machine Learning Python Application" clearly outlines this issue.
Designing and Deploying a Machine Learning Python Application (Part 2) | Towards Data Science
This article explains the core problems that arise when running long ML processes as part of a standard web request.
Read the sections that introduce Problem #1: Memory and Problem #2: Time. The author highlights how both memory and processing time for ML inference can "clog up the backend," preventing the application from handling other requests. This is the exact issue we are about to solve.
To visualize this, think of a coffee shop. A synchronous system is like a single barista who takes an order, makes the drink, serves it, and only then moves to the next customer. An asynchronous system is one where a cashier takes the order and hands it off to a team of baristas. The cashier is immediately free to take the next order, while the drinks are made in the background. We are about to turn your Django app into the efficient cashier.
The Celery Architecture: Producer, Broker, Consumer
To achieve asynchronicity, we'll use Celery. Celery is a distributed task queue. Its architecture revolves around three main components:
- Producer: This is your Django application. When it needs a long-running job done (like ML inference), it doesn't do the work itself. Instead, it sends a "task" message describing the job to a message broker.
- Message Broker: This is a middleman, like Redis or RabbitMQ. It holds a queue of all the task messages sent by the producer. It's like the order rail in a kitchen. We will use Redis for this role.
- Consumer (Worker): This is one or more separate Celery processes. A worker's only job is to watch the message queue. When a new task appears, the worker picks it up, executes the code for that task, and then goes back to watching the queue for the next job.
The diagram below illustrates this flow. Your Django app (the "web server") sends a task to the message broker (Redis). A separate Celery worker process picks up the task, does the work, and can optionally store the result in a "result store" (which can also be Redis).
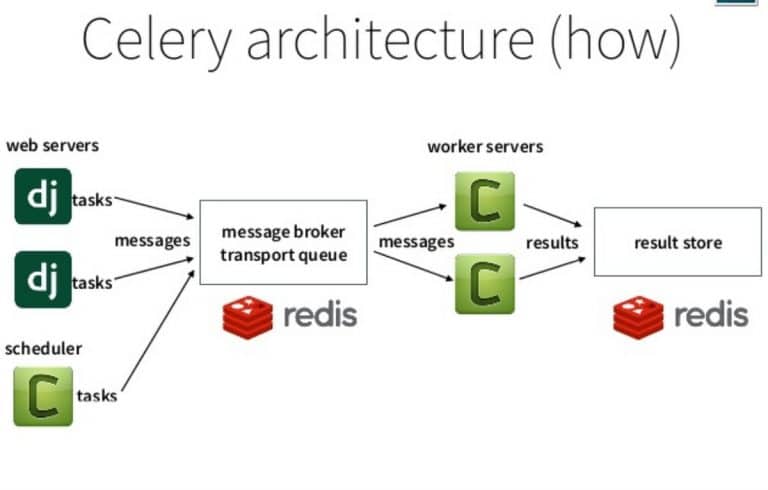
This diagram shows the key components of a Celery system. Our Django application acts as the 'web server' (producer), Redis serves as both the 'message broker' and 'result store', and we will run a 'worker server' process to execute our tasks.
The video "How to add Async Tasks to Django with Celery" from London App Developer provides an excellent verbal overview of these concepts.
How to add Async Tasks to Django with Celery
This section of the video clearly explains what asynchronous tasks are and why they are essential for tasks with high latency, like interacting with AI APIs.
Watch the segment from the beginning. It reinforces the "why" and provides several relevant use cases that align perfectly with our goals.
Hands-On Task: Offloading ML Inference to a Celery Task
Now, let's refactor your diabetes prediction API to use this asynchronous pattern. You will continue working in the same Django project.
Step 1: Install Dependencies
First, you need to install Celery and the Redis client library.
pip install celery redis
You also need a running Redis server. If you have Docker installed, this is the easiest way to start one:docker run -d -p 6379:6379 redis
Step 2: Configure Celery in Django
Celery needs to be integrated into your Django project so it knows about your settings and apps. This involves a few standard configuration files. The video "Celery tasks with Django REST Framework!" by BugBytes provides a very clear walkthrough.
Celery tasks with Django REST Framework!
This video guides you through the standard setup for integrating Celery with a Django project, including creating the necessary files and configuring the settings.
Follow the steps shown from the setup. In summary, you will: Create a celery.py file inside your main project directory (e.g., your_project/celery.py). Update your your_project/__init__.py file to ensure the Celery app is loaded when Django starts. Add Celery configuration to your your_project/settings.py. Use the following code as your guide, adapting the project name your_project_name to match your actual project's name. 1. Create your_project_name/celery.py:
Use the following code as your guide, adapting the project name your_project_name to match your actual project's name.
1. Create your_project_name/celery.py:
import os
from celery import Celery

# Set the default Django settings module for the 'celery' program.
os.environ.setdefault('DJANGO_SETTINGS_MODULE', 'your_project_name.settings')

app = Celery('your_project_name')

# Using a string here means the worker doesn't have to serialize
# the configuration object to child processes.
# - namespace='CELERY' means all celery-related configuration keys
#   should have a `CELERY_` prefix.
app.config_from_object('django.conf:settings', namespace='CELERY')

# Load task modules from all registered Django apps.
app.autodiscover_tasks()
2. Update your_project_name/__init__.py:
# This will make sure the app is always imported when
# Django starts so that shared_task will use this app.
from .celery import app as celery_app

__all__ = ('celery_app',)
3. Add to your_project_name/settings.py:
Add these lines at the bottom of your settings file. This tells Celery where to find your Redis message broker.
# Celery Configuration
CELERY_BROKER_URL = 'redis://localhost:6379/0'
CELERY_RESULT_BACKEND = 'redis://localhost:6379/0' # We'll use this in a future lesson
CELERY_ACCEPT_CONTENT = ['json']
CELERY_TASK_SERIALIZER = 'json'
CELERY_RESULT_SERIALIZER = 'json'
Step 3: Create the Prediction Task
Now, create the function that the Celery worker will execute.
- In your
predictionsapp directory, create a new file namedtasks.py. - In this file, define a function that will contain the prediction logic you previously had in your view.
# predictions/tasks.py
from celery import shared_task
from .apps import PredictionsConfig

@shared_task
def run_diabetes_prediction(features):
    """
    Runs the diabetes prediction model as a background Celery task.
    """
    model = PredictionsConfig.model

    # The model expects a 2D array
    prediction_result = model.predict([features])
    prediction = prediction_result[0]

    result_text = "Diabetic" if prediction == 1 else "Not Diabetic"

    # For now, we'll just print the result to the worker's console.
    print(f"Prediction Task Complete: The result is '{result_text}' for features {features}")

    return result_text
Notice the @shared_task decorator. This is what registers the function with Celery as a discoverable task.
Step 4: Refactor the API View
Modify your DiabetesPredictionAPIView to offload the work to the task you just created. Instead of running the prediction itself, it will now call .delay() on your task function.
# predictions/views.py
from rest_framework.views import APIView
from rest_framework.response import Response
from .tasks import run_diabetes_prediction # Import the task

class DiabetesPredictionAPIView(APIView):
    def post(self, request):
        data = request.data

        # Ensure the features are in the correct order
        features = [
            data.get('preg'), data.get('plas'), data.get('pres'),
            data.get('skin'), data.get('test'), data.get('mass'),
            data.get('pedi'), data.get('age')
        ]

        # Offload the prediction task to Celery
        run_diabetes_prediction.delay(features)

        # Return an immediate response
        response_dict = {"message": "Prediction task has been queued and is running in the background."}

        return Response(response_dict, status=202) # 202 Accepted
The .delay() method is the magic here. It doesn't execute the function. Instead, it serializes the function name and its arguments (features) into a message and sends it to the Redis broker. Your view is now free to return an immediate response. We use the HTTP status code 202 Accepted to signify that the request has been accepted for processing, but the processing has not been completed.
Step 5: Run and Test the System
To see this in action, you need to run three separate processes in three different terminal windows:
- Redis Server: Make sure your Redis instance (e.g., from Docker) is running.
- Django Server:
python manage.py runserver - Celery Worker:
celery -A your_project_name worker -l info
(Replaceyour_project_namewith your project's actual name).
Once all three are running, go to your API endpoint http://127.0.0.1:8000/api/predict/diabetes/ and submit a POST request with the same JSON data as before.
- Observe the API Response: You should instantly get back the
202 Acceptedresponse with the message that the task has been queued. - Check the Worker's Terminal: This is where the action is! You will see log messages from the Celery worker indicating that it has received a task (
predictions.tasks.run_diabetes_prediction), started executing it, and finally, you should see theprintstatement with the prediction result.
The final part of the BugBytes video demonstrates this testing flow perfectly.
Celery tasks with Django REST Framework!
This segment shows how to start the Celery worker and test the entire asynchronous flow. You'll see the API respond immediately while the task execution appears in the worker's log output.
Watch from the demonstration to see how making the API request triggers the task in the separate worker terminal. This confirms your asynchronous setup is working correctly.
Conclusion
Fantastic work! You have fundamentally improved the architecture of your application. By integrating Celery, you've transformed your slow, blocking ML API into a scalable, non-blocking service.
Key Takeaways:
- Long-running processes like ML inference should not be run in the main request-response cycle.
- Celery allows you to offload these processes to background workers, keeping your web application responsive.
- The architecture consists of a producer (your Django app), a message broker (Redis), and a consumer (the Celery worker).
- You define a background task using the
@shared_taskdecorator and trigger it from your view using the.delay()method. - The API's responsibility changes from doing the work to queuing the work.
In this lesson, we simply printed the result to the worker's log. But how does the user or frontend application get the prediction result? And what happens if the task fails? Our next lesson will address these critical questions as we explore strategies for handling task timeouts, failures, and fallbacks.