Welcome to the next lesson in our Django journey! In the last couple of lessons, you've built a robust user authentication system and learned how to secure pages so that only logged-in users can access them. Our TaskMaster application is becoming more complete, but the way we handle data submission is still very basic.
Currently, our TaskCreateView and TaskUpdateView use a simple fields attribute to generate forms. While functional, this approach offers little control over the form's appearance, validation logic, or user experience. Today, we'll replace this with Django's powerful Forms API, a cornerstone of building interactive and secure web applications.
This lesson will teach you how to manage user-submitted data professionally using Django Forms. This directly supports your goal of gaining "extensive experience in Django" by moving beyond the defaults and taking control of the data flow in your application.
By the end of this 60-minute lesson, you will be able to:
- Create a
ModelFormto generate a form directly from a Django model. - Integrate the
ModelForminto your existing class-based views. - Customize form rendering in templates for better UI control.
- Implement custom validation rules to enforce specific data constraints.
1. Why Use Django Forms?
So far, Django's generic views have automatically created forms for us. This is great for speed, but for a real-world application like the one you're aiming to build, you need more power. Django's Form objects are central to managing user input. They are responsible for:
- Rendering HTML: Generating the form fields to display to the user.
- Validation: Checking that the submitted data is correct and secure.
- Cleaning Data: Converting the submitted string data into proper Python data types.
- Error Handling: Displaying user-friendly error messages when validation fails.
There are two main classes for creating forms: forms.Form for general-purpose forms and forms.ModelForm for forms that directly map to a model. Since our "create task" form is tied directly to our Task model, ModelForm is the perfect tool. It saves us from writing redundant code by automatically creating form fields based on our model's definition.
How to use Django forms to easily build and manage forms
This article from Hostinger provides a concise introduction to the two primary ways of creating forms in Django.
Focus on the section How to create Django forms. This will clarify the distinction between using the Form class and the ModelForm class, and why ModelForm is so efficient when your form corresponds to a database model.
2. Creating and Integrating Your TaskForm
Let's replace the basic form generation in our TaskMaster project with a proper ModelForm. This involves creating a new file, defining our form, and telling our views to use it.
The process is clearly demonstrated in the following video. While the example is about creating blog posts, the steps are identical to what we need to do for our tasks.
This video by Dave Gray provides a clear, step-by-step guide to creating a ModelForm and integrating it into views and templates.
Watch the first part to see how to create a forms.py file and define a ModelForm class with its nested Meta class. Next, see how to import this new form into views.py and pass it to the template context in this section. Finally, watch this segment to understand how to render the form in a template, making sure to include the essential {% csrf_token %} for security.
Hands-On: Implementing the TaskForm
Now, apply those steps to your tasks app.
-
Create
tasks/forms.py:
Inside yourtasksapp directory, create a new file namedforms.py. -
Define
TaskForm:
Add the following code totasks/forms.py. This defines a form that is linked to yourTaskmodel and includes the fields for title, description, and completion status.# tasks/forms.py from django import forms from .models import Task class TaskForm(forms.ModelForm): class Meta: model = Task fields = ['title', 'description', 'completed'] -
Update Your Views:
Now, opentasks/views.pyand modifyTaskCreateViewandTaskUpdateViewto use your newTaskForm.# tasks/views.py from django.shortcuts import render from django.views.generic import ListView, DetailView, CreateView, UpdateView, DeleteView from django.urls import reverse_lazy from django.contrib.auth.mixins import LoginRequiredMixin from .models import Task from .forms import TaskForm # 1. Import your new form # ... TaskListView and TaskDetailView remain the same ... class TaskCreateView(LoginRequiredMixin, CreateView): model = Task form_class = TaskForm # 2. Replace 'fields' with 'form_class' success_url = reverse_lazy('task-list') class TaskUpdateView(LoginRequiredMixin, UpdateView): model = Task form_class = TaskForm # 3. Replace 'fields' with 'form_class' success_url = reverse_lazy('task-list') # ... TaskDeleteView remains the same ...
By replacing fields with form_class, you've told Django to use your custom form, giving you a powerful hook for future customizations. Your application should still work exactly as before, but now the form is managed by a dedicated class.
3. The Form Handling Lifecycle
When you submit a form, Django follows a specific and crucial pattern, often called POST/Redirect/GET. Understanding this flow is key to debugging and building complex applications.
This flowchart provides a perfect visual summary of the process:
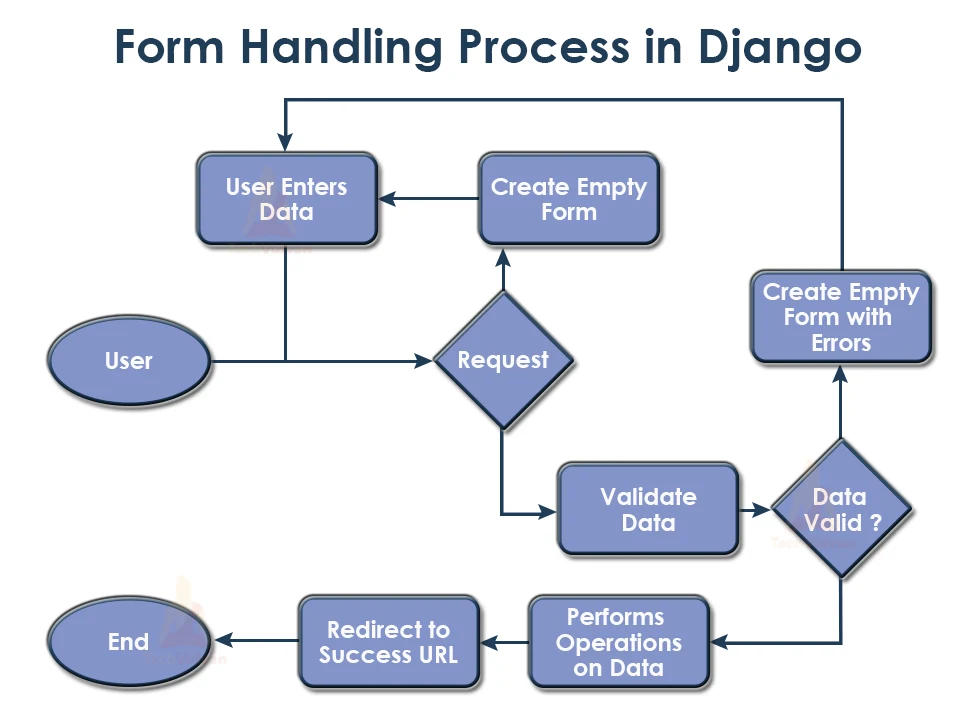
Here is a breakdown of the steps shown in the chart:
- GET Request: A user navigates to the "create task" page. The view instantiates an empty
TaskFormand renders it. - User Submits Data (POST Request): The user fills out the form and clicks "Submit". The browser sends the data back to the server in a POST request.
- Data Binding: The view receives the POST request and instantiates the
TaskForm, but this time it's bound with the submitted data (e.g.,form = TaskForm(request.POST)). - Validation: The view calls
form.is_valid(). Django runs all validation rules: checking field types,max_length, and any custom rules you've defined. - Two Paths:
- If Invalid:
is_valid()returnsFalse. The view re-renders the page with the bound form. This form now contains error messages that are displayed to the user. - If Valid:
is_valid()returnsTrue. The view performs the required action (likeform.save()to create the new task) and then redirects the user to a new page (thesuccess_url). This redirect is vital—it prevents the user from accidentally resubmitting the form by refreshing the page.
- If Invalid:
Our class-based CreateView and UpdateView handle this entire lifecycle for you automatically!
4. Customizing Form Rendering and Validation
The real power of Django Forms comes from customization. Let's improve the user experience by changing how our form looks and adding a custom validation rule.
Customizing Widgets and Rendering
By default, {{ form }} renders as a plain set of fields. You can use helpers like {{ form.as_p }} to wrap fields in paragraphs, but for full control, you should render each field manually. This lets you add CSS classes and structure the form exactly as you wish.
Let's also change the description field from a single-line input to a multi-line textarea. We do this by specifying a widget in our forms.py.
1. Update tasks/forms.py:
# tasks/forms.py
from django import forms
from .models import Task

class TaskForm(forms.ModelForm):
    class Meta:
        model = Task
        fields = ['title', 'description', 'completed']
widgets = {
'description': forms.Textarea(attrs={'rows': 4}),
}
2. Update tasks/templates/tasks/task_form.html:
Create or update this template to render the fields manually. This gives you full control over the HTML structure.
{% extends 'base.html' %}

{% block content %}
    <a href="{% url 'task-list' %}">Go Back</a>
    <hr>
    <form method="POST" action="">
        {% csrf_token %}

        <div>
            <label>{{ form.title.label_tag }}</label>
            {{ form.title }}
            {% if form.title.errors %}
                <ul class="errors">
                    {% for error in form.title.errors %}
                        <li>{{ error }}</li>
                    {% endfor %}
                </ul>
            {% endif %}
        </div>

        <div>
            <label>{{ form.description.label_tag }}</label>
            {{ form.description }}
            {% if form.description.errors %}
                <ul class="errors">
                    {% for error in form.description.errors %}
                        <li>{{ error }}</li>
                    {% endfor %}
                </ul>
            {% endif %}
        </div>

        <div>
            <label>{{ form.completed.label_tag }}</label>
            {{ form.completed }}
        </div>

        <input type="submit" value="Submit">
    </form>
{% endblock content %}
Notice how we can now display errors for each specific field.
Custom Validation
Django's ModelForm automatically validates based on your model's definition (e.g., max_length on a CharField). But what if you need a more specific rule? You can add custom validation methods to your form class.
A method named clean_<fieldname>() will be automatically called by is_valid() to perform custom validation on that specific field.
Let's add a rule that prevents users from creating tasks with the word "procrastinate" in the title.
How to use Django forms to easily build and manage forms
This article section explains how to add custom validation logic to your forms.
Read the part on Custom validation. It clearly demonstrates how to implement a clean_<field>() method to enforce field-specific rules and how to raise a ValidationError.
Update tasks/forms.py with a custom validator:
# tasks/forms.py
from django import forms
from django.core.exceptions import ValidationError
from .models import Task

class TaskForm(forms.ModelForm):
    def clean_title(self):
        title = self.cleaned_data.get('title')
        if 'procrastinate' in title.lower():
            raise ValidationError("This is a task manager, not a procrastination tool!")
        return title

    class Meta:
        model = Task
        fields = ['title', 'description', 'completed']
        widgets = {
            'description': forms.Textarea(attrs={'rows': 4}),
        }
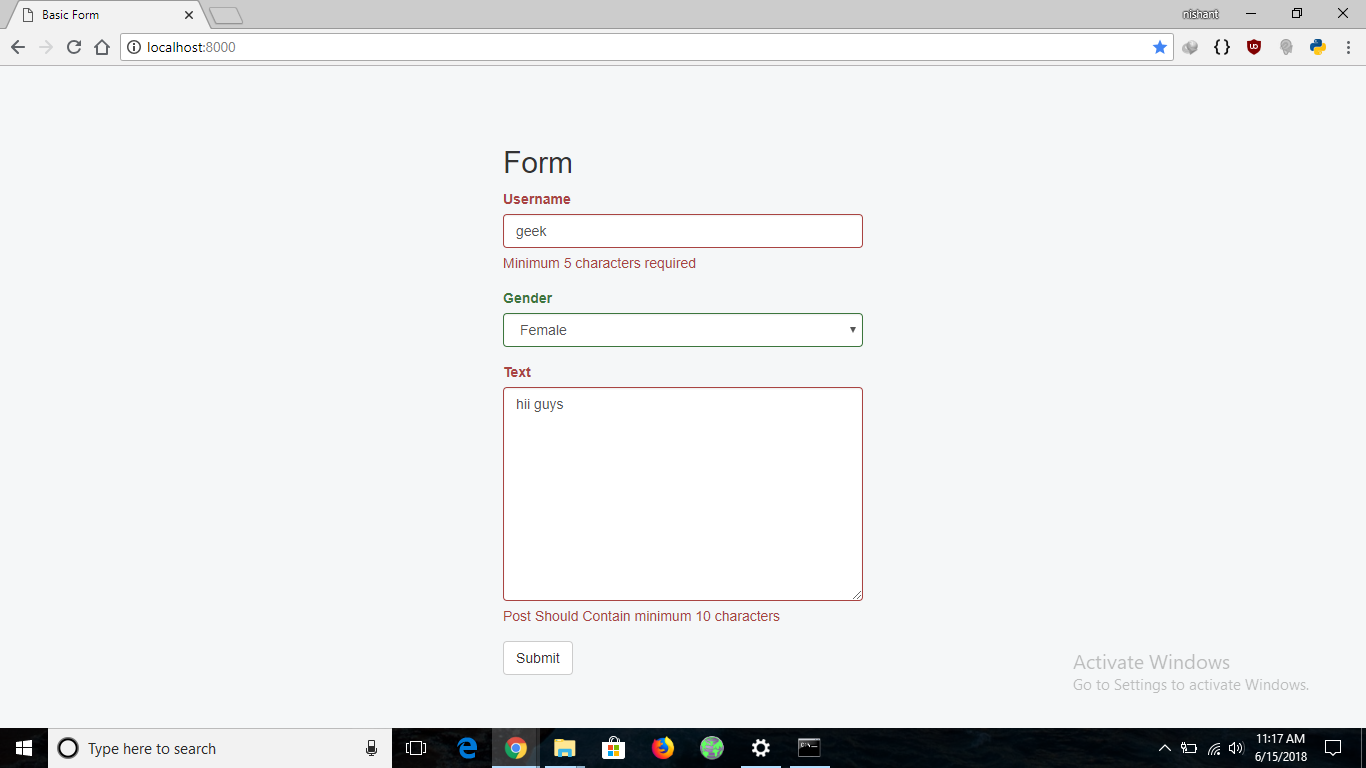
Now, if a user tries to submit a task with "procrastinate" in the title, they will see this friendly error message.
Conclusion
You have successfully leveled up your form-handling skills! You've moved from letting Django do all the work to taking control with ModelForm. This gives you the power to customize rendering, widgets, and, most importantly, validation logic.
Key Takeaways:
forms.ModelFormis the idiomatic Django way to create forms that map directly to your database models.- The form lifecycle follows the POST/Redirect/GET pattern to handle submissions securely and robustly.
- You can customize a form's appearance using widgets in the
Metaclass and by rendering fields manually in the template. - Custom validation is achieved by adding
clean_<fieldname>()methods to your form class, where you can raise aValidationError.
In our last lesson, we noted a critical flaw: every user can see and edit every other user's tasks. In our next lesson, we will finally fix this. We will associate tasks with the currently logged-in user, ensuring data privacy. This will involve overriding the form_valid method in our TaskCreateView—a perfect continuation of the work you've done today.