Hello! In our last lesson, you mastered the fundamentals of Django's ORM, learning how to perform Create, Read, Update, and Delete (CRUD) operations on your Task model. You now have the power to manipulate data directly in the database using Python. Today, we'll build the crucial layer that connects this data logic to the outside world: Django Views.
This lesson will show you how to write the functions and classes that receive web requests, use the ORM skills you've acquired to interact with the database, and then formulate and send back a response to the user's browser. We will explore the two main approaches for this: the straightforward Function-Based Views (FBVs) and the structured, object-oriented Class-Based Views (CBVs). By the end, you'll be able to create the core logic handlers for your web application.
1. The Role of Views in the Request-Response Cycle
Before we write any code, let's place views within the larger context of a Django application. When a user navigates to a URL in your application, a request travels through several layers before a response is sent back. A view is the component responsible for the application-specific logic that processes this request and generates the response.
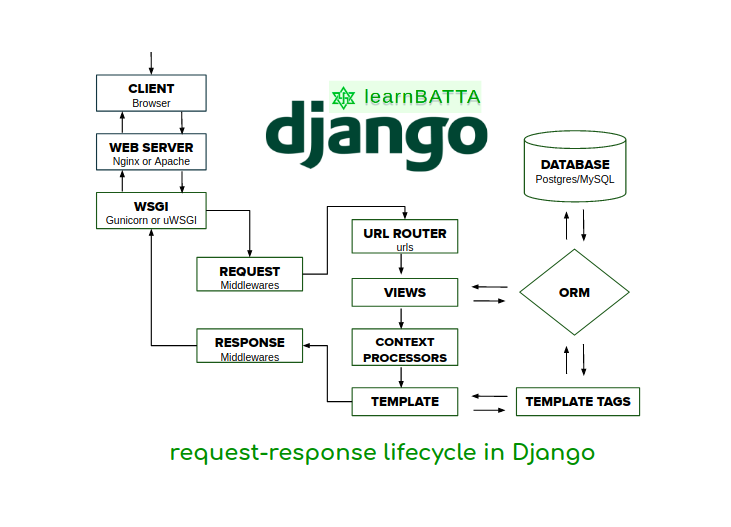
At its simplest, a Django view is just a Python callable that takes a web request and returns a web response. The "request" is an HttpRequest object containing metadata about the user's request, and the "response" is an HttpResponse object that you construct.
Let's watch a short segment that demonstrates this fundamental process. It shows how to create a very basic view and connect it to a URL.
Django - Views, URLs and Management Commands
This video from BugBytes explains and demonstrates how to create a simple view, map it to a URL, and see the result. It perfectly illustrates the core concepts we're discussing.
Watch from this section covering views and URLs. Pay close attention to these three steps: Writing a simple function in views.py. Creating a urls.py file in the app and defining a path. Including the app's URLs in the main project's urls.py.
2. Function-Based Views (FBVs)
As you saw in the video, the most direct way to write a view is with a simple Python function. This is known as a Function-Based View (FBV). They are easy to read, explicit, and a great starting point.
An FBV takes at least one argument: the request object. Inside the function, you typically perform some logic, like fetching data from the database. To handle different types of requests, like a user viewing a page (GET) versus submitting a form (POST), you use if statements to check the request.method attribute.
Hands-On: Creating a Task List View
Let's apply this to our TaskMaster project. We'll create a view to display all the tasks from our database.
-
Create
tasks/urls.py: Inside yourtasksapp directory, create a new file namedurls.py. This file will hold the URL patterns specific to thetasksapp. -
Create the View in
tasks/views.py: Opentasks/views.pyand add the following code. We'll import ourTaskmodel and therendershortcut, which is used to combine a template with a context dictionary and return anHttpResponse.from django.shortcuts import render from .models import Task def task_list(request): # Use the ORM to get all Task objects tasks = Task.objects.all() # Define the context to pass to the template context = { 'tasks': tasks } # Render the template with the context and return it return render(request, 'tasks/task_list.html', context) -
Create the Template: In your
tasksdirectory, create a new folder namedtemplates. Insidetemplates, create another folder namedtasks. Finally, insidetasks/templates/tasks, create a file namedtask_list.htmlwith this content:<!DOCTYPE html> <html> <head> <title>TaskMaster - All Tasks</title> </head> <body> <h1>All Tasks</h1> <ul> {% for task in tasks %} <li>{{ task.title }} - {% if task.completed %}Completed{% else %}Pending{% endif %}</li> {% empty %} <li>No tasks found.</li> {% endfor %} </ul> </body> </html>This uses Django's template language to loop through the
taskswe passed from the view. -
Wire up the URLs:
-
In your new
tasks/urls.py, add the following to map a URL to yourtask_listview:from django.urls import path from . import views urlpatterns = [ path('', views.task_list, name='task-list'), ] -
Now, tell the main project about these URLs. Open
taskmaster/urls.py(the project's URL file) and include thetasksapp's URLs:from django.contrib import admin from django.urls import path, include # Make sure to import include urlpatterns = [ path('admin/', admin.site.urls), path('tasks/', include('tasks.urls')), # Add this line ]
-
Now, run your development server (python manage.py runserver) and navigate to http://127.0.0.1:8000/tasks/. You should see a page listing all the tasks you created in the previous lesson!
To solidify your understanding of FBVs, the following article provides an excellent written explanation with clear pros and cons.
Class-based vs Function-based Views in Django
This article from TestDriven.io provides a great comparison of the two view types.
Start by reading the Introduction and then focus on the section on FBVs. Notice how the example code uses if request.method == 'POST' to handle form submissions, a pattern we will use frequently.
3. Class-Based Views (CBVs)
While FBVs are simple, they can become unwieldy. As you add more logic for different HTTP methods (GET, POST, PUT, etc.), your view function fills up with if/elif/else blocks. Class-Based Views (CBVs) solve this by using Python classes to structure your view logic.
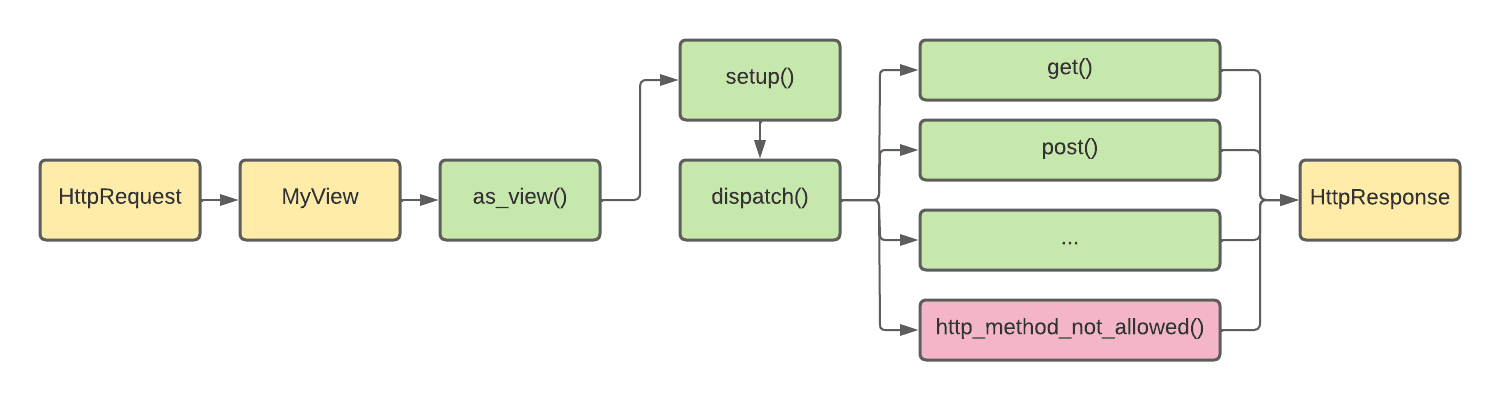
In a CBV, you create a class that inherits from one of Django's view classes (the most basic is django.views.View). Instead of one function with conditional branches, you write separate methods for each HTTP method you want to handle, such as get() and post().
This approach leverages Object-Oriented Programming, allowing for better organization and code reuse through inheritance.
The CBV Code Flow
When you use a CBV, Django does some work behind the scenes. The .as_view() method you add in urls.py is an entry point that sets up the class instance and calls a dispatch() method. This method inspects the request and calls the appropriate method on your class (get, post, etc.).
Hands-On: Converting to a Class-Based View
Let's convert our task_list FBV into a CBV. The logic remains the same, but the structure changes.
This video provides a very clear, step-by-step walkthrough of converting an FBV to a CBV, which we will follow.
Easily Convert Django Function Based Views To Class Based Views
This video by Dennis Ivy is perfect for understanding the practical steps of converting an FBV to a CBV.
Watch from this segment where he converts a list view. Follow his steps to refactor your own task_list view.
Here's the code for your tasks/views.py after the conversion:
from django.shortcuts import render
from django.views import View  # Import the base View class
from .models import Task


# Keep the old FBV for reference if you like, or remove it.
# def task_list(request):
#     ...

class TaskListView(View):
    def get(self, request):
        tasks = Task.objects.all()
        context = {
            'tasks': tasks
        }
        return render(request, 'tasks/task_list.html', context)
And the required change in tasks/urls.py:
from django.urls import path
from . import views

urlpatterns = [


    # The path is the same, but we now point to the class and call .as_view()
    path('', views.TaskListView.as_view(), name='task-list'),
]
Refresh your browser at http://127.0.0.1:8000/tasks/. The page should look exactly the same! You've successfully refactored the view's implementation without changing its behavior.
Now, return to the TestDriven.io article to read about CBVs and see how they are implemented in the author's "Todo App".
Class-based vs Function-based Views in Django
This article provides a parallel implementation using CBVs.
Read the section on Class-based views. As you read, compare their TaskListView class with the one you just wrote. We'll cover the "Generic Class-based Views" mentioned at the end of the section later in the course; for now, focus on the custom CBV that inherits directly from View.
Conclusion
You have now built the essential connection between your users and your application's logic. You can create endpoints that respond to web requests, fetch data using the ORM, and render that data for the user.
Key Takeaways:
- Views are the heart of Django's request processing, taking a request and returning a response.
- URLconfs (
urls.py) act as a table of contents, mapping URL paths to specific views. - Function-Based Views (FBVs) are simple, explicit Python functions. They are great for unique, non-standard logic.
- Class-Based Views (CBVs) are Python classes that organize logic into separate methods for each HTTP verb (
get,post). They promote better structure and reusability. - The
.as_view()method is the entry point for a CBV in your URL configuration.
In our next lesson, we will address a crucial next step: User Authentication. Now that we can display tasks, we need to control who can view, create, and modify them. We will dive into Django's built-in authentication system to add registration, login, and logout functionality to our TaskMaster application.