Welcome back! In our previous lesson, you laid the essential groundwork for our "TaskMaster" application by defining the Task model and using Django's migration system to create the corresponding database table. You've successfully built the blueprint and the container for our data. Now, it's time to learn how to manage the data within that container.
This lesson dives into the heart of database interaction with Django's Object-Relational Mapper (ORM). We'll focus on performing the four fundamental operations that form the acronym CRUD: Create, Read, Update, and Delete. You'll learn how to use Python code to add new tasks, retrieve existing ones, modify them, and remove them from your database, all without writing a single line of SQL. Mastering these ORM operations is a critical skill for any Django backend developer and a core component of building data-driven applications.
1. The CRUD Operations: A High-Level View
At its core, almost every web application that deals with data relies on CRUD operations. Django's ORM provides a powerful and intuitive Python-based API to perform these tasks.
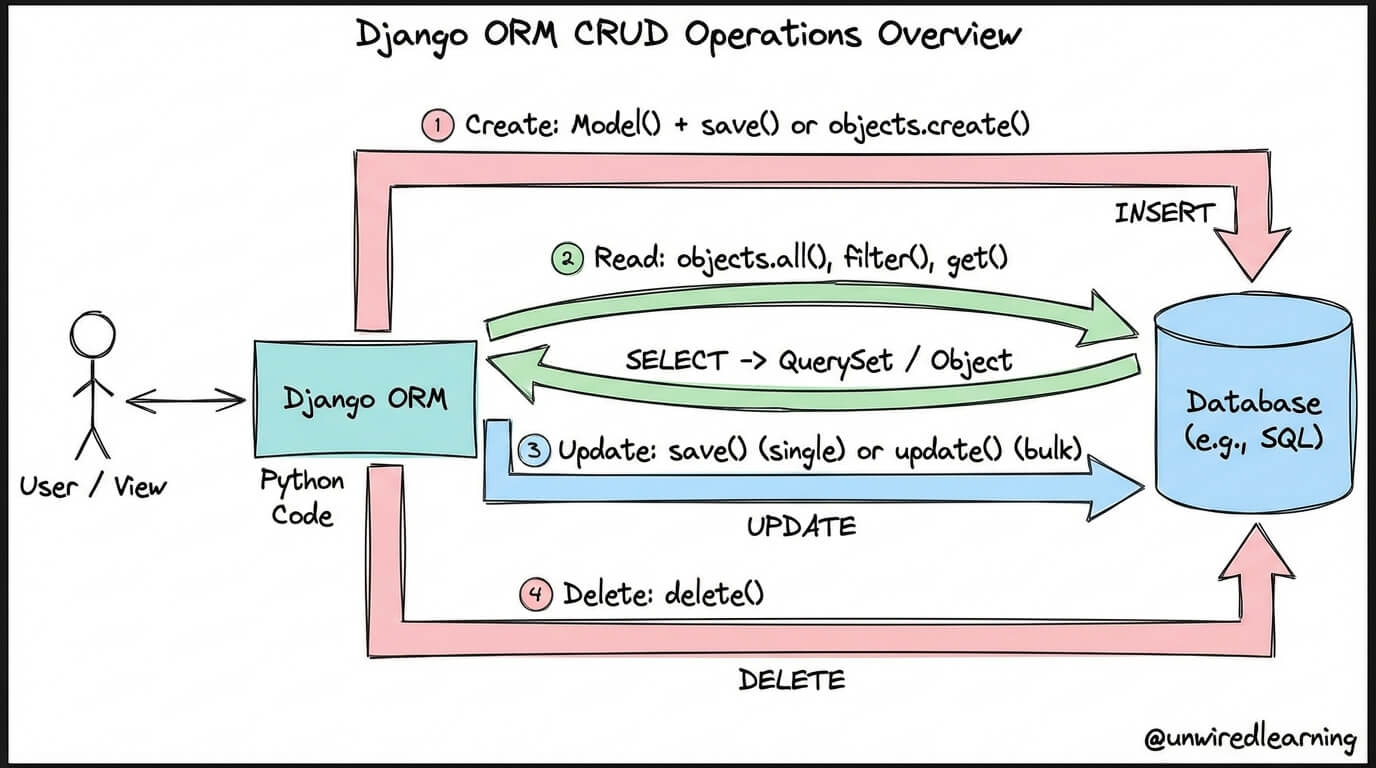
This diagram provides a visual overview of how Django's ORM acts as a bridge between your Python code and the database for all four CRUD operations. Your code calls Python methods, and the ORM translates them into the appropriate SQL commands (INSERT, SELECT, UPDATE, DELETE).
2. The Django Shell: Your Interactive Sandbox
Before we start manipulating data, we need a place to experiment. The Django Shell is an interactive Python console that's aware of your project's context, including your database settings and models. It's an indispensable tool for testing queries and interacting with your data on the fly.
To start the shell, navigate to your project's root directory (where manage.py is located) in your terminal and run:
python manage.py shell
This will launch a Python REPL (Read-Eval-Print Loop) where you can import your models and start working with them directly.
This short video from Dave Gray introduces the ORM and shows how to launch the interactive shell, which is exactly where we'll begin.
Python Django ORM Intro Tutorial
This video explains the role of the ORM and demonstrates how to start the interactive Django shell.
Watch the segment from the beginning until entering the shell. This will set you up for the hands-on exercises in this lesson.
3. Hands-On with CRUD: Let's Manage Some Tasks
Now that you're in the Django shell, let's perform each of the CRUD operations on our Task model. First, you'll need to import the Task model.
# In the Django shell
from tasks.models import Task
Create: Adding New Tasks
There are two primary ways to create a new record in the database.
Method 1: Instantiate and save()
This method is explicit and gives you a chance to modify the object before committing it to the database.
# In the Django shell
t1 = Task(title="Learn Django ORM", description="Complete the CRUD lesson.")
t1.save()
After you run .save(), Django executes an INSERT SQL query, and the t1 object is now a permanent record in your tasks_task table with a unique id.
Method 2: The create() Manager Method
This is a more common and concise way to create and save a new object in a single step.
# In the Django shell
t2 = Task.objects.create(title="Set up project repository", completed=True)
This single line achieves the same result as the two lines in the previous method.
Read: Retrieving Tasks
Reading data is the most frequent operation. Django's ORM provides a rich API for fetching records.
Getting all tasks:
The .all() method retrieves every record from the table. It returns a QuerySet, which is a list-like object containing your model instances.
# In the Django shell
all_tasks = Task.objects.all()
print(all_tasks)
You'll see a QuerySet containing the two tasks you just created.
Getting a single task:
The .get() method is used to retrieve exactly one object. It's typically used with a unique identifier like the primary key (id or pk).
# In the Django shell
# Assuming the first task you created has id=1
task_one = Task.objects.get(id=1)
print(task_one.title) # Output: Learn Django ORM
Important: .get() will raise a Task.DoesNotExist error if no object matches, or a Task.MultipleObjectsReturned error if more than one object matches. It enforces uniqueness.
Filtering tasks:
The .filter() method is the workhorse for retrieving a subset of your data based on specific criteria. It also returns a QuerySet.
# In the Django shell
completed_tasks = Task.objects.filter(completed=True)
print(completed_tasks)

# Find tasks with 'ORM' in the title (case-sensitive)
orm_tasks = Task.objects.filter(title__contains="ORM")
print(orm_tasks)
The double-underscore (__contains) is a "field lookup," one of Django's powerful querying tools.
To solidify these create and read operations, let's watch another segment from Dave Gray's video. He demonstrates creating and retrieving objects, and crucially, shows how the __str__ method you defined in the last lesson makes the QuerySet output so much more readable.
Python Django ORM Intro Tutorial
This video walks through creating, saving, and retrieving model instances in the shell, and shows the benefit of the __str__ method.
Watch from creating and reading objects. Follow along in your own shell, creating the tasks as shown in the examples above.
Update: Modifying Existing Tasks
Once you have a task, how do you change it?
Method 1: Update a single object
The most common way is to retrieve an object, modify its attributes in Python, and then call .save().
# In the Django shell
task_to_update = Task.objects.get(id=1)
task_to_update.completed = True  # Mark the task as completed
task_to_update.save()            # Save the changes to the database
When you call .save() on an existing object, Django intelligently executes an UPDATE SQL query instead of INSERT.
Method 2: Update multiple objects
For bulk updates, it's more efficient to use the .update() method on a QuerySet. This performs a single UPDATE query.
# Suppose we want to add a note to all incomplete tasks
Task.objects.filter(completed=False).update(description="This task is pending review.")
Important: The QuerySet.update() method bypasses the individual model's save() method, so any custom logic in save() will not be executed. It's a direct, efficient database operation.
The following video from BugBytes provides an excellent demonstration of both single and bulk update patterns.
Django ORM - Updating and Deleting QuerySets / ForeignKey on_delete behaviour
This video covers updating a single record using .save() and multiple records using QuerySet.update().
Watch how to update a single record by fetching it, changing its value, and calling .save(). Then, watch the section on updating multiple records using a QuerySet and the .update() method.
Delete: Removing Tasks
Finally, to remove records from the database, you use the .delete() method.
Method 1: Delete a single object
Retrieve the object you want to remove and call .delete().
# In the Django shell
# Let's create a temporary task to delete
task_to_delete = Task.objects.create(title="Temporary task")
task_to_delete.delete()
Method 2: Delete multiple objects
Just like with updates, you can call .delete() on a QuerySet to perform a bulk deletion.
# For example, to delete all completed tasks
Task.objects.filter(completed=True).delete()
Be very careful with bulk deletes! They are permanent.
The BugBytes video also clearly demonstrates single and bulk deletions.
Django ORM - Updating and Deleting QuerySets / ForeignKey on_delete behaviour
This segment shows how to delete single and multiple records. It also introduces the on_delete concept, which will be important later when we build relationships between models.
Watch the section on deleting a single record, followed by the explanation of deleting a queryset.
4. A Comprehensive Guide for Review
You've now practiced the fundamentals of all four CRUD operations. The following article from Unwired Learning is an excellent, comprehensive tutorial that covers everything you just learned with clear code examples. It uses a Post model for its examples, but the principles are identical. I highly recommend reading through it to reinforce your understanding.
Django ORM CRUD Tutorial: Create, Filter, Update, Delete
This article provides a complete walkthrough of CRUD operations with Django's ORM, covering various methods and common patterns for each operation.
Read the article from the beginning to the section on Common CRUD Patterns. As you read the examples for Post, mentally translate them to our Task model. For instance, Post.objects.create(...) is the same pattern as Task.objects.create(...). Pay close attention to the different methods presented for each operation.
Conclusion
In this lesson, you gained practical, hands-on experience with the core functionality of the Django ORM. You are now able to programmatically manage the data in your application's database using Python.
Key Takeaways:
- CRUD (Create, Read, Update, Delete) are the four basic operations for data management.
- The Django Shell (
manage.py shell) is your interactive environment for testing ORM queries. - Create: Use
Model.objects.create()or instantiate a model and call.save(). - Read: Use
Model.objects.all()for all records,.get()for a single unique record, and.filter()to find records matching specific criteria. - Update: For a single object, get it, change its attributes, and call
.save(). For bulk updates, useQuerySet.update(). - Delete: Call
.delete()on a single model instance or on aQuerySetfor bulk deletion.
You've built the data structure and learned how to manipulate the data within it. In our next lesson, we will build on this foundation by creating Django Views. These are the functions that will receive requests from a user's browser, use the CRUD operations you just learned to interact with the database, and then render a response. This is where your backend logic starts to come alive and connect to the outside world.