In our last session, you successfully created the skeleton of your first Django project, "TaskMaster." You set up the project structure, created a tasks app, and saw the default welcome page. This established the foundation upon which all functionality is built. Now, we'll give our application a memory by defining its data structure.
This lesson focuses on one of Django's most powerful features: its Object-Relational Mapper (ORM). You will learn how to define database tables using simple Python classes called Models. Then, you'll use Django's migration system to translate those Python definitions into an actual database schema. This process is fundamental to building any data-driven application and directly supports your goal of building robust backend systems.
1. Models: The Blueprint for Your Data
At the heart of any web application is data. In our "TaskMaster" project, the core piece of data is a "task". But how do we represent a task? It might have a title, a description, and a status (completed or not).
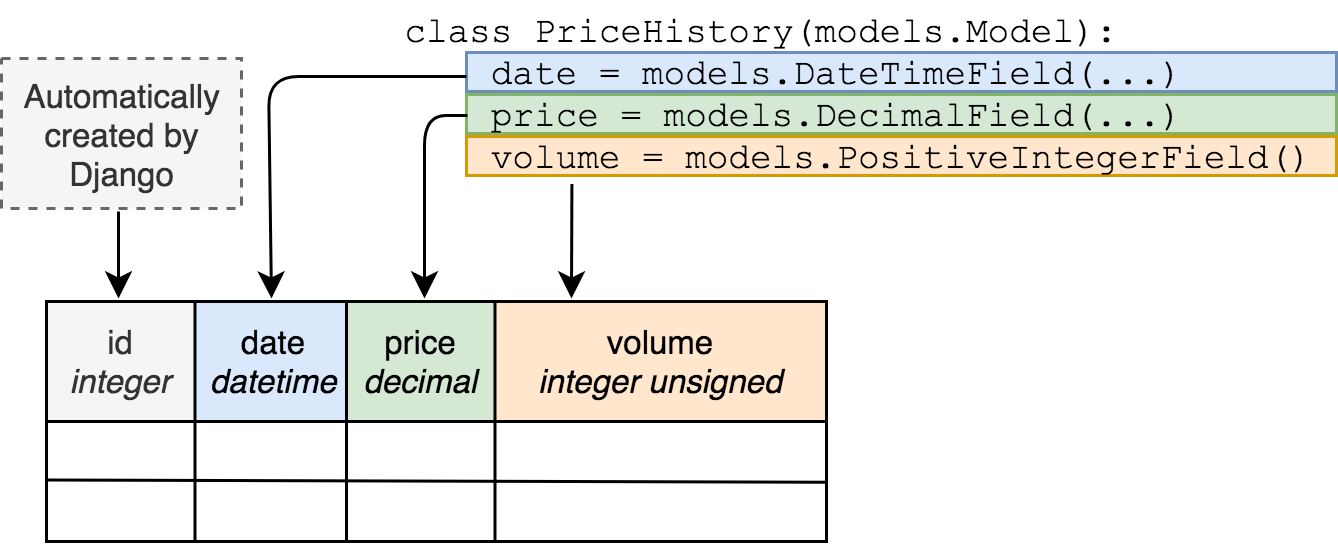
In Django, we define the structure of our data using Models. A model is a Python class that inherits from django.db.models.Model. Each attribute of the class represents a database field, and Django uses this class definition to interact with a corresponding database table. This mapping from a Python object to a database table is the core of Django's ORM.
The ORM is a powerful abstraction. It allows you to define your data structures and query your database using Python code, without writing a single line of SQL. Django handles the translation for you.
For a more detailed introduction to the concept of modeling data as objects, the Django Girls tutorial provides an excellent, beginner-friendly explanation.
This reading introduces the idea of object-oriented programming in the context of modeling real-world things, like a blog post, which serves as a great mental model before defining our own Task object.
Focus on the section What is a blog post?. Think about how you would apply the same logic to define the properties of a "task" in our application.
2. Defining the Task Model
Now, let's apply this concept to our tasks app. We will define a Task model in the tasks/models.py file. This file was automatically created when we ran the startapp command in the previous lesson.
Open taskmaster_project/tasks/models.py and replace its contents with the following code:
from django.db import models

class Task(models.Model):
    """A model representing a single task in the task manager."""
    title = models.CharField(max_length=200)
    description = models.TextField(blank=True, null=True)
    completed = models.BooleanField(default=False)
    created_at = models.DateTimeField(auto_now_add=True)
    updated_at = models.DateTimeField(auto_now=True)

    def __str__(self):
        return self.title
Let's break this down:
class Task(models.Model):: We define a class namedTaskthat inherits frommodels.Model. This is how Django knows this class should be mapped to a database table.title = models.CharField(...): A field for short text strings.max_lengthis required forCharField.description = models.TextField(...): A field for long-form text. We've setblank=Trueandnull=True, which means this field is optional at both the form validation and database levels.completed = models.BooleanField(...): A true/false field. We've setdefault=False, so any new task will be marked as incomplete by default.created_at = models.DateTimeField(auto_now_add=True): A date and time field.auto_now_add=Trueautomatically sets this field to the current timestamp when aTaskobject is first created.updated_at = models.DateTimeField(auto_now=True): This field will automatically be updated to the current timestamp every time the object is saved.def __str__(self):: This is a special Python method. Defining it provides a human-readable representation of the object, which is incredibly useful for debugging and in the Django admin interface. Here, we're saying that aTaskobject should be represented by its title.
This video from Dave Gray provides a clear walkthrough of creating a model and defining its fields, which should reinforce what you've just read.
Python Django Models and Migrations
This video segment demonstrates defining a Django model class and its fields, explaining different field types and their options.
Watch the section from creating our model. Pay attention to how different field types like CharField, TextField, and DateTimeField are used with various options.
3. The Migration Workflow: From Code to Database
You've defined the model in Python, but your database is still empty and unaware of this Task structure. To synchronize your database with your models, you use Django's two-step migration system.
makemigrations: This command inspects all your models and compares them against the set of migrations that currently exist on your filesystem. It then generates new migration files that describe the changes needed to get the database schema in sync with your models.migrate: This command takes all the unapplied migrations and runs them against the database, effectively altering your database tables, columns, and constraints.
This workflow is like version control for your database schema. The migration files are snapshots of your changes, and you can apply or even revert them.

4. Hands-On: Creating and Applying Your First Migration
Let's execute this two-step process for our Task model.
Step 1: Create the Migration File
In your terminal, from the root of your taskmaster_project directory (where manage.py is located), run the following command:
python manage.py makemigrations tasks
You should see output similar to this:
Migrations for 'tasks':
  tasks/migrations/0001_initial.py
    - Create model Task
Django has detected your new Task model and created a migration file named 0001_initial.py inside the tasks/migrations/ directory. This file contains Python code that describes the creation of the tasks_task table and its columns. It's the blueprint for the database change.
Step 2: Apply the Migration to the Database
Now, run the migrate command:
python manage.py migrate
The output will be more verbose. You'll see Django applying migrations for its built-in apps (like admin, auth, sessions) followed by the migration for our tasks app:
Operations to perform:
  Apply all migrations: admin, auth, contenttypes, sessions, tasks
Running migrations:
  Applying contenttypes.0001_initial... OK
  Applying auth.0001_initial... OK
  ... (many more lines for built-in apps) ...
  Applying tasks.0001_initial... OK
Congratulations! Your Task model is now a real table in your project's database (the default db.sqlite3 file).
The Django Girls tutorial provides a simple, step-by-step guide to this exact process, which is a great resource to solidify your understanding.
This guide walks you through the makemigrations and migrate commands, explaining what each one does.
Read the section Create tables for models. This directly corresponds to the commands you just ran.
5. Under the Hood: What Did Django Do?
You've successfully used the ORM, but what SQL did Django actually generate and run? You can find out with the sqlmigrate command. This is an excellent tool for debugging and for understanding how the ORM works.
Run this command in your terminal:
python manage.py sqlmigrate tasks 0001
You'll see the raw SQL that Django generated from your 0001_initial.py migration file. It will look something like this:
CREATE TABLE "tasks_task" (
    "id" integer NOT NULL PRIMARY KEY AUTOINCREMENT,
    "title" varchar(200) NOT NULL,
    "description" text NULL,
    "completed" bool NOT NULL,
    "created_at" datetime NOT NULL,
    "updated_at" datetime NOT NULL
);
Notice how Django automatically created the id primary key field and named the table tasks_task (a combination of the app name and the model name).
For a deeper dive into the migration files and the commands available to manage them, the following video provides a comprehensive exploration.
Django - What are migrations - actually? Introduction to migrations and the Django database
This video from Very Academy demystifies the migration process, exploring what the generated files contain and how commands like sqlmigrate and showmigrations work.
Watch what happens when we run make migrations to see a breakdown of the generated 0001_initial.py file. Then, watch how to view the SQL and apply the migration. This part demonstrates the sqlmigrate and migrate commands you just learned.
Conclusion
In this lesson, you bridged the gap between your Python code and the database. You learned that Django Models are the "single source of truth" for your data's structure and that the ORM uses them to manage the database schema without requiring you to write SQL.
Key Takeaways:
- A Django Model is a Python class that defines a database table.
- Model fields (
CharField,BooleanField, etc.) map to table columns. - The migration process is a two-step "dance":
makemigrationsanalyzes your models and creates migration files.migrateapplies these migration files to update the database schema.
- The
sqlmigratecommand is a useful tool to inspect the SQL that Django generates.
You've successfully defined the data structure for a task. In our next lesson, we will use the Django ORM to perform CRUD (Create, Read, Update, Delete) operations on this Task table, allowing us to finally start managing data in our application.