In our last session, we mapped out the "studio" that is Logic Pro, identifying the key areas like the Tracks Area and the Mixer. Now that you know your way around, it's time to prepare your canvas. Every creative project, whether it's a painting, a novel, or a piece of music, begins with setting the fundamental parameters. For a song, this means defining its technical and musical DNA before you even record a single note.
This lesson focuses on creating a new Logic Pro project and configuring its most crucial settings: the sample rate, tempo, and time signature. By the end of our session, you'll be able to confidently start a new project tailored to the specific needs of your music, ensuring a solid foundation for your productions.
Starting a New Project
When you first open Logic Pro or create a new project (File > New), you are presented with a dialog asking how you want to begin.
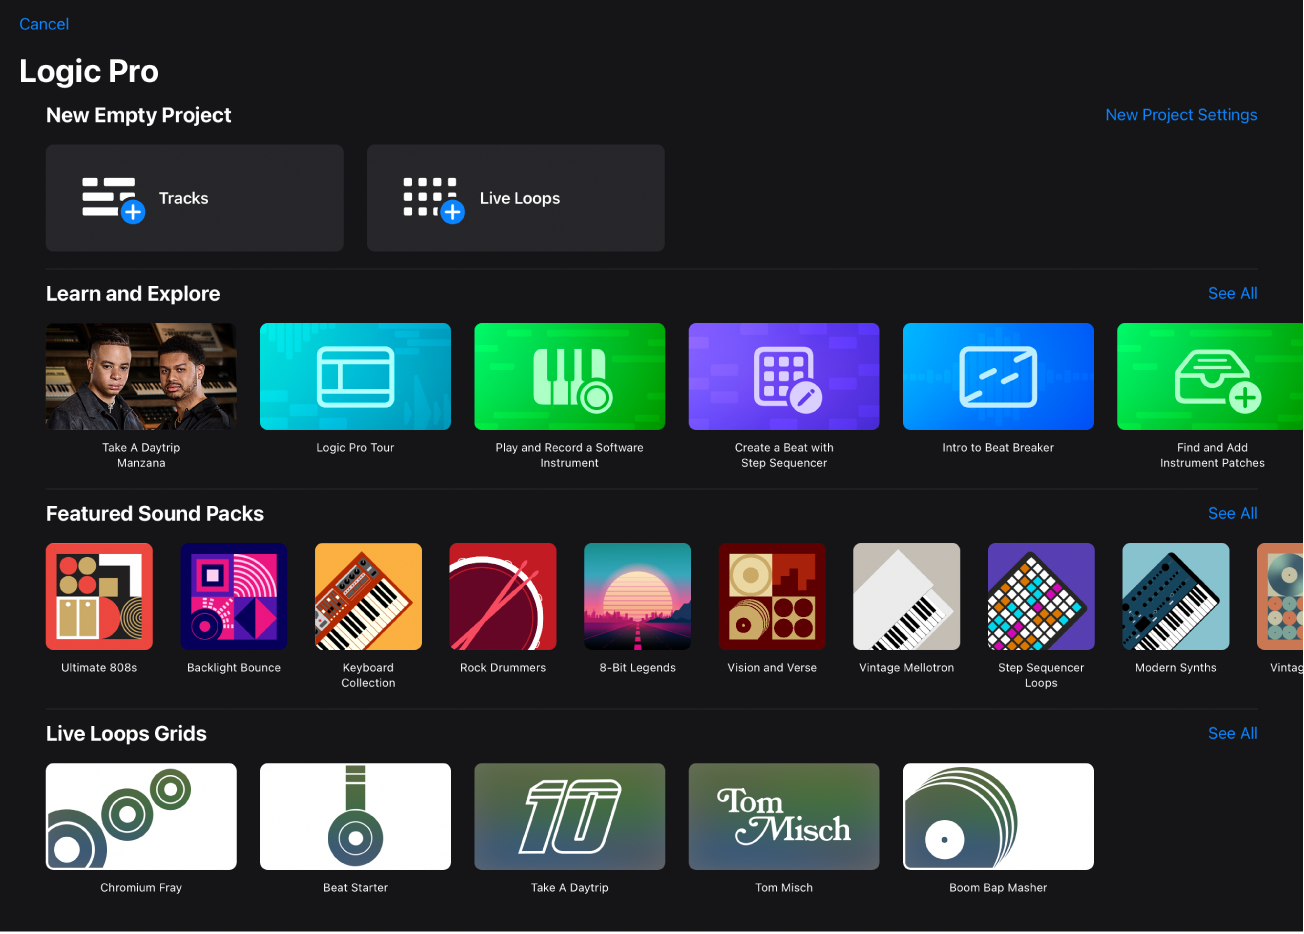
For your goal of producing full songs, you will almost always select Tracks to start an empty project. Before you do, however, there are important settings to consider.
The following video provides a quick, practical walkthrough of this initial setup screen.
Logic Pro 101: Beginner’s Guide
This clip from SEIDS' "Logic Pro 101: Beginner’s Guide" shows the initial project creation window and the settings you can configure right from the start.
Watch the segment from the first screen. Pay attention to the "Details" dropdown arrow, which reveals options for tempo, time signature, key, and sample rate. Don't worry about being overwhelmed; we will break down each of these settings.
As you saw, clicking the "Details" triangle (or the "New Project Settings" link in newer versions) opens up a panel where you can define the core properties of your project. Let's explore what these properties mean and why they matter.
The Technical Foundation: Sample Rate
Before we get to the musical settings, we must establish the technical quality of our project. The most important setting here is the sample rate.
In simple terms, sample rate determines the resolution of your digital audio. It's the number of times per second that Logic Pro takes a "snapshot" of an incoming audio signal to convert it into digital data. A higher sample rate captures more detail, resulting in higher fidelity, but it also demands more processing power from your computer and creates larger files.
Think of it like the resolution of a digital photograph. A low-resolution image might look blurry or pixelated up close, while a high-resolution image remains sharp and detailed.
Here are the common standards:
- 44.1 kHz (44,100 samples per second): The standard for audio CDs. It's a perfectly viable professional rate.
- 48 kHz (48,000 samples per second): The standard for audio in video and film. It has become the most common default for modern music production due to its slight increase in fidelity and wide compatibility.
- 96 kHz (96,000 samples per second): High-resolution audio. While it offers theoretical benefits, it significantly increases CPU load and file size. For most music production, especially when working with many tracks and effects, the benefits are often negligible.
For your album, 48 kHz is the recommended sample rate. It provides excellent quality and is the professional standard you'll encounter most often.
You can set this in the initial project dialog, or you can change it later by going to File > Project Settings > Audio....

The following video explains this setting clearly.
Logic Pro: A Complete Tutorial For The Overwhelmed Beginner!
This segment from Cuomo Music Creation's tutorial provides an excellent definition of sample rate and its implications.
Watch the portion on setting the Project's sample rate. The presenter explains what it means and why 48 kHz is a common and practical choice for most work.
The Musical Blueprint: Tempo, Time, and Key
Once the technical foundation is set, you can define the musical rules of your project. These are the tempo, time signature, and key signature. You can find concise definitions for these in the Logic Pro documentation.
Tempo, key, and time signature, Logic Pro X Help
This page from the Logic Pro X Help guide defines the three core musical properties of a project.
Read the short descriptions under the headings Tempo, Key, and Time signature. This will give you a solid, official definition of each term.
Now, let's put those definitions into the practical context of your music.
Tempo
Tempo is the speed of your song, measured in beats per minute (BPM). This is arguably the most important musical decision you'll make at the start, as it defines the entire energy and feel of the track. Your chosen genres operate across a wide range of tempos:
- Dark-Pop (Billie Eilish): Often slower and more atmospheric, typically from 70-120 BPM.
- Brazilian Funk: Characterized by its driving rhythm, usually around 130-150 BPM.
- Hyperpop (Charli XCX, Slayyyter): Known for its high energy, frequently pushing 130-180 BPM or even higher.
When blending these styles, a tempo in the 130-150 BPM range could be a fantastic starting point. Don't worry about getting it perfect immediately; it can always be changed later.
Time Signature
The time signature defines the rhythmic pulse of your music—how beats are grouped into measures (or bars). It looks like a fraction, such as 4/4.
- The top number tells you how many beats are in one measure.
- The bottom number tells you what kind of note gets one beat.
For nearly all pop, electronic, and funk music you'll be making, the time signature will be 4/4. This is so common it's called "common time." It means there are four beats in every measure, and a quarter note gets one beat. You can safely leave this setting at its default for now.
Key Signature
The key signature defines the "home" note (the tonic) and scale (major or minor) for your song. While you've opted to study music theory separately, setting the key in Logic is still useful. Many of Logic's loops and some software instruments will automatically conform to the project key, making it easier to experiment with ideas that sound musically coherent.
If you don't know the key of your song yet, it's perfectly fine to leave it at the default of C Major. Like tempo, this can easily be changed later.
The following video demonstrates how to adjust all these musical settings directly in Logic Pro's main window.
Logic Pro: A Complete Tutorial For The Overwhelmed Beginner!
Returning to the Cuomo Music Creation tutorial, this section shows you how to adjust the musical parameters of your project.
Watch from where the presenter begins to set the project's musical properties. Focus on how they adjust the tempo, key, and time signature using the LCD display in the Control Bar. This is the quickest way to make these changes as you work.
Your Turn: Creating a Project Template
Let's apply this knowledge. We will create a new project with settings optimized for a Hyperpop track with a Brazilian Funk influence.
- Open Logic Pro and choose File > New from Template... (or press
Command+N). This opens the Project Chooser. - Select New Project > Empty Project.
- At the bottom, click the Details disclosure triangle to reveal the project settings.
- Set the following parameters:
- Sample Rate: 48 kHz
- Tempo: 140 BPM (a great starting point for this genre blend)
- Time Signature: 4/4
- Key Signature: Leave it as C Major.
- Ensure your audio interface is selected for both Input and Output Device if you have one connected.
- Click Create.
You now have a blank project, perfectly configured and ready for your ideas. To learn more about how Logic handles project files and templates, the following article provides a good overview.
How to Start a Logic Pro Project | dummies
This article from Dummies.com explains how to start a project from the Project Chooser, similar to what we just did.
Read the sections Starting your project and the part on templates. This reinforces the process and introduces the concept of templates, which you'll find incredibly useful later on for saving your favorite starting setups.
Conclusion
You've now moved from a passive observer of the interface to an active creator. You've laid the essential groundwork for a new song by making deliberate, informed choices about its core settings.
Here are the key takeaways:
- Always start a new project by configuring its details: sample rate, tempo, and time signature.
- Sample Rate dictates the technical audio quality. Use 48 kHz as your professional standard.
- Tempo (BPM) defines the speed and energy of your track and is a crucial creative choice.
- Time Signature sets the rhythmic framework, which will almost always be 4/4 for your genres.
You have successfully prepared your digital canvas. The next step is to choose your colors and brushes. In our upcoming lesson, we will explore the two fundamental types of tracks in Logic Pro—audio and software instrument tracks—and learn how to add and configure them to start building your song.