In our last lesson, you set up the foundational parameters for a new song, establishing its tempo and audio quality. You now have a blank, correctly configured project—a digital canvas awaiting your creative brushstrokes. The next step in bringing your musical ideas to life is to add the elements that will hold your sounds: tracks.
This lesson delves into the two fundamental types of tracks in Logic Pro: Audio tracks and Software Instrument tracks. Understanding the distinct role of each is crucial for building your productions. By the end of this session, you will be able to differentiate between these track types, add them to your project, and configure their basic settings, preparing your session for recording and composition.
The Two Core Building Blocks: Audio vs. MIDI
In any digital audio workstation, sounds are organized into tracks. While there are several specialized track types, nearly everything you create will be built upon two primary concepts: audio and MIDI.
Conceptually, think of it this way:
- An Audio Track holds a direct recording of sound, like a photograph captures a moment. The waveform you see is a visual representation of the sound itself. It's for things you capture with a microphone (like vocals) or import as a sound file (like a drum loop).
- A Software Instrument Track holds MIDI (Musical Instrument Digital Interface) data. MIDI is not sound; it's a set of instructions—a blueprint—telling a virtual instrument which notes to play, when to play them, and with what expression. It's for creating melodies and harmonies with Logic's built-in synthesizers, pianos, and drum machines.
The following video offers a very clear and concise explanation of this crucial distinction.
Logic Pro Complete Beginner Basics Tutorial (2026)
This segment from the "Logic Pro Complete Beginner Basics Tutorial" by Ocean provides an excellent visual and conceptual breakdown of audio versus MIDI tracks.
Watch the section from the beginning. Focus on how the presenter differentiates between the audio waveform ("the sound itself") and the MIDI clip ("information that it tells the sound to play").
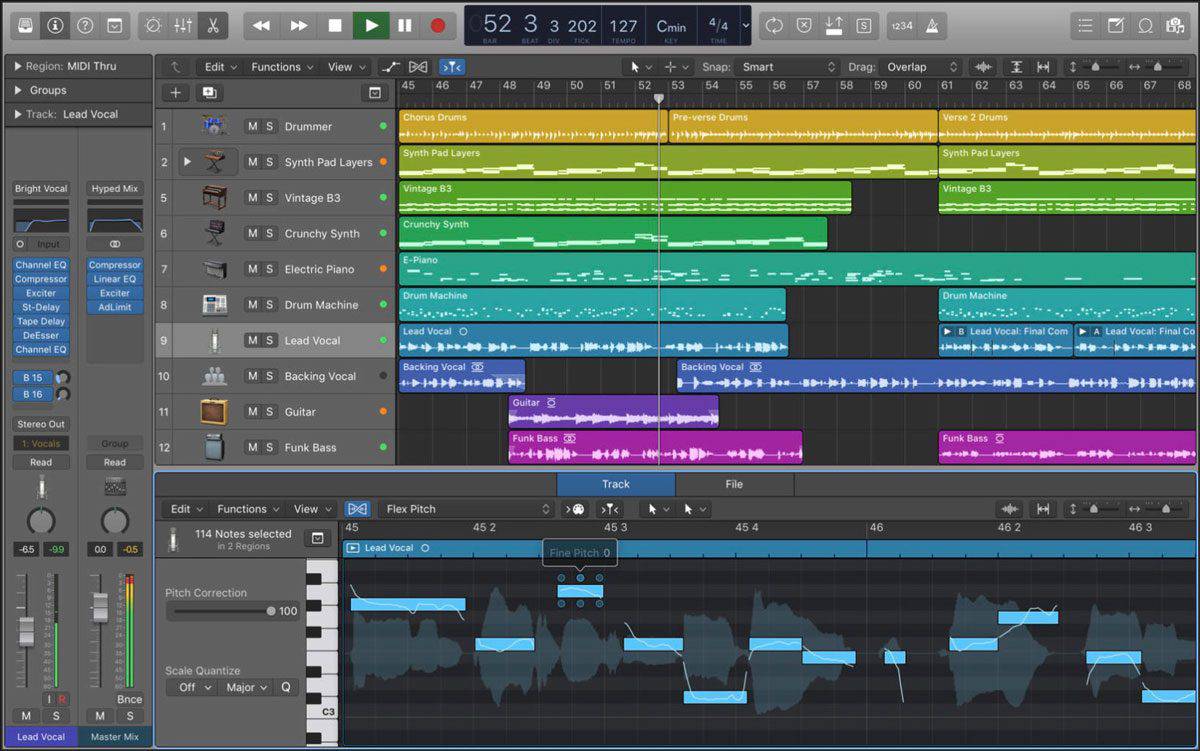
As you can see, these two track types look different in the main workspace. An audio track displays a waveform, while a software instrument track contains rectangular blocks representing MIDI notes.
Adding and Configuring Tracks
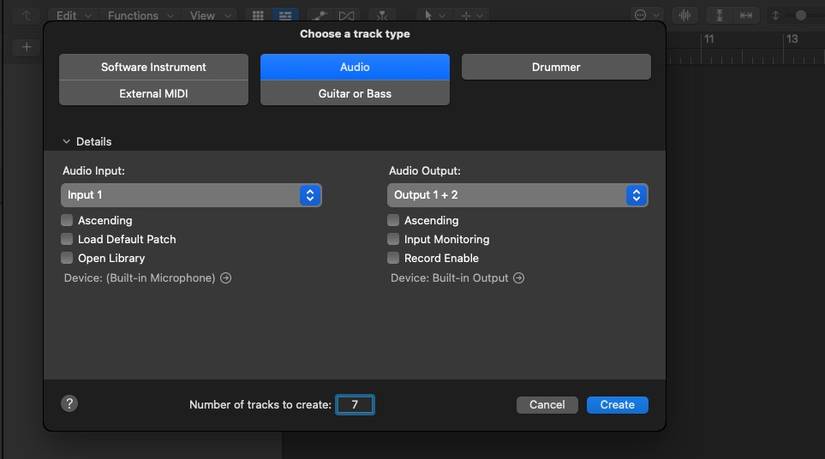
To add a new track to your project, you'll use the "Add Tracks" button, which is the + icon located above the track headers on the left side of the main window. This opens the "Choose a track type" dialog.
Let's break down how to create and set up each of these essential track types. The MusicTechHelpGuy channel provides some of the most thorough Logic Pro tutorials available. The following video gives a fantastic overview of all the track types, but we'll focus on the two most important ones.
Logic Pro 11 - #05 Tracks & Regions (MIDI, Patterns, Session Players, Audio)
This video, "Tracks & Regions," offers a deep dive into how different tracks function in Logic Pro. It's a great resource for understanding the bigger picture.
First, watch the introduction from the beginning for a solid definition of tracks and regions. Then, jump to the section on creating a Software Instrument track from this point. Observe how he adds the track and loads an instrument patch from the Library. Finally, watch the section on creating an Audio track from this point. Pay close attention to how he selects the correct input for his microphone. The other track types mentioned (Pattern, Session Player) are advanced variations we will explore in later modules.
The Audio Track
You'll use an audio track whenever you want to record sound from an external source. This is for your vocals, an acoustic guitar, or any sound you capture with a microphone.
To add and configure an Audio Track:
- Click the
+button to open the "Choose a track type" dialog. - Select Audio.
- Under the "Details" section, you must configure the Audio Input. This tells Logic where the sound is coming from. If your microphone is plugged into the first input of your audio interface, you would select
Input 1. - Click Create.
Once the track is created, there are two crucial buttons in its header:
- Record Enable (
R): This button must be armed (flashing red) for Logic to know you want to record onto this specific track. This prevents you from accidentally recording over the wrong thing. - Input Monitoring (
I): When this is activated (orange), you will hear the live signal from your microphone or instrument through your headphones or speakers, processed with any effects you've added. This is essential for hearing yourself as you perform.
The Software Instrument Track
You'll use a software instrument track to compose with Logic's vast library of virtual instruments. This is where you will design your synth sounds, program your drum patterns, and write basslines.
To add and configure a Software Instrument Track:
- Click the
+button. - Select Software Instrument.
- For now, you can leave the "Instrument" dropdown on its default setting.
- Click Create.
A new, empty software instrument track is created. By default, it loads a classic electric piano sound. To change it, make sure the Library is open (click the filing cabinet icon in the top-left corner, or press Y). With the new track selected, you can browse the Library and click on any sound patch to load it. Your track is now ready to be played with a MIDI keyboard or have notes drawn into its regions.
For a more hands-on, article-based walkthrough, the following resource is excellent.
Logic Pro X: Everything You Need to Get Started - Mastering.com
This guide from Mastering.com provides clear, step-by-step instructions for recording both audio and MIDI.
First, read Part 2: Recording Audio Tracks. This reinforces the process of adding an audio track and explains the importance of the Record Enable and Input Monitoring buttons. Next, read the beginning of Part 6, which covers creating a software instrument track, choosing a patch from the library, and even introduces Musical Typing (Command+K)—a great tool for playing instruments with your computer keyboard if you don't have a MIDI controller handy.
As you get comfortable, you'll want to work faster. Logic has keyboard shortcuts for creating tracks, which aligns perfectly with your tool-focused approach.
- New Audio Track:
Command + Option + A - New Software Instrument Track:
Command + Option + S
Your Turn: Assembling Your Palette
It's time to put this into practice. Open the project you created in the previous lesson (the one set to 140 BPM and 48 kHz). We are going to set up the initial tracks for a song idea.
-
Add an Audio Track:
- Use the shortcut
Command + Option + Aor the+button. - In the "Details" section, select the input your microphone is connected to (e.g., Input 1).
- Click Create.
- Double-click the track's name and rename it "Vocal Idea".
- Click the
Rbutton to arm it for recording.
- Use the shortcut
-
Add a Software Instrument Track for a Synth Pad:
- Use the shortcut
Command + Option + S. - Make sure the Library is visible (press
Yif it's not). - In the Library, navigate to
Synthesizer > Padand choose a sound that interests you, perhaps something atmospheric to suit the dark-pop aesthetic. - Rename the track "Dark Pad".
- Use the shortcut
-
Add a Software Instrument Track for a Bass:
- Press
Command + Option + Sagain. - In the Library, go to
Synthesizer > Bassand select a punchy or sub-heavy bass sound. This will be the foundation for your Brazilian Funk-inspired rhythm section. - Rename the track "Funk Bass".
- Press
Your project should now contain three tracks, each configured for a specific purpose. You have successfully assembled the basic palette of sounds needed to start building your song.
Conclusion
In this lesson, you've learned the critical difference between the two main track types that form the foundation of any music production. You now understand that Audio tracks hold recorded sound waves, while Software Instrument tracks hold MIDI data that triggers virtual instruments.
Here are the key takeaways:
- Audio tracks are for recording external sources like vocals and guitars. Their key settings are the Audio Input, Record Enable (
R), and Input Monitoring (I). - Software Instrument tracks are for playing Logic's built-in instruments using MIDI. Their key setting is choosing a sound patch from the Library.
- You can quickly add tracks using the
+button or keyboard shortcuts, which will be essential for a fast and fluid workflow.
You have now transformed your blank project into a session ready for creation. The next logical step is to learn how to control the flow of time within that session. In our next lesson, we will master Logic's transport controls, enabling you to play, record, and loop your ideas on the tracks you've just created.