Hello! Let's dive into the next step of shaping your sound.
In our last session, you harnessed the power of Smart Controls to create expressive, macro-style effects, like the "Drama" knob for your dark-pop pad. This gave you an intuitive, performance-oriented way to manipulate sound. Today, we're going to look "under the hood" at the components that those Smart Controls were manipulating. This lesson focuses on the heart of sound design in Logic Pro: the audio effect plugin chain.
The learning outcome for today is to load, bypass, and reorder audio effect plugins in a track's insert chain. Mastering this is like a designer learning how to mix primary colors to create a unique palette. It's the foundational skill for building the specific textures, tones, and atmospheres that will define your album, whether it's the aggressive saturation of hyperpop or the intimate, close-up feel of a Billie Eilish-style vocal.
The Channel Strip and Signal Flow
Every track in Logic has a corresponding channel strip, which you can see in the Inspector panel on the left or in the Mixer window (press X). Think of the channel strip as the track's control center. It holds the fader for volume, the pan knob for stereo placement, and, crucially, a series of slots for audio effects.
The most important concept to grasp here is signal flow. The audio signal starts at the top of the channel strip (from your audio file or software instrument) and flows downwards, passing through each effect plugin in the order they are arranged. Each plugin processes the sound and passes the result to the plugin below it.
This means the order of your plugins is not just a matter of organization; it is a fundamental creative choice that dramatically alters the final sound.
To visualize this, watch the following segment from The Band Guide. It clearly explains how the signal travels down through the chain of plugins on a channel strip.
Signal Flow: How Sound Moves Around Inside Logic | 5-Minute Logic Expert (Pt 11)
This video provides an excellent and concise explanation of the signal flow concept within Logic Pro.
Pay close attention to the section from instrument generating that sound. The presenter demonstrates how audio passes from the region, down through a series of plugins from top to bottom, before reaching the volume fader. This top-to-bottom processing is the key takeaway.
Managing Your Plugin Chain
Now that you understand the concept of signal flow, let's get practical. How do you actually build and manage this chain of effects? The process involves three key actions: loading, bypassing, and reordering.
Loading an Audio Effect
On any channel strip in the Inspector, you'll see a section labeled Audio FX. This is where you insert your plugins.
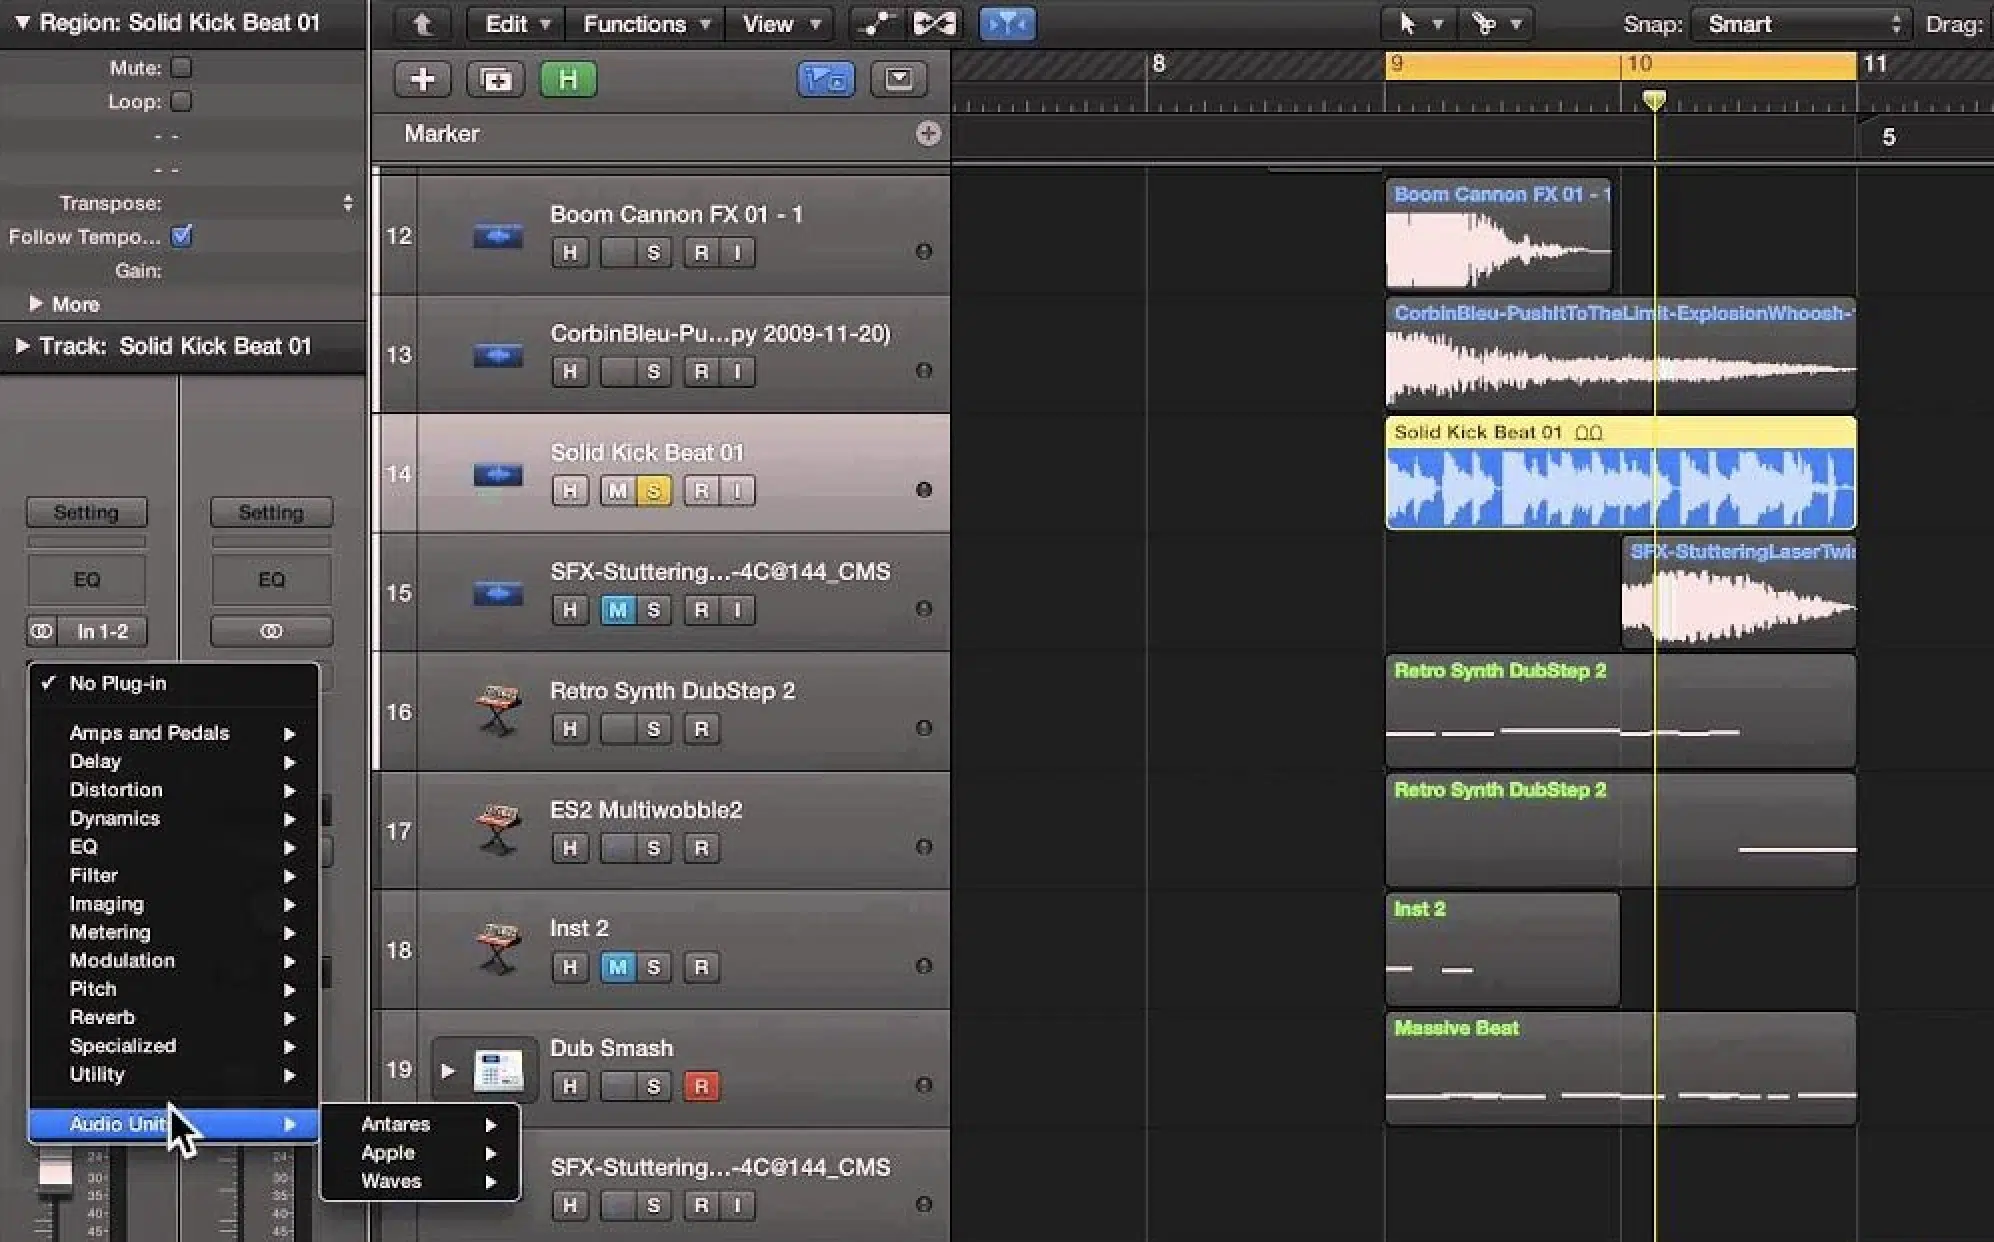
- Click on an empty Audio FX slot. A menu will pop up, listing all of Logic's built-in effects, categorized by type (e.g., Delay, Distortion, Dynamics, EQ, Reverb). Any third-party plugins you install will appear under "Audio Units" at the bottom.
- Navigate through the categories and select the plugin you want to load. Its interface will open, ready for you to tweak.

Bypassing a Plugin
Bypassing temporarily deactivates a plugin without removing it from the chain. This is one of the most critical actions in mixing and sound design, as it allows you to instantly compare the sound with and without the effect (an "A/B test").
To bypass a plugin, simply hover your mouse over it in the Audio FX slot and click the small blue power button that appears on the left. The plugin's name will be dimmed, and the sound will pass through it unprocessed. Click the power button again to re-engage it. You can also Option-click directly on the plugin slot as a shortcut.
Reordering and Removing Plugins
As we've established, order matters. To change the order of your plugins, simply click and drag any plugin up or down in the Audio FX list. You'll see the other plugins shift to make space.
To remove a plugin completely, click on its slot and, from the top of the menu that appears, choose "No Plug-in."
The following guide provides a concise, step-by-step summary of this entire process.
In-Depth Guide to Using Send vs. Insert Effects in Mixing
This article offers a clear, practical guide to insert effects. We're focusing on the "how-to" section for now.
Please read the subsection titled How to Insert an Effect. It's a six-step list that perfectly summarizes the actions of selecting a track, finding the slots, choosing, ordering, and bypassing/removing plugins. This reinforces what we've just discussed.
For a live demonstration of these actions within Logic's Mixer window, the following video is incredibly helpful.
Logic Pro: A Complete Tutorial For The Overwhelmed Beginner!
This segment of a comprehensive Logic tutorial focuses on the Mixer window, providing a great visual of plugin management in action.
Watch the section from clicking on them. Observe how the presenter adds new plugins, bypasses existing ones using the power icon, and easily rearranges them by clicking and dragging.
Practical Exercise: The EQ vs. Compressor Debate
Let's put this into practice to understand why order is so important. We'll use the two most common processing tools: EQ and Compression.
- Set up your track. Use an Apple Loop for this. Go to the Loop Browser (
O), find a dynamic drum loop (try searching for "Acoustic Drums"), and drag it onto a new audio track. Make sure the loop is playing. - Load your plugins. On the drum track's channel strip, load two plugins:
- In the first Audio FX slot, add a Compressor (
Dynamics > Compressor). - In the second slot, add a Channel EQ (
EQ > Channel EQ).
- In the first Audio FX slot, add a Compressor (
- Configure the effects.
- In the Compressor, choose a preset like "Studio VCA" to start. Increase the Ratio to around 4:1 and lower the Threshold until you see the needle moving significantly (about 3-6 dB of Gain Reduction).
- In the Channel EQ, create a drastic high-pass filter by clicking the button on the far left of the EQ display and dragging the frequency point up to around 200 Hz. This will cut out all the low-end kick drum.
- Listen and Compare.
- Configuration A (Compressor -> EQ): With the loop playing, listen carefully. The compressor is reacting to the full drum sound, including the kick you are about to cut. The EQ then removes the low end from this compressed signal.
- Configuration B (EQ -> Compressor): Now, click and drag the Channel EQ above the Compressor in the Audio FX list. Listen again. The sound will likely be different. Now, the EQ is removing the kick drum's energy before it hits the compressor. The compressor is no longer reacting to the kick, only to the snares and cymbals, which will change its behavior entirely.
Toggle the order back and forth. Neither is "right" or "wrong," but they are different. Understanding this interaction is the key to intentional sound shaping.
Conclusion
You've now moved from being a user of pre-made controls to an architect of your own sound processing chains. This fundamental skill is the gateway to all advanced sound design and mixing.
Here are the key takeaways from today's lesson:
- Audio effects are loaded as plugins into the Audio FX slots on a track's channel strip.
- The audio signal flows from top to bottom through this chain, with each plugin affecting the next.
- The order of plugins is a critical creative choice that significantly impacts the final sound.
- You can easily load, bypass, reorder, and remove plugins to build and audition your effect chains.
In our next and final lesson for this module, we will address a crucial organizational aspect of production: how to save, organize, and manage Logic Pro project files and their assets. As your projects grow from single loops to full songs with custom plugin chains, keeping your work tidy and safe becomes paramount. This will set you up for a smooth and efficient workflow as you begin to build your album.