Welcome! In our previous lessons, we've progressively assembled the foundational skills for navigating and working within Logic Pro. You've learned to manage tracks, use the transport controls, import loops, and, most recently, build your own custom sound-shaping chains with audio effect plugins. As you start creating more complex instrument and effect settings, your projects will grow from simple sketches into intricate sessions. This brings us to a crucial, often overlooked, aspect of the creative process: organization.
Today, we'll address the learning outcome of how to save, organize, and manage Logic Pro project files and their assets. This is the final and perhaps most important lesson in our "Logic Pro Fundamentals" module. For someone embarking on a full studio album, mastering file management isn't just about tidiness; it's about safeguarding your work, streamlining your creative flow, and enabling powerful, iterative experimentation. Think of it as building the organizational scaffolding that will support your entire album project from the first idea to the final master.
The Two Pillars of a Logic Pro Project: Packages vs. Folders
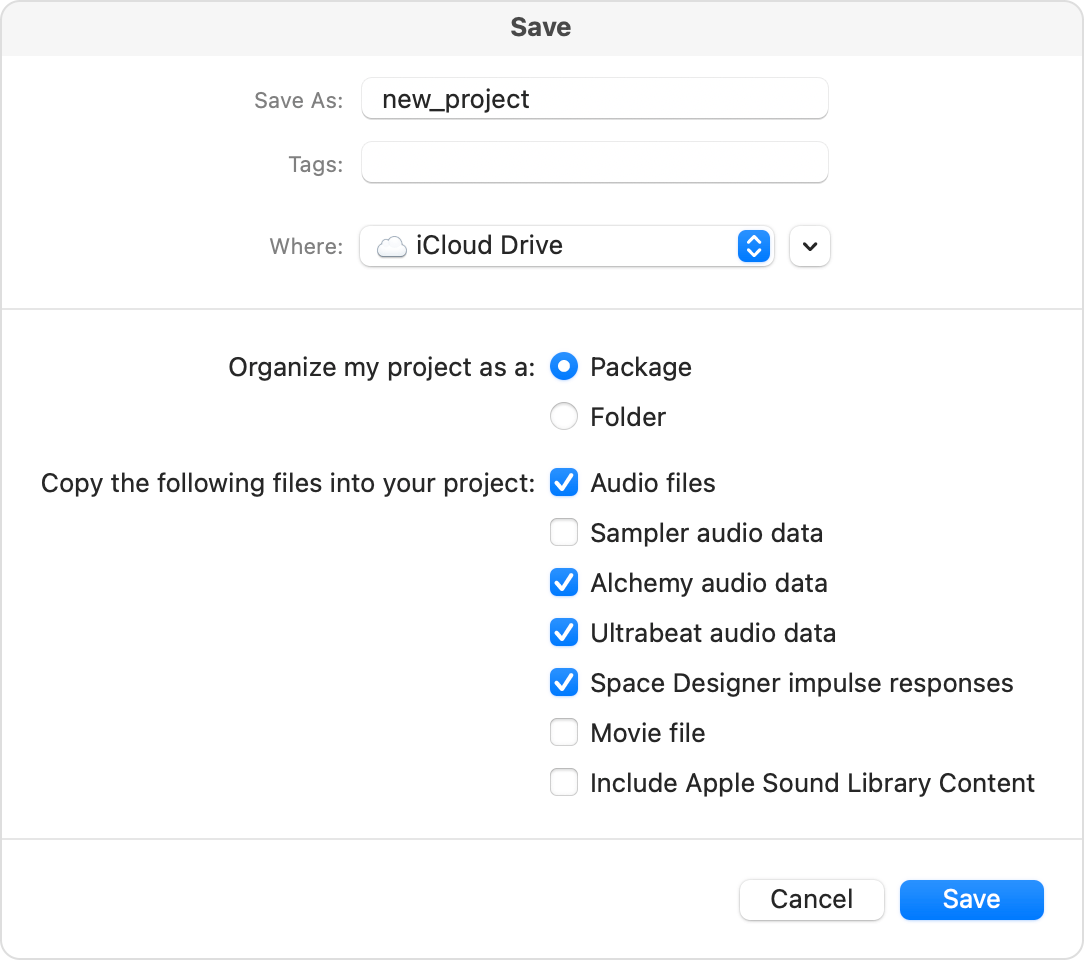
When you save a Logic Pro project for the first time (File > Save As...), you're faced with a fundamental choice that defines how your project and all its associated files are stored. You must decide whether to save your project as a Package or a Folder.
-
A Package appears in your Mac's Finder as a single, tidy file with the
.logicxextension. It's a container that holds your project data, audio files, samples, and other assets internally. This format is clean and very easy to move around or share, as everything is bundled together. -
A Folder creates a standard folder on your hard drive. Inside, you'll find the
.logicxproject file plus subfolders forAudio Files,Samples,Bounces, etc. This format exposes the project's structure, making it easy to see and access all the component files directly.
The video below from MusicTechHelpGuy offers an excellent comparison of these two formats and shows you what they look like in practice.
Logic Pro 11 - #06 Saving Projects, Project Packages vs. Folders
This video provides a clear, practical breakdown of Logic's two primary saving formats.
Watch the section from the beginning at cons of these formats for a quick introduction. Then, skip ahead to one extra click to get there, where the presenter demonstrates the structural differences between a project saved as a folder and one saved as a package. Notice how you can still access the contents of a package by right-clicking and selecting "Show Package Contents."
So, which should you choose?
- Packages are great for simplicity and portability. If you want a no-fuss way to keep everything together in one icon, this is your choice.
- Folders are often preferred for large, complex projects like an album. The open structure allows you to add your own folders for things like lyric sheets, mix notes, or inspirational reference tracks, keeping everything related to a song in one main directory.
For your album work, I recommend starting with the Folder structure for its flexibility, but the most important thing is to choose one and be consistent.
"Future-Proofing" Your Work: The Importance of Assets
This brings us to the single most important part of the 'Save' dialog: the checkboxes under "Copy the following files into your project."
Your projects will use many different types of files: audio you record, Apple Loops, samples for instruments like Sampler and Drum Machine Designer, and more. By default, Logic doesn't always store a copy of these files inside your project. Instead, it might simply reference them from their original location (e.g., the Apple Loops library or your Downloads folder).
This creates a significant risk. If you move, rename, or delete those original files, Logic will no longer be able to find them, and your project will break. To prevent this, you must tell Logic to save a copy of all necessary files inside your project folder or package.
The video from Why Logic Pro Rules demonstrates this pitfall and its solution perfectly.
#11 - Saving & Future Proofing Your Projects (Newbie to Ninja - A Beginner's Guide to Logic Pro)
This video brilliantly illustrates the concept of "future-proofing" by showing what happens when assets are not correctly saved with a project.
First, watch from deselect all these different options to understand the function of the asset checkboxes. Then, see the consequences from projects are future proof, where moving the source files results in a "missing files" error. Finally, watch the solution from as we expect it to, which shows how to consolidate assets into a project after the fact using the File > Project Settings > Assets menu.
The Golden Rule: When you save a project, always check all the asset boxes (Audio Files, Sampler Audio Data, Alchemy Audio Data, etc.). This makes your project self-contained and ensures it will open and play correctly on any computer, now and in the future.
Iteration and Experimentation with Project Alternatives
Your background in design thinking emphasizes iteration—creating and refining multiple versions of an idea. Logic Pro has a powerful feature designed for exactly this workflow: Project Alternatives.
Instead of cluttering your hard drive with dozens of separate project files (MySong_v1.logicx, MySong_v2_new_drums.logicx, MySong_final_mix.logicx), you can save different versions within a single project.
You can create a new alternative at any time via File > Project Alternatives > New Alternative.... This is perfect for trying out bold ideas without fear of ruining your main version. You could have alternatives for:
- Different drum patterns (e.g., "Hyperpop Version" vs. "Funk Version").
- Different song structures ("Short Intro" vs. "Long Intro").
- Different mixes or sound design choices.

This is your creative safety net. It encourages the kind of experimentation that leads to breakthroughs. You can always go back to a previous alternative if a new idea doesn't work out.
The following article offers a professional's take on organizing sessions, including the practical use of alternatives for version control.
How I organise a Logic Pro X session - Steve Frenzel
This article by Steve Frenzel outlines several best practices for keeping Logic projects tidy and manageable. We'll focus on the section about alternatives.
Read the final section of the article, Creating alternatives. Notice how the author uses alternatives to create a clean "Original" state to return to and separate versions for client revisions ("V1", "V2"). This is a powerful workflow model.
Pro-Level Organization Practices
As your album takes shape, your projects will grow. Adopting good organizational habits now will pay massive dividends later. The same article by Steve Frenzel provides an excellent overview of practices used by professionals.
Here are some key habits to build:
- Renaming Tracks: Double-click a track's name to give it a clear, descriptive label (e.g., "Sub Bass," "Lead Vocal," "Funk Kick"). Don't leave them as "Audio 1" or "Inst 2."
- Color-Coding: Right-click a track header and select "Assign Track Color" to visually group related tracks. For example, make all drum tracks blue, all bass tracks yellow, and all vocal tracks green. This makes your session instantly readable.
- Markers: Use the Marker track (
Option + ') to label the sections of your song (Intro, Verse, Chorus, Bridge, Outro). This helps with navigation and is essential when you move on to arranging your song.
These organizational methods are not just about neatness; they reduce cognitive load and allow you to focus on creativity rather than trying to decipher a messy project.
Sharing Your Work Correctly
Finally, there will come a time when you need to send a project to a collaborator, a mixing engineer, or even back to me for feedback. There is a right way and a wrong way to do this.
The common mistake: Sending only the .logicx file from a project that was saved as a Folder. This file contains the instructions, but not the actual audio or sample files, which live in the subfolders. The recipient will get a "missing files" error.
The correct method:
- Locate your project in Finder. This will either be the single Package file or the main Folder.
- Right-click on the file or folder and choose "Compress."
- This will create a single
.zipfile containing everything. Send this.zipfile.
The MusicTechHelpGuy video you watched earlier explains this critical final step perfectly.
Logic Pro 11 - #06 Saving Projects, Project Packages vs. Folders
This clip covers the essential last step for collaboration.
Please re-watch the final segment from all of the data. This directly addresses the common error beginners make and shows the correct way to compress a project for sharing.
Conclusion
You've now completed the foundational module for Logic Pro. By mastering file management, you've laid a stable, professional groundwork for your album production.
Here are the key takeaways from today's lesson:
- Save projects as either Packages (single file) or Folders (exposed structure), and be consistent.
- Always copy all assets (audio, samples, etc.) into your project to make it self-contained and "future-proof."
- Use Project Alternatives as a powerful, non-destructive tool for iteration and experimentation.
- Adopt professional habits like renaming, color-coding, and using markers to keep your projects organized and easy to navigate.
- When sharing, always compress (zip) the entire project folder or package, never just the
.logicxfile on its own.
With these fundamentals in place, you are ready to move from learning the tool to actively creating with it. In our next module, "Audio & MIDI Production Essentials," we will begin the exciting process of capturing your own unique sounds, starting with our first lesson on how to record audio from a microphone or interface with proper gain staging.