Hello! Welcome back to your journey into Logic Pro.
In our last lesson, you learned how to bring sounds into your project, both from Logic's own vast library of Apple Loops and by importing your own audio files. You now have the foundational skill of sourcing the raw materials for your music. Today, we're going to focus on the next crucial step: shaping and manipulating those sounds in an intuitive and powerful way.
This lesson is all about Smart Controls. The learning outcome is to use Smart Controls to intuitively adjust instrument and effect parameters. Think of this from a design perspective: when you're faced with a complex piece of software or machinery, a well-designed user interface abstracts the complexity away, giving you a few meaningful controls that have a big impact. Smart Controls are exactly that for your sounds. Instead of navigating through multiple plugin windows with dozens of tiny knobs, you get a clean, consolidated dashboard for performance and sound design. This is where you can start to make a sound truly your own, quickly and creatively.
What are Smart Controls? Your Sound's Dashboard
When you select any track in Logic, a set of controls automatically appears in the bottom part of the main window. This area is the Smart Controls panel. You can show or hide it at any time by pressing the B key on your keyboard.
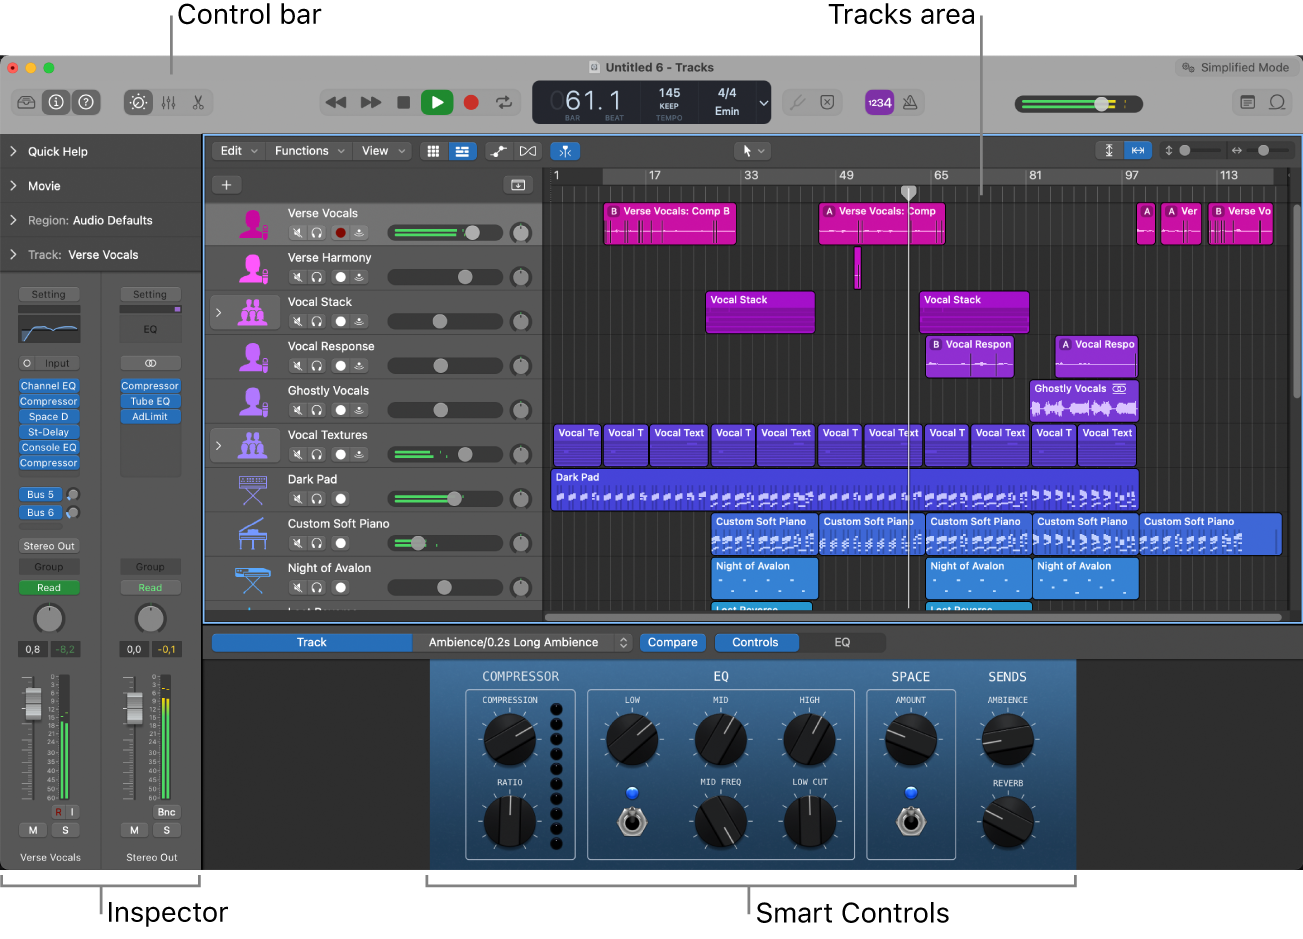
These controls are "smart" because they automatically map to what Logic considers the most important parameters of the instruments and effects on your selected track. This provides an immediate, simplified interface for you to start tweaking.
Let's see this in action. The following video provides an excellent tour of the Smart Controls panel and how it dynamically changes based on the track you've selected.
#22 - Smart Controls For Fast & Easy Controls (Newbie to Ninja - A Beginner's Guide to Logic Pro)
This video from the "Why Logic Pro Rules" channel offers a fantastic introduction to what Smart Controls are and how they function automatically.
First, watch the opening section to see how to open the panel and how it automatically updates for the selected track. Then, see a practical demonstration of tweaking the pre-assigned controls for both an audio track (like a guitar) and a software instrument (a drum kit). Pay attention to how a single knob movement can change the sound dramatically.
Your Turn: Explore the Automatic Mappings
Open the Logic project you started in the last lesson—the one with your drum, bass, and synth loops.
- Press
Bto ensure the Smart Controls panel is visible. - Select your drum track. Observe the controls. They might be labeled with things like "Kick," "Snare," "Tone," or "Compression." Try turning the knobs and see how the drum sound changes.
- Now, select your green (MIDI) synth track. The panel will instantly change to show controls relevant to that synthesizer, such as "Filter Cutoff," "Resonance," or "Envelope." Play a note and twist these knobs.
You're interacting with complex effects and instrument settings without needing to open a single plugin window. This is the core of the "intuitive" workflow Smart Controls offer.
The Power of Macros: One Knob to Rule Them All
The true power of Smart Controls is revealed when one knob controls multiple parameters at once. This is known as a macro control. For your interest in hyperpop and dark-pop, this technique is essential for creating dramatic builds, filter sweeps, and textural shifts.
Imagine a single "Intensify" knob that, when turned up, simultaneously increases distortion, opens a filter, and adds more reverb. This is what macros enable.

Designing Your Own Control Surface
While Logic's automatic setups are useful, the real creative potential is unlocked when you design your own Smart Control layout. This is where you apply your design thinking to your sound. You'll decide which parameters are most important for your performance and map them to a clean, custom interface.
The following article from Logic Studio Training provides a brilliant, step-by-step guide to building a custom Smart Control setup from scratch. We'll walk through it together.
Build Logic Pro Smart Controls That Actually Work - Logic Studio Training
This article provides a clear, practical workflow for creating your own powerful Smart Controls. It aligns perfectly with a hands-on, tool-focused approach.
First, read the section on setting up your channel strip to understand the initial preparation. Then, follow the instructions for opening the panel and its Inspector. The core of the process is in linking knobs to parameters using the "Learn" function. Finally, absorb the powerful techniques in fine-tuning your controls, especially the concept of creating macros by adding multiple mappings to one knob.
Practical Exercise: Build a "Dark-Pop" Macro
Let's apply these steps to create a sound tailored to your goals.
- Create a New Track: In your project, create a new Software Instrument track. In the Library, load up a simple synth patch. A good starting point is under
Synthesizer > Pad > Dark Atmosphere. - Add Effects: In the Inspector on the left, add the following Audio FX plugins to the channel strip in this order:
Filter > AutoFilterDistortion > OverdriveReverb > ChromaVerb
- Open Smart Controls: Press
Bto open the panel. In the top-left of the panel, click the Inspector button (it looks like a small 'i' in a circle) to open the mapping area. - Create a Macro Knob - "Drama":
- Click "Learn" in the Parameter Mapping section of the Inspector. The button will flash.
- Click on the first empty knob in the Smart Controls interface. It will become highlighted.
- Now, open the
AutoFilterplugin window. Click and drag its Cutoff knob. You should see the mapping appear in the Inspector. The first link is made. - Without turning off "Learn" mode, open the
Overdriveplugin window. Click and drag its Drive knob. - Finally, open the
ChromaVerbwindow. Click and drag its Wet knob. - Click "Learn" again to turn it off.
- Test and Refine:
- You have now mapped three different parameters to one Smart Control! Play some notes on your synth and turn your newly created knob. You should hear the sound get brighter, more distorted, and more reverberant all at once.
- Double-click the knob's label (e.g., "Knob 1") and rename it to something descriptive, like "Drama" or "Intensity."
- Experiment with the Invert and Range Min/Max settings in the mapping inspector for each parameter to fine-tune the macro's behavior. For instance, you could have the reverb decrease as the distortion increases by inverting its mapping.
Saving Your Work for Future Use
Once you've designed a control setup you love, you don't want to lose it. You can save the entire channel strip—the instrument, the effects, and the custom Smart Control mappings—as a single preset.
This is a crucial workflow habit. As you progress, you'll build a personal library of your own custom-designed sounds that you can recall in any project instantly. The article you just reviewed contains the steps for this.
Build Logic Pro Smart Controls That Actually Work - Logic Studio Training
Let's revisit the same article for the final, crucial step.
Read this short section. Follow the instructions to save the "Drama" synth you just created as a Channel Strip Setting. Name it something memorable like "My Dark Pop Pad 01".
Conclusion
Today you've bridged the gap between having sounds and performing them. You've seen how Smart Controls act as an intuitive dashboard for your tracks, abstracting away complexity and putting creative control at your fingertips. By moving beyond the default settings and designing your own macro controls, you've taken a significant step toward developing a unique sonic signature.
Here are your key takeaways from this lesson:
- Smart Controls (
Bkey) provide a simplified, intuitive interface for your track's most important parameters. - They update automatically when you select different tracks, offering a tailored set of controls.
- The real power lies in creating macro controls, where a single knob manipulates multiple parameters across different plugins.
- You can design and save your own custom sound palettes, complete with bespoke controls, as Channel Strip Settings.
In our next lesson, we will zoom in on the effects you used today. We'll formally cover how to load, bypass, and reorder audio effect plugins in a track's insert chain. This will give you the foundational knowledge to build the complex effect chains that you can then control with the Smart Control techniques you learned here.