In our previous session, you mastered the transport controls, giving you command over the timeline of your project. You can now navigate, loop sections, and capture ideas with the speed of a professional. Your Logic Pro project is no longer a static grid but a dynamic space ready for sound.
This lesson is about filling that space. We'll move from the empty canvas to acquiring your sonic palette. You'll learn how to bring sounds into your project in two fundamental ways: by exploring Logic's vast, built-in library of Apple Loops and by importing your own audio files. Mastering this is the first step to sketching out musical ideas quickly and building the foundation for your unique dark-pop and hyperpop tracks.
Your Instant Sound Library: The Loop Browser
Logic Pro comes with a massive, royalty-free library of musical phrases and sounds called Apple Loops. Think of this as an enormous collection of creative prompts—drum beats, bass lines, synth melodies, and atmospheric textures—all ready to be mixed and matched.
The best part? These loops automatically adapt to your project's tempo and key, allowing you to experiment freely without worrying about technical mismatches.
To get started, you need to open the Loop Browser. The quickest way is to press the O key on your keyboard. You can also click the loop icon in the top-right corner of the Control Bar.
For a quick walkthrough of how to open the browser and start exploring, the following video is a great starting point.
How To Use Apple Audio Loops in Logic Pro X
This video from music production tutor Charles Cleyn provides a very clear and concise introduction to the Loop Browser.
First, watch the brief segment showing you how to open the browser and use the 'O' shortcut. Then, continue watching as he explains the powerful filtering system, which is key to finding the sounds you need.
The Three Colors of Sound: Audio, MIDI, and Drummer Loops
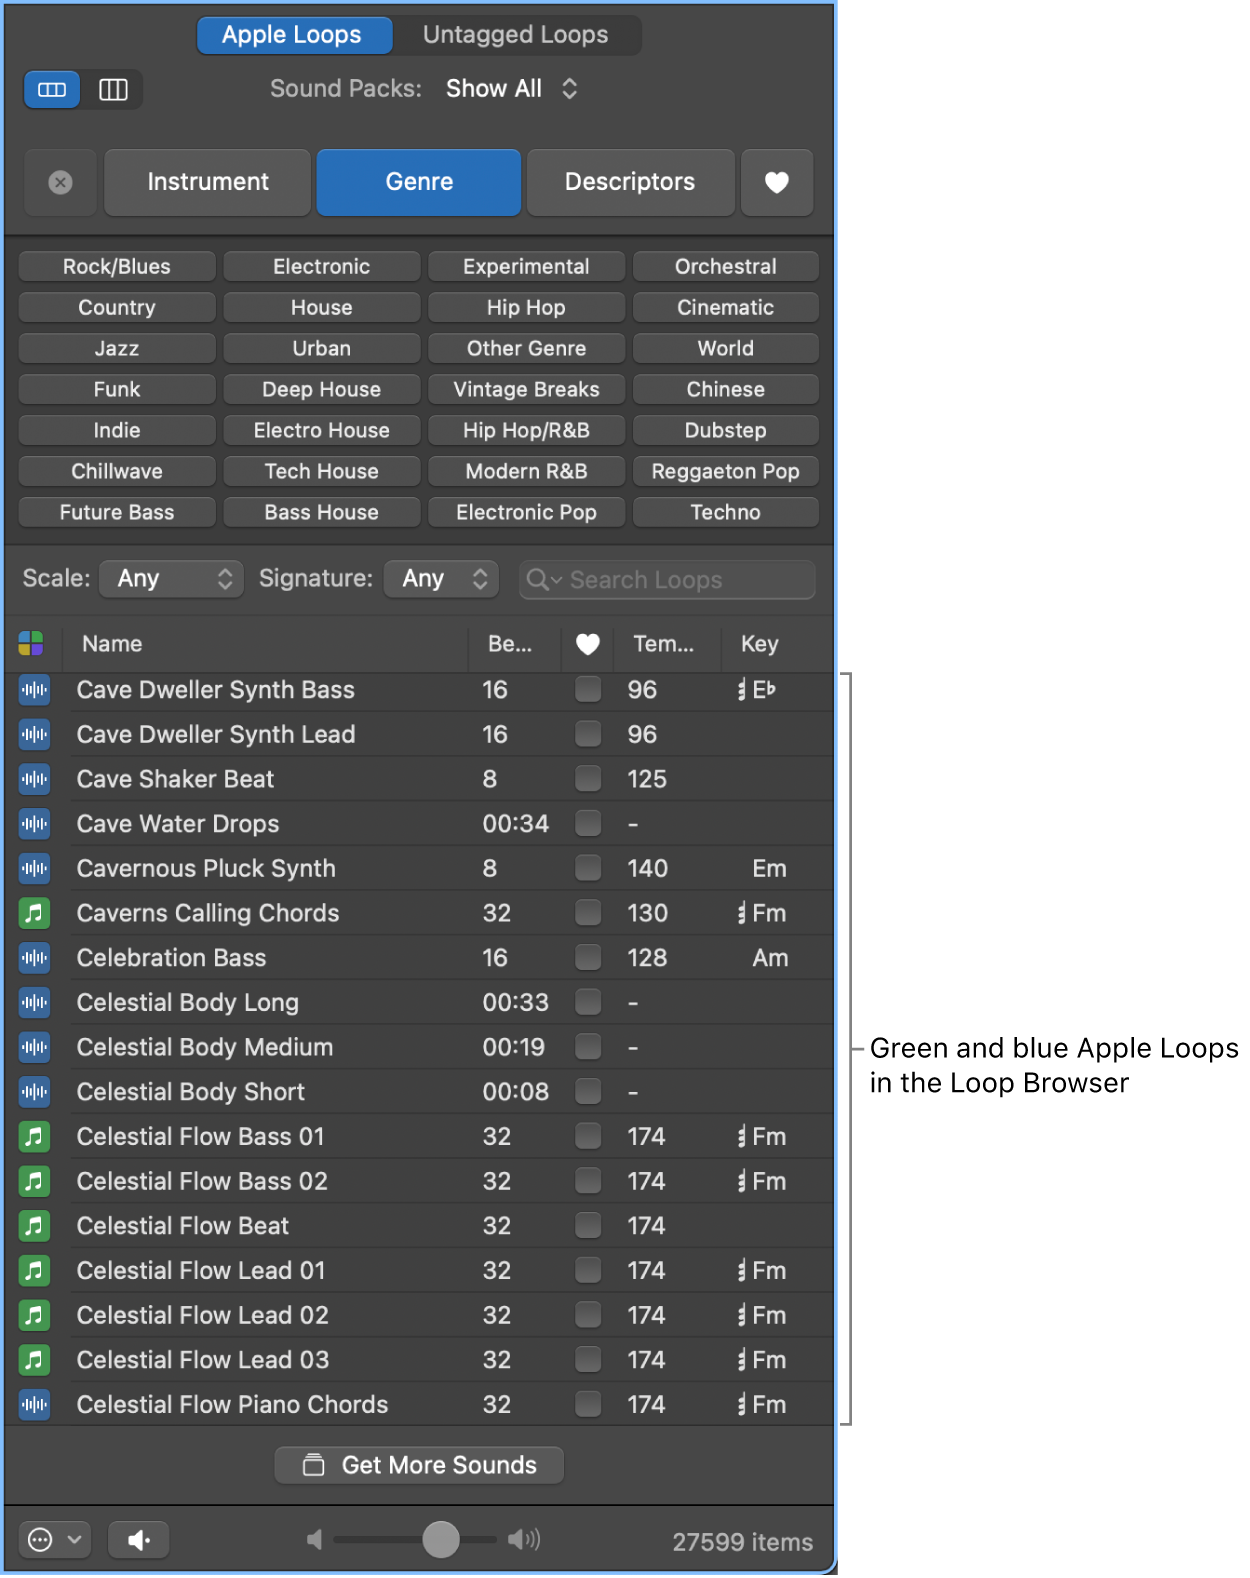
As you look at the list of loops, you'll notice their icons are different colors—primarily blue, green, and sometimes yellow. This color-coding is incredibly important as it tells you what type of loop it is and how you can edit it.
- Blue (Audio Loops): These are pre-recorded audio files, like a .wav or .mp3. You can stretch them, slice them, and apply effects, but you cannot change the individual notes within the performance. They are like a finished painting.
- Green (Software Instrument Loops): These contain MIDI data, not audio. When you drag a green loop into your project, Logic creates a track with a software instrument and all the necessary effects, already loaded with the MIDI notes to play the loop. Because it's MIDI, you have complete control to change the notes, the timing, and even swap out the instrument entirely. This is where your sound design journey truly begins.
- Yellow (Drummer Loops): These are special loops that load a "Drummer" track. This is a virtual drummer that you can direct to play in different styles. We will explore this powerful feature later in the course.
Understanding this distinction is one of the most fundamental concepts for producing in Logic. The next video segment explains this visually and is crucial for your workflow.
How To Use Apple Audio Loops in Logic Pro X
Charles Cleyn provides an excellent visual breakdown of the three loop types.
Watch this essential segment on the difference between blue, green, and yellow loops. Pay close attention to how a green loop opens up the Piano Roll with editable MIDI notes.
For your goal of creating unique sounds, green loops will be your best friend. You can take a synth line, deconstruct it, change the melody, and then replace the preset synth with one you've designed yourself.
Finding the Perfect Loop: Filtering and Searching
With tens of thousands of loops, scrolling randomly is inefficient. Your background in design thinking is relevant here; you need a strategy to narrow the options and find what serves your creative vision. The Loop Browser's filter system is designed for exactly this.
At the top of the browser, you'll see filter buttons like Instrument, Genre, and Descriptors.
- Instrument: Lets you find specific sounds like "Synth Bass," "Drums," "Vocals," or "Piano."
- Genre: Helps you find loops in styles like "Electronic," "Hip Hop," or "Funk." This will be invaluable for blending your core pop style with Brazilian Funk rhythms.
- Descriptors: Narrows the search further with moods like "Dark," "Melodic," "Grooving," or "Processed."
You can combine these filters to hone in on very specific ideas. For example, you could filter for: Instrument: Drums + Genre: Electronic + Descriptor: Grooving to find a danceable beat.
Everything You Need to Know About Apple Loops (& How to Make Your Own)
The "Why Logic Pro Rules" channel offers another excellent look at the Loop Browser, focusing on workflow.
Watch the section covering the filter system to see it in action. Afterward, continue watching as the video demonstrates how to preview loops and drag them into your project, showing how both audio and software instrument tracks are created automatically.
To audition a loop, simply click on it. It will play in sync with your project's tempo. To add it to your song, just click and drag it from the browser into the empty space in the Tracks Area below your existing tracks.
Your Turn: Sketch a Beat
Let's put this into practice. Open the Logic project you've been working on.
- Set the Tempo: In the top Control Bar, set your project's tempo to 135 BPM. This is a good starting point for an electro-pop or hyperpop track.
- Find a Drum Loop:
- Open the Loop Browser (
O). - Click the "All" button to clear any previous filters.
- Select the
Instrumentfilter and chooseDrums. - Select the
Genrefilter and chooseElectronic. - Audition a few loops until you find one with a driving feel. Drag it into your Tracks Area.
- Open the Loop Browser (
- Find a Bass Line:
- Clear the filters again.
- Select
Instrument>Bass>Synth Bass. - Select the
Descriptorfilter and chooseDark. - Find a bass loop that complements your drum beat and drag it in.
- Find a Synth Melody:
- Clear the filters.
- Select
Instrument>Synth. - Select
Loop Packs>All Packsand look for something that sounds modern, like loops from the "Prismatic" or "Keyboard Riffs" packs. - Choose a green (MIDI) synth loop and drag it in.
Press Spacebar to play. In just a few minutes, you have the basic sketch of a song. Now, double-click the green MIDI region you added. The Piano Roll will open, and you can try moving some notes around to make the melody your own.
Importing Your Own Audio Files
Apple Loops are fantastic, but the real unique character of your music will come from sounds you find or create yourself. This could be a drum sample downloaded from a service like Splice, a field recording, or a vocal phrase from a collaborator.
The easiest way to import an audio file is to drag it directly from a Finder window on your Mac and drop it into the Tracks Area in Logic. Logic will automatically create a new audio track for it.
When you do this, a dialog box will appear.
This dialog asks what you want to do with the imported audio file.
Always ensure "Copy files to project" is checked. This saves a copy of the audio file inside your Logic project file itself. This makes your project self-contained, so you never have to worry about broken file links if you move the project to another computer or hard drive.
For an official reference on this process, you can consult Apple's documentation.
Using loops and other media in Logic Pro for Mac - Apple Support (AZ)
This is the official guide from Apple, which explains the formal methods for importing files. While drag-and-drop is fastest, it's good to know where to find this information.
On this page, locate the "Import and search for files" section, and click the link for Import media files. On the new page that loads, read the section that starts with "Drag a file from the Finder". This confirms the process and explains the options in the dialog box.
Conclusion
You now have the core skills to populate your projects with sound. You've moved from an empty grid to a workspace filled with creative potential. This ability to quickly assemble and audition ideas is fundamental to modern music production.
Here are the key takeaways:
- The Loop Browser (
Okey) is your built-in library of royalty-free sounds. - The three colors of loops are critical: Blue (Audio) is a fixed recording, while Green (MIDI) is fully editable and ideal for sound design.
- Use the filter system (Instrument, Genre, Descriptors) to efficiently find sounds that match your creative goals.
- Drag-and-drop is the fastest way to add both Apple Loops and your own external audio files to your project.
- When importing your own files, always copy them to the project folder to keep your work self-contained.
Now that you can bring sounds into your project, the next step is to start sculpting them. In our next lesson, we will explore Smart Controls, an intuitive feature that lets you easily adjust the most important parameters of your instruments and effects, giving you immediate creative control over your sonic palette.