Introduction
In our last lesson, we built a structured protocol for the screening call, transforming it from a casual conversation into a systematic qualification process. You now have a method to identify qualified prospects who are a strong fit for your specialized consulting practice. The logical next step, and the focus of this lesson, is to design the system that seamlessly converts that qualified prospect into a fully-engaged client.
This lesson directly addresses the learning outcome: Design a client onboarding workflow that seamlessly moves a prospect from initial contact to signed agreement. For someone with your background in operations research and process efficiency, we can approach this task with particular rigor. We won't just create a to-do list; we will design a workflow—a dynamic, optimizable system with defined steps, decision points, and deliverables, all aimed at maximizing client confidence and minimizing friction.
Part 1: The Philosophy of Onboarding — From Checklist to Workflow
Before we map out the steps, let's define the strategic goals of our onboarding process. A world-class onboarding experience is built on three core principles, which we can call the "3 C's":
- Convenience: The process must be as frictionless as possible for the client. Every step should feel logical and easy to complete.
- Clarity: The client should never have to ask, "What's next?" The path from their "yes" to the start of coaching should be crystal clear.
- Confidence: Every interaction must reinforce their decision to work with you. A professional, organized onboarding process signals that they are in capable hands.
This video from Jordan Platten provides an excellent overview of these guiding principles.
This Exact Client Onboarding Process Made Me $500k in 30 Days
This video introduces the '3 C's' of effective client onboarding—Convenience, Clarity, and Confidence—which will serve as the guiding principles for our workflow design.
Watch the introductory segment from the beginning of this section. As you watch, consider how each of these principles counters the anxiety a new client might feel after making a significant investment.
With these principles in mind, it's crucial to distinguish between a simple checklist and a true workflow. Your experience with process analysis will make this distinction intuitive.
- A checklist is a static list of tasks (e.g., send contract, send invoice). It's helpful for tracking but doesn't show dependencies or flow.
- A workflow is a dynamic system. It defines the sequence of events, identifies dependencies (Task B cannot start until Task A is complete), assigns ownership, and includes decision points that can trigger different paths.
The article "7-step client onboarding workflow" explains this distinction well.
7-step client onboarding workflow for a seamless client experience
This resource clearly articulates the difference between a static checklist and a dynamic workflow, a concept central to building a scalable and efficient system.
Please read the FAQ entry titled "What is the difference between a client onboarding checklist and workflow?". This formalizes the system-thinking approach we will be taking.
Our goal is to build a robust workflow. A simple visual of a linear process, like the one below, is a good starting point, but we will create a more sophisticated model that accounts for the specific decision points in a consulting engagement.

Part 2: Mapping Your Onboarding Workflow
To design our workflow, we will adopt the methodology of a process map or flowchart. This approach allows us to visualize the entire sequence, identify potential bottlenecks, and optimize the flow of information and actions. The concepts of "decision trees" and "blockers" from queuing theory and project management are directly applicable here.
The video "How To Setup A Full Client Onboarding Process" by Toni Debelic is exceptionally useful as it provides a template and a clear methodology for this kind of process mapping. The language he uses will be very familiar to you.
How To Setup A Full Client Onboarding Process (TEMPLATE)
This video provides a powerful framework for mapping a client onboarding process as a system, using concepts like decision trees and blockers that align with an operations research perspective.
Watch the segment where the presenter walks through his onboarding template. Pay close attention to how he identifies the four main "blockers" or "decision trees" that gate the client's progress: Contract Signed Invoice Paid Onboarding Form Filled Onboarding Call Booked These are the critical nodes our workflow must be designed to navigate efficiently.
As the video explains, the entire onboarding process can be viewed as a system designed to guide the client from one blocker to the next as quickly and smoothly as possible. Your task as the system architect is to define what happens between these gates and what deliverables are required to open them.
Part 3: Designing the Key Deliverables
With the workflow map conceptualized, we can now design the specific artifacts and communication points that will populate it.
Post-Screening Communication
Immediately after a qualified prospect agrees to move forward during the screening call, your workflow begins. The first step is to send a "Next Steps" email that formalizes their decision and initiates the process. This email should contain:
- A confirmation of their commitment and your excitement to work with them.
- The key documents they need to review and sign: the Coaching Agreement.
- The invoice for the initial payment.
- A clear statement of the process: "Once the agreement is signed and payment is complete, you will receive access to your private client portal to begin our intake process."
The Coaching Agreement
This document is the first major gate. It transforms a prospect into a client. It's not just a legal formality; it's a tool for setting expectations and professional boundaries. The "Coaching Agreement Guide" from the Universal Coach Institute provides a superb, comprehensive checklist for its contents.
Coaching Agreement Guide: Templates and Best Practices
This guide offers a detailed breakdown of the essential components of a professional coaching contract, which serves as a critical deliverable in your onboarding workflow.
Focus on the section What Should Be Included. This acts as a perfect to-do list for drafting your own agreement. Note the key elements: Scope of Coaching (including the crucial coaching vs. therapy boundary) Roles and Responsibilities Confidentiality and Ethics Session Structure Fees, Payment, and Refunds Cancellation and Rescheduling Liability and Disclaimers Termination Clause The article also includes downloadable templates which you can adapt for your practice.
The Client Dashboard & Intake Form
Once the agreement is signed and the invoice is paid, the next gate is information collection. While a simple Google Form can work, a more professional approach that aligns with your high-end positioning is to create a dedicated, customized Client Dashboard. This elevates the client experience from a simple transaction to a curated environment.
The video from Jordan Platten provides a brilliant walkthrough of this concept.
This Exact Client Onboarding Process Made Me $500k in 30 Days
This video explains how to create and use a customized client dashboard to centralize all client-related information and significantly enhance the professional feel of your service.
Watch the segment from where he explains the client dashboard. He suggests using a tool like Notion to create a private, branded space for each client that includes: The Roadmap: A high-level overview of the coaching journey. The Intake Form: The detailed questionnaire for data gathering. File Storage: A link to a shared folder (e.g., Google Drive) for assets. Call Recordings: A database where all session recordings are automatically stored. This dashboard becomes the central hub for your entire engagement, demonstrating an exceptional level of organization and care.
Part 4: Assembling Your Onboarding Workflow
Now, let's integrate these pieces into a coherent workflow for your practice. This workflow can be run manually at first and automated later as you refine the process.
Proposed Onboarding Workflow:
- TRIGGER: A qualified prospect verbally agrees to proceed at the end of a screening call.
- ACTION (Manual): Send the "Next Steps" email containing the Coaching Agreement (via an e-signature service like DocuSign or PandaDoc) and the invoice (via a payment processor like Stripe).
- GATE 1: Contract Signed. The e-signature platform notifies you.
- GATE 2: Invoice Paid. The payment processor notifies you.
- ACTION (Automated/Manual): Once both gates are passed:
- Create a client record in your tracking system.
- Provision their private Client Dashboard (e.g., duplicate your Notion template and customize it with their name/logo).
- Send the official Welcome Email, which includes the link to their dashboard and instructions to complete the intake form within it.
- Optional: Trigger a welcome gift order to be sent to their address.
- GATE 3: Intake Form Completed. The form submission triggers a notification to you.
- ACTION (Automated): The confirmation page of the intake form presents the Calendly link to book the paid "Diagnostic & Strategy Session".
- GATE 4: Diagnostic Session Booked.
- WORKFLOW COMPLETE. The prospect is now a fully onboarded client, and you are prepared for the first deep-dive session.
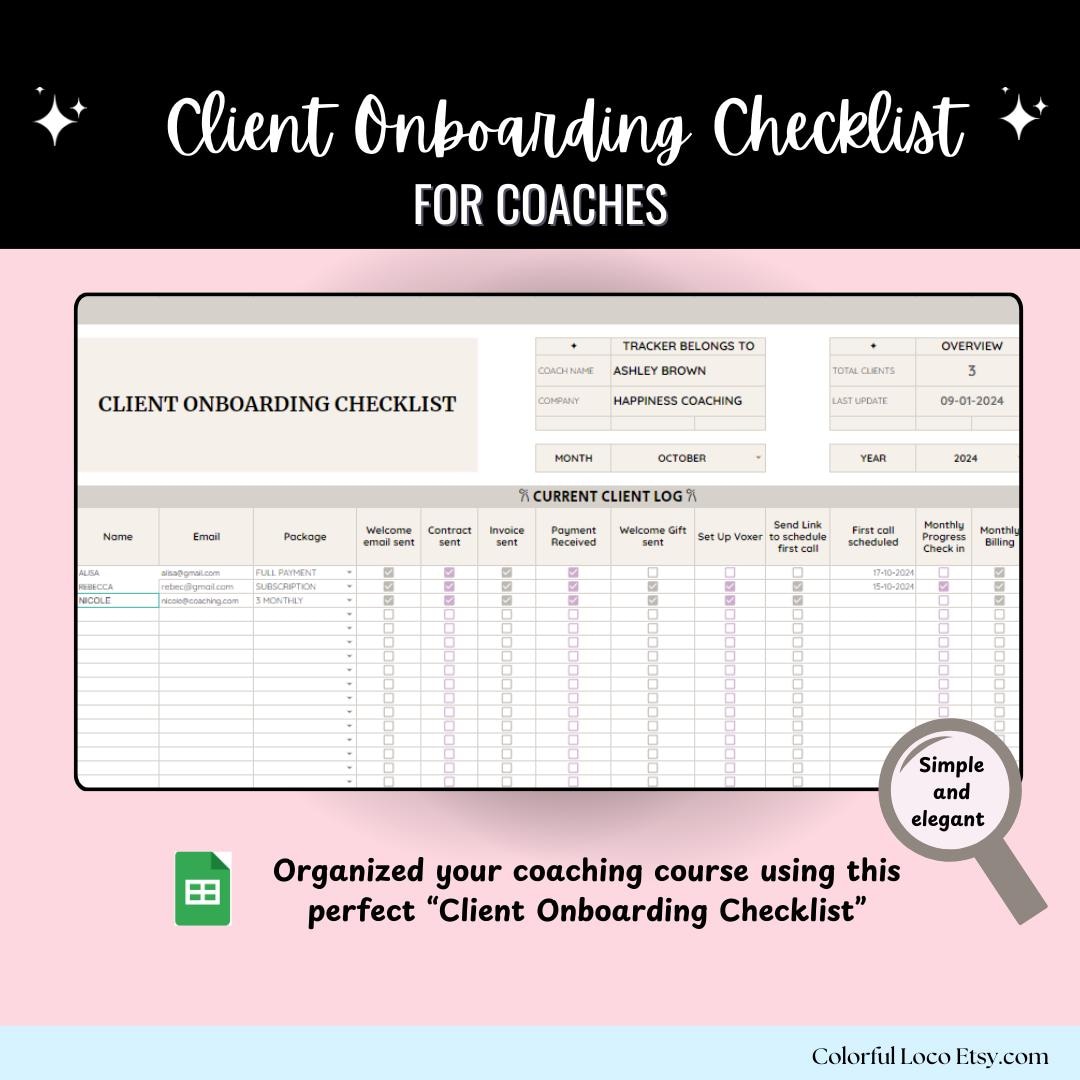
This entire process can be tracked using a simple tool, like the checklist shown below, which acts as the operational interface for your workflow.
Exercise: Design Your Workflow Protocol
It's time to translate this framework into a concrete protocol for your practice. Create a document outlining your official onboarding workflow. Address the following points:
- Map the Flow: Using the 9-step sequence above as a guide, create your own process map. You can do this as a simple numbered list or a flowchart if you prefer.
- Define Key Deliverables:
- Coaching Agreement: Draft the "Scope of Coaching" and "Boundaries" sections for your agreement. Be explicit about distinguishing your efficiency/logistical coaching from therapy or legal advice.
- Client Dashboard: Choose your platform (Notion is an excellent choice). Outline the top 3-4 sections your dashboard will include. How will you tailor the "Roadmap" to your unique process?
- Refine the Process:
- Decide on your primary communication channel for onboarding (e.g., email, dedicated Slack/WhatsApp).
- Toni Debelic's video stresses the importance of running a process manually for 20-25 clients before automating. What are the first parts of your workflow you would consider automating once the process is validated?
This exercise will produce the first version of a key standard operating procedure (SOP) for your business, ensuring every client receives the same seamless, professional experience.
Conclusion
In this lesson, you've designed a comprehensive client onboarding workflow, moving far beyond a simple checklist to create a sophisticated, client-centric system.
Your key takeaways are:
- A great onboarding process is built on Convenience, Clarity, and Confidence.
- Thinking in terms of a workflow with gates (or blockers) is a powerful way to design and optimize the process of converting a prospect to a client.
- Key deliverables like the Coaching Agreement and a customized Client Dashboard are not just administrative tasks; they are critical tools for setting expectations and demonstrating professionalism.
- The workflow should be designed to be automated but validated manually to ensure it is robust and client-friendly.
You now have a system for both acquiring qualified leads and seamlessly onboarding them into your practice. Our next lesson will build directly on this by having you create an informed consent document covering scope, limitations, confidentiality, and data handling protocols. This will add another layer of professional and ethical rigor to the documentation you've started to design today.