Hello! Let's get started with your next lesson.
In our last session, you mastered using structured references like Recruitment_Tracker[Stage] to create dynamic and readable formulas within Excel Tables. This is a powerful way to handle data that grows and changes.
Today, we'll learn a complementary skill that addresses the learning outcome: Define and use Named Ranges to simplify formula references for key cells or constants. While Tables are ideal for structured datasets, you'll often work with single, important values—like a target, a commission rate, or a list of department names—that live in fixed cells. Giving these cells or ranges a memorable name makes your formulas cleaner, more professional, and much easier to maintain.
1. The "Why": Named Ranges for Clarity and Maintenance
In the last lesson, we saw how structured references made formulas readable. Named Ranges take this a step further. Imagine you have a sales report where you calculate commission. Which of these formulas is easier to understand at a glance?
=G5*D12=Total_Sales*Commission_Rate
The second formula is self-explanatory. This is the core benefit of Named Ranges. For an MIS Executive, building reports that you and others can easily understand and audit is a critical skill.
Let's look at another example.
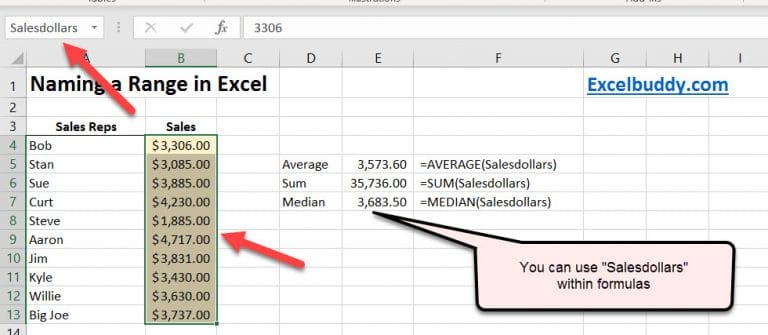
As you can see, using a name like Salesdollars makes your intention clear. Furthermore, if your Salesdollars range ever needed to be moved or adjusted, you would only have to update the Named Range definition in one place, and every formula using it would automatically be correct.
2. Creating Named Ranges: Three Key Methods
There are several ways to create a named range. We'll cover the most important ones, from the quickest method for a single cell to the most efficient method for large sets of data.
Method 1: The Name Box (The Quickest Way)
When you only need to name a single cell or a small range, the Name Box is the fastest tool.
Creating Named Ranges in Excel | Dynamic Named Range in Excel | FREE Excel Course
Let's watch a short video from the TrumpExcel channel that demonstrates how to create a simple named range using the Name Box and explains the key benefits.
Watch from the beginning to 02:42. Pay attention to how a cell reference like C2-C3 is transformed into the much more readable revenue-cogs.
As you saw, creating a name is as simple as selecting the cells, typing a name in the Name Box (to the left of the formula bar), and pressing Enter.
Important Naming Rules:
Before you start creating names, you must be aware of a few rules that Excel enforces.
- No spaces: Names cannot contain spaces. Use an underscore (
_) or hyphen (-) instead (e.g.,Commission_Rate). - Start with a letter or underscore: A name must begin with a letter, an underscore (
_), or a backslash (\). It cannot start with a number (e.g.,2024_Salesis invalid, butSales_2024is fine). - No cell references: You cannot use names that look like cell references, such as
A1orFY25.
Method 2: Create from Selection (The Most Efficient Way)
This is a huge time-saver and a technique that will make you look like a pro. When you have a block of data with clear headers, Excel can create all the named ranges for you automatically.
Stop manually naming ranges in Excel: There is a much faster way
The article 'Stop manually naming ranges in Excel' from How-To Geek perfectly explains why this feature is so powerful. It walks through a clear, practical scenario.
Please read the section 'The step-by-step process'. It shows you how to select a table of data and use the 'Create from Selection' tool (or the shortcut Ctrl+Shift+F3) to instantly name all your rows and columns based on the headers.
This method is incredibly useful for turning static summary tables into interactive formula components, which is a common task in MIS reporting.
Method 3: The Define Name Dialog Box
This method gives you the most control, allowing you to set the scope of your named range and add comments.
- Scope determines where the name can be used.
- Workbook (global): The name can be used on any sheet in the workbook. This is the default and most common setting.
- Worksheet (local): The name is recognized only on the specific sheet where it was created. This is useful for preventing name conflicts if you use the same name (e.g., "Total") on multiple sheets.
SECRET Excel Named Range Shortcuts to Save Time
This video from MyOnlineTrainingHub provides a great explanation of scope. It also introduces another powerful concept: creating a 'named constant'.
Please watch two short clips from this video: Named Constants (03:00 - 03:58): See how to create a name that holds a fixed value (like an exchange rate or commission percentage) that isn't stored in a cell. Name Scope (05:42 - 07:09): This clearly explains the difference between a workbook-level name and a worksheet-level name, and how to reference them.
Using named constants for values like tax rates, commission percentages, or yearly targets is a best practice. It centralizes your key business metrics, making your reports easier to update and less prone to error.
3. Managing Your Named Ranges
As your workbooks become more complex, you'll need a way to see, edit, and delete the names you've created. This is done through the Name Manager.
You can open the Name Manager by:
- Going to the Formulas tab and clicking Name Manager.
- Using the keyboard shortcut Ctrl + F3.

Creating Named Ranges in Excel | Dynamic Named Range in Excel | FREE Excel Course
For a quick tour of the Name Manager, let's return to the TrumpExcel video.
Watch from 10:30 to 12:36. This segment will show you how to use the Name Manager to view, edit, and delete the names you've created.
4. Hands-On Practice
Let's apply what you've learned. Please open a new, blank Excel sheet.
Scenario: You are creating a simple calculator to determine the final salary offer for new hires, which includes a potential role-specific bonus.
-
Set up the Data:
- In cell A1, type
Role. In B1, typeCyber Analyst. - In cell A2, type
Base Salary. In B2, type50000. - In cell A3, type
Bonus. - In cell A4, type
Final Offer.
- In cell A1, type
-
Create a Named Constant:
- We need to define a standard bonus for the
Cyber Analystrole. Let's make this a named constant. - Press Ctrl + F3 to open the Name Manager.
- Click New....
- In the Name box, type
Analyst_Bonus. - In the Refers to box, delete the existing content and type
=7500. - Click OK, then Close. You have now created a constant that isn't tied to any cell.
- We need to define a standard bonus for the
-
Write the Formula:
- Now, let's use this constant in a formula.
- Select cell B3.
- Type the following formula:
=IF(B1="Cyber Analyst", Analyst_Bonus, 0) - Press Enter. The value
7500should appear. This formula checks if the role in B1 is "Cyber Analyst" and, if so, applies the bonus you defined.
-
Name a Cell and Complete the Calculation:
- Let's give the
Base Salarycell a name. - Select cell B2.
- Click in the Name Box (left of the formula bar), type
Base_Salary, and press Enter. - Now, select cell B4.
- Type the formula:
=Base_Salary+B3 - Press Enter. The final offer should be calculated.
- Let's give the
Now, test your work. Change the role in B1 to "MIS Executive". The bonus in B3 should immediately change to 0, and the final offer will update. This simple exercise demonstrates how named ranges and constants can make your logic clear and your models interactive.
Key Takeaways
- Named Ranges give human-readable names to cells, ranges, constants, or formulas, making your work self-documenting.
- They are ideal for referring to fixed values or ranges, such as tax rates, targets, or configuration lists. This complements Excel Tables and structured references, which are best for dynamic, row-based data.
- You can create names using the Name Box, the Define Name dialog, or the highly efficient Create from Selection tool (
Ctrl+Shift+F3). - The Name Manager (
Ctrl+F3) is your central hub for editing, deleting, and auditing all the names in your workbook.
Next Lesson
Fantastic! You've added another essential tool to your Excel toolkit. You now understand how to structure both dynamic data (with Tables) and static data (with Named Ranges).
In our next lesson, we'll dive into sorting and filtering data within an Excel Table. This is a fundamental skill for exploring your data, finding specific records, and preparing subsets of data for reporting.