Hello! Welcome to the second lesson in our "Core Formulas for Conditional Logic" module.
In our last session, we mastered relative, absolute, and mixed cell references. You learned how to use the $ symbol to lock parts of a formula, allowing you to write a calculation once and copy it efficiently. This is a skill we will put to immediate use today.
This lesson focuses on one of the most powerful functions in Excel: the IF function. We will tackle the learning outcome: Write IF and nested IF formulas to categorize data based on logical conditions.
For an MIS Executive, this is a daily task. You'll constantly need to classify raw data into meaningful groups—like labeling incidents by priority, flagging candidates for review, or categorizing sales performance. The IF function is your primary tool for building this kind of business logic directly into your trackers and reports.
We'll cover:
- The basic
IFfunction for two-outcome decisions. - How to "nest"
IFfunctions to handle multiple categories (e.g., High/Medium/Low). - Combining
IFwithANDandORfor more complex logical tests.
Let's begin.
1. The Basic IF Function: Making Simple Decisions
At its core, the IF function asks a question and gives one of two possible answers. Its structure is simple:
=IF(logical_test, value_if_true, value_if_false)
- logical_test: The condition you want to check. It must be a question that can be answered with either TRUE or FALSE (e.g.,
B2 > 5000,C2 = "Active"). - value_if_true: What to display if the condition is TRUE.
- value_if_false: What to display if the condition is FALSE.
Imagine you're tracking sales data and want to quickly see which sales met a specific target. You could use an IF function to label each sale as "On Target" or "Below Target".
To see how this works in practice, let's watch a clear demonstration.
Excel IF Formula: Simple to Advanced (multiple criteria, nested IF, AND, OR functions)
This first part of a video from Leila Gharani explains the basic IF function. It also provides a perfect recap of our last lesson by showing why you need to use an absolute reference ($) for the condition's threshold.
Watch from the beginning to 03:17. Pay close attention to the three parts of the IF function and how the F4 key is used to lock the reference to the threshold cell.
This simple structure is the foundation for almost any rule-based categorization you'll perform in an MIS role.
2. Nested IF Functions: Handling Multiple Categories
A single IF function is great for two outcomes, but what if you need more? For instance, in your previous cybersecurity role, an incident might not just be "Major" or "Minor" but "Critical," "High," "Medium," or "Low."
To handle more than two outcomes, you can nest IF functions. This means placing a new IF function inside the value_if_false part of the previous one.
The logic flows like this:
- Check the first condition. If it's true, provide the result and stop.
- If it's false, move to the next
IFfunction and check its condition. - Repeat until a condition is met or you reach the final "catch-all" value.
Let's look at a common example: converting numerical scores into letter grades.
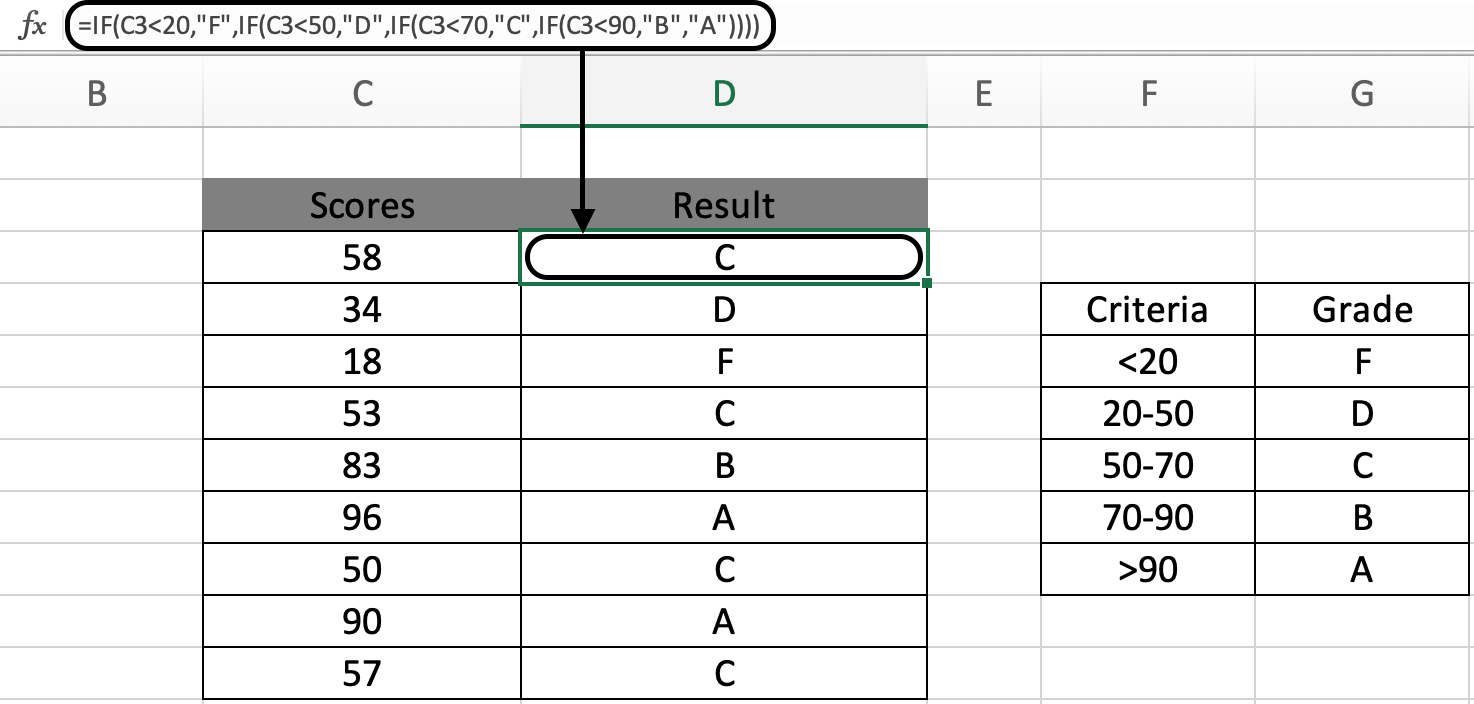
When working with numerical ranges like this, there's a crucial tip to keep your formula simple: always check from one end (highest to lowest, or lowest to highest). This avoids having to write complicated "between" logic.
The following video explains this concept and the nesting structure very clearly.
MS Excel | Nested IF Statements
The instructor in this video from Mr Long Education - IT & CAT demonstrates how to build a nested IF for three categories. His tip to ignore the 'middle' condition and focus on the highest or lowest first is an excellent best practice.
Watch from 02:04 to 08:43. First, see how he builds a formula for three text-based codes ('P', 'E', 'A'). Then, pay close attention to the second example where he categorizes sales into 'Bronze', 'Silver', and 'Gold', and explains the strategy for handling numerical ranges.
For a step-by-step written guide, the following article is excellent. It shows you how to build a complex nested IF formula one piece at a time, which is a great way to learn and troubleshoot.
Use an Excel Nested If Function to Create Categories
This article from Humanitarian Data Solutions walks you through creating age categories from numerical age data. It's a perfect, practical use case for a nested IF.
Read the section 'Step-by-Step: Excel Nested If Function'. Follow how the author adds one IF statement at a time to build the final formula. The tip about using Alt+Enter to format your formula for readability is also very useful.
3. Adding Complexity with AND and OR
Sometimes, a single condition isn't enough. You might need to test multiple criteria at once.
AND: UseIF(AND(...))when all conditions must be true. For example, flagging a candidate for a priority interview only if they areAvailableAND have more than5 years of experience.OR: UseIF(OR(...))when at least one of the conditions must be true. For example, flagging an incident for review if it involvesPIIOR affects more than1000 users.
You simply place the AND or OR function, with its own set of conditions, inside the logical_test part of your IF function.
Let's return to the video from Leila Gharani, who demonstrates this clearly.
Excel IF Formula: Simple to Advanced (multiple criteria, nested IF, AND, OR functions)
This video now shows how to combine IF with the AND and OR functions to handle more complex criteria.
First, watch the section on the AND function from 03:17 to 05:14. Notice how it's used to check if a value falls between two numbers. Next, watch the section on the OR function from 07:54 to 09:18. See how it's used to check if a value is outside a specific range.
Hands-on Practice
Let's apply what you've learned. Imagine you have a small dataset for tracking job candidates from your recruitment experience.
| Candidate ID | Experience (Yrs) | Status | Priority Review? |
|---|---|---|---|
| C-101 | 8 | Active | |
| C-102 | 3 | Active | |
| C-103 | 10 | Offer Extended | |
| C-104 | 6 | Active |
Your task is to write a formula in the "Priority Review?" column. A candidate gets a "Yes" if they have more than 5 years of experience AND their status is "Active". Otherwise, it should say "No".
Solution:
Assuming "Experience" is in column B and "Status" is in column C, starting in row 2, the formula would be:=IF(AND(B2>5, C2="Active"), "Yes", "No")
This is a perfect example of a rule you might implement in a recruitment tracker to help managers focus on the most relevant candidates.
Key Takeaways
IFFunction: The basic building block for conditional logic in Excel:=IF(condition, value_if_true, value_if_false).- Nested
IF: The solution for handling more than two outcomes. You embed anIFin thevalue_if_falseslot of anotherIF. - Order Matters: When using nested
IFs with numbers, test your conditions in a logical sequence (e.g., largest to smallest) to keep the formula simple. AND&OR: These functions expand your logical tests.ANDrequires all conditions to be met, whileORrequires only one to be met.
Next Lesson
Excellent work! You've just learned how to build logic and rules into your spreadsheets.
In the next lesson, we will learn how to use COUNTIFS and SUMIFS to aggregate data based on multiple criteria. The categories we created today (like "On Target," "High Priority," "Yes/No") are the exact criteria we will use with these functions to build powerful summary tables and dashboards.