Introduction
Welcome to our final lesson in the "Core, Calves, and Forearm" module. In the last session, we dissected the anatomy of the triceps surae, establishing why a complete calf development program must include both straight-knee exercises for the gastrocnemius and bent-knee exercises for the soleus. You learned that the unique biarticular nature of the gastrocnemius and the principle of active insufficiency are the scientific underpinnings of this strategy.
Today, we transition from anatomical theory to practical execution. Our goal is to formulate coaching cues for calf raises to ensure full range of motion and maximize stimulus. Many gym-goers perform calf raises, but few achieve significant growth. The difference often lies in small, deliberate details of execution that are designed to overcome the specific biomechanical challenges of the movement. By the end of this lesson, you will be able to coach yourself or a client through a calf raise with precision, ensuring every rep contributes maximally to hypertrophy.
The Biomechanical Hurdle: Why Your Calves Are Built to Cheat
Before we discuss cues, we must understand the primary obstacle to effective calf training: the Achilles tendon. As we saw in the previous lesson, the calf-ankle complex acts as a very efficient second-class lever. This efficiency is further enhanced by the elastic properties of the Achilles tendon.
To grasp this, let's explore an excellent article that explains this phenomenon using an analogy.
The article 'Training the Calves' from Bodyrecomposition.com provides a brilliant explanation for why bouncy calf training is ineffective. Pay close attention to the analogy it draws with kangaroos.
Read the section titled 'What Can We Learn from Kangaroos?'. Focus on how elastic tissues like the Achilles tendon can store and return energy, reducing the work the actual muscle has to do.
As the article explains, when you perform quick, bouncy reps, you are primarily loading and unloading the Achilles tendon. The tendon acts like a spring, storing elastic energy on the way down and releasing it on the way up. This provides a significant amount of the force needed to move the weight, meaning the gastrocnemius and soleus muscles are doing very little work.
Our primary goal in coaching the calf raise is to systematically remove this tendinous contribution, forcing the muscle fibers to take over. Every coaching cue we formulate will be aimed at achieving this.
The Four Pillars of a Perfect Calf Raise
To maximize the stimulus on the calf muscles, we need to enforce four key principles of execution. These are non-negotiable for effective calf training.
- Full Range of Motion (ROM): Go from a maximal stretch to a maximal contraction.
- Controlled Tempo: Eliminate momentum, especially during the lowering (eccentric) phase.
- Strategic Pauses: Pause deliberately at the bottom (to dissipate elastic energy) and at the top (to maximize tension).
- Strict Posture: Keep the rest of the body rigid to prevent compensation.
Let's watch two videos from leading coaches who emphasize these exact points.
8 Calf Raise Mistakes and How to Fix Them
First, Dr. Mike Israetel from Renaissance Periodization outlines several critical mistakes in calf training. Notice how his corrections all point back to achieving a full ROM and controlling the movement.
Watch from 00:35 to 02:58. Pay attention to his emphasis on the full stretch, peak contraction, controlling the eccentric, and keeping the leg straight.
How To FORCE YOUR CALVES To Grow With Smarter Training Methods
Next, Jeff Nippard provides a detailed, step-by-step guide to executing a calf raise. He breaks down the same principles into actionable steps and cues.
Watch from 01:36 to 05:12. Focus on his instructions for foot setup, quad activation, pausing at the top and bottom, and the mental cue of pressing the toes down.
Formulating Cues: A Step-by-Step Coaching Playbook
Now, let's synthesize this information into a clear set of coaching cues for each phase of a straight-legged calf raise (e.g., standing machine calf raise).
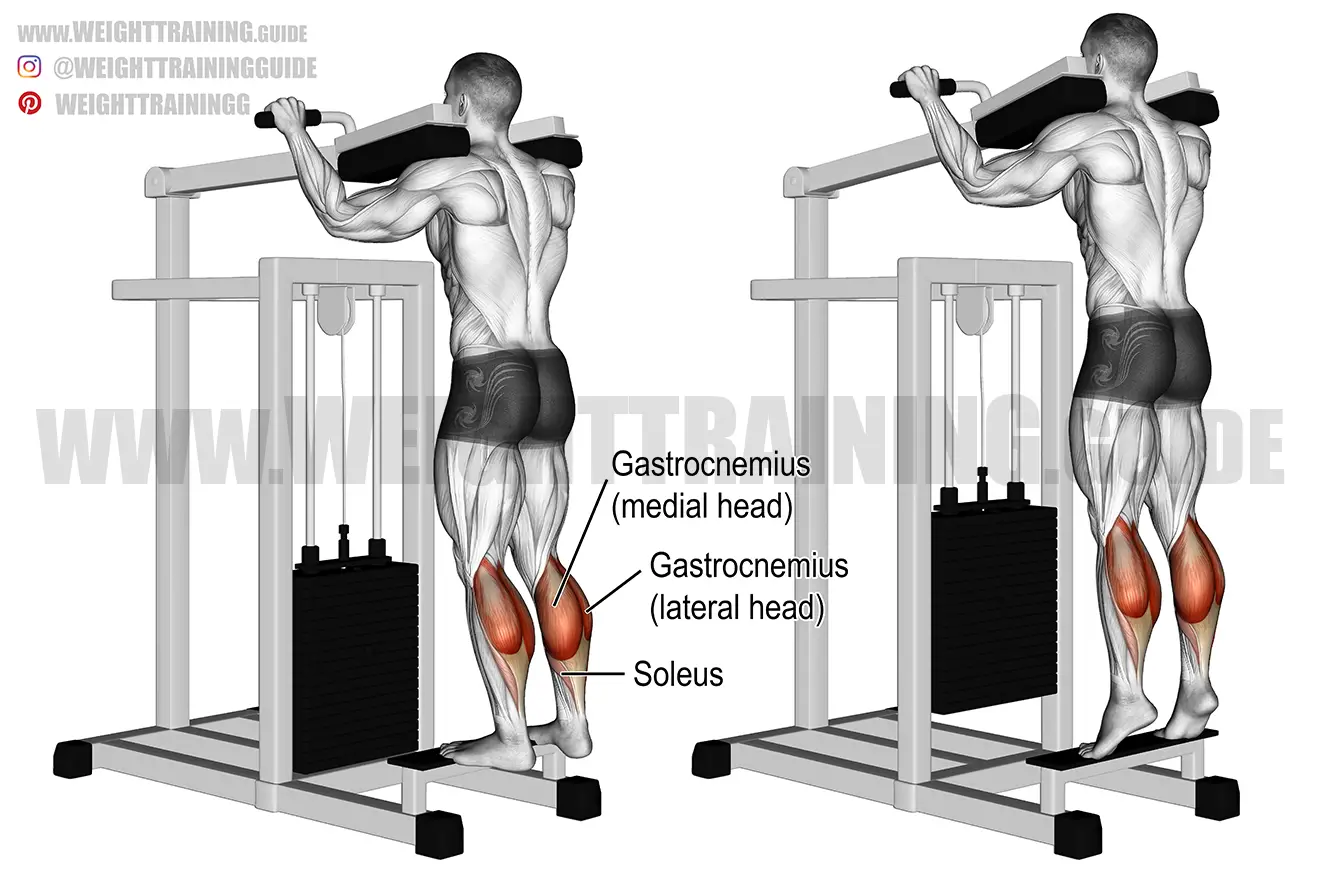
Phase 1: The Setup
- Action: Position the body on the machine.
- Cue: "Place the balls of your feet on the edge of the platform, allowing your heels to hang off."
- Anatomical Intent: This setup is required to allow the ankle to move through its full range of motion into dorsiflexion (the stretch).
Phase 2: The Stretch (Bottom of the Rep)
- Action: Lower the heels to the lowest possible point.
- Cue: "Let your heels sink down until you feel a deep, loaded stretch in your calves. Pause here for a full two-second count: one-Mississippi, two-Mississippi."
- Anatomical Intent: This deep stretch places the muscle fibers at a long length, which is a potent signal for hypertrophy (stretch-mediated hypertrophy). The two-second pause is the crucial step to dissipate the elastic energy stored in the Achilles tendon, forcing the muscle to initiate the next phase.
Phase 3: The Concentric (Lifting Phase)
- Action: Drive the heels upward.
- Cue: "Lock your knees by flexing your quads. Now, drive through your big toe and push the platform up as high as you can. Your body should only move straight up."
- Anatomical Intent: Flexing the quads ensures the knee remains extended, isolating the gastrocnemius. The "drive through the big toe" cue helps promote a powerful plantar flexion and prevents rolling the ankle.
Phase 4: The Peak Contraction (Top of the Rep)
- Action: Squeeze the calves at the highest point.
- Cue: "At the very top, get as high on your toes as you can and squeeze your calves hard for one second, like you're trying to make them cramp."
- Anatomical Intent: A conscious, isometric squeeze ensures you've achieved a true peak contraction and maximizes motor unit recruitment in the shortened position. Failure should be defined as the inability to reach this peak position.
Phase 5: The Eccentric (Lowering Phase)
- Action: Lower the heels back to the starting position.
- Cue: "Control the descent. Lower the weight slowly over three seconds. Fight gravity all the way down until you're back in that deep stretch."
- Anatomical Intent: The eccentric phase is highly responsible for muscle damage, a key driver of hypertrophy. Rushing the negative is a missed opportunity for stimulus.
Common Faults and Anatomical Corrections
As a coach, your job is to identify and correct mistakes. Here’s how to do it using your anatomical knowledge.
| Common Fault | Anatomical Cause | Corrective Cue |
|---|---|---|
| Bouncing Reps | Using the elastic recoil of the Achilles tendon instead of muscular force. | "Pause for two full seconds in the stretched position at the bottom of every single rep. No exceptions." |
| Partial Range of Motion | Avoiding the mechanically difficult (and most hypertrophic) end ranges, especially the deep stretch. | "We're defining a rep by a deep stretch and a peak squeeze. If you don't hit both, the rep doesn't count." |
| Bending the Knees | On a straight-leg variation, this is a compensation pattern to use the quads, reducing the load on the gastrocnemius as it enters active insufficiency. | "Keep your quads flexed and your knees locked straight throughout the entire set. The only joint that moves is your ankle." |
| Going Too Heavy | The load exceeds the muscle's ability to execute a rep with proper tempo and ROM, leading to compensations. | "Let's reduce the weight by 30% and focus on making every part of the rep perfect. The muscle doesn't know the weight on the stack, only the tension it experiences." |
Coach's Note: Advanced Application
Once you master perfect form, you can use advanced techniques to maximize stimulus. The principles remain the same. The RP Strength article you'll read briefly touches on some of these.
Calves Hypertrophy Training Tips
The article 'Calves Hypertrophy Training Tips' from RP Strength reinforces the importance of the stretch and introduces advanced concepts. These are powerful tools for breaking through plateaus.
Read the sections on 'Range of Motion', 'Controlled Eccentrics and Pauses', and 'Lengthened Partials'. Note how they describe the deep stretch as 'nearly mandatory' and suggest partial reps in the stretched position as a way to accumulate more stimulus where it's most effective.
- Lengthened Partials: After reaching failure on full ROM reps, you can perform several additional partial reps just in the bottom, stretched half of the movement. This accumulates more volume under high tension in the muscle's most productive range.
- Myo-reps: Given the calf's quick recovery between sets, you can use myo-reps (an activation set followed by several mini-sets with very short rest) to accumulate many effective, near-failure reps in a short amount of time.
Conclusion
You now possess the knowledge to transform the simple calf raise from a bouncy, ineffective movement into a potent tool for hypertrophy. The cues are not just arbitrary instructions; they are the practical application of biomechanics and physiology.
Key Takeaways:
- Effective calf training is about negating the elastic contribution of the Achilles tendon to maximize muscular work.
- A perfect calf raise involves a full ROM, a controlled eccentric, and deliberate pauses at the peak contraction (1s) and deep stretch (2s).
- Coaching cues should be specific and intentional, such as "pause for two seconds at the bottom" or "flex your quads to lock your knees."
- Common faults like bouncing and partial reps are not just poor form; they are biomechanical strategies (conscious or not) to make the exercise easier by reducing muscular tension. Your job is to make it harder and more effective.
Preview of the Next Lesson
We have now completed our deep dive into the major muscles of the lower body. This lesson concludes our module on the core, calves, and forearms. In the next module, we will begin our comprehensive study of the upper body, starting with the chest. The learning outcome will be: Describe the origin, insertion, and fiber direction of the clavicular (upper), sternal (mid), and costal (lower) divisions of the pectoralis major. This will set the foundation for understanding how to target different regions of the chest for complete development.