Introduction
Welcome to the next lesson in our final module. In our previous session, we honed the critical coaching skill of formulating cues with anatomical intent—translating your knowledge into precise instructions to improve a client's movement execution. We established that the right cue can transform an exercise by ensuring the target muscle does the work.
However, before we can cue a movement, we must first determine if the client is prepared to perform that movement safely and effectively. This brings us to today's topic: client assessment. Today's lesson is designed to help you master the learning outcome: Define the purpose of a movement screen and identify key assessments relevant to hypertrophy training (e.g., overhead squat, ankle dorsiflexion).
Think of this process with the logic of an engineer: you wouldn't deploy a complex system without first running diagnostics to check for errors. A movement screen is your diagnostic tool. It allows you to identify potential "bugs" in the human movement system—asymmetries, restrictions, and compensations—before you apply the "stress" of a training program. This "measure twice, cut once" approach is fundamental to building a resilient, high-performing physique and is the bridge between knowing anatomy and applying it responsibly.
1. The Philosophy of a Movement Screen: Why We Assess
Before we dive into specific tests, it's crucial to understand the purpose and principles behind movement screening. It’s not about diagnosing medical conditions or predicting who will be the best athlete. Rather, it’s about establishing a baseline of movement quality.
Gray Cook, the founder of the Functional Movement Screen (FMS), is a leading voice in this field. His philosophy provides a clear framework for the role of a fitness professional.
Movement Screening, Testing, and Assessment, with Gray Cook | NSCA.com
To understand the foundational principles of movement screening, let's watch some key segments from a lecture by Gray Cook. He clearly distinguishes between movement health and movement performance, and defines our role as coaches in this process.
Please watch the following segments: 03:19 - 04:51: Focus on the distinction between pain (a medical issue) and simple soreness or fatigue. This is a critical boundary for a coach. 05:03 - 06:15: Note his clarification that a screen is the first thing, not the only thing. It establishes a health baseline. 12:21 - 13:30: Pay attention to the two core principles: 1) Separate pain, and 2) Set baselines. 15:52 - 17:33: Understand why fitness professionals are the 'front line of defense' for identifying movement issues.
Key Principles of Movement Screening:
- Movement Health Precedes Movement Performance: You cannot build elite performance on a dysfunctional foundation. The screen's first job is to ensure a client can move through fundamental patterns without pain.
- Separate Pain from Dysfunction:
- Pain is a "Red Light": If a movement pattern causes pain, this is a signal to stop. It indicates a potential medical issue that is outside your scope of practice. The client should be referred to a qualified professional like a physical therapist.
- Dysfunction is a "Yellow Light": If a client cannot perform a movement pattern correctly but experiences no pain, this is a movement competency issue. It's your job to address this with corrective exercises. Loading a dysfunctional pattern with weight reinforces bad habits and can increase injury risk.
- Establish a Baseline: A movement screen provides a snapshot of your client's starting point. It allows you to make informed decisions about exercise selection and provides a benchmark to measure progress against. You'll know if your program is improving their movement quality or inadvertently making it worse.
- It's a Screen, Not a Diagnostic Tool: The goal is to filter for major problems, not to pinpoint the exact cause of an issue. The screen tells you what is happening (e.g., the knees collapse inward); further assessment and your anatomical knowledge will help you figure out why.
2. A Key Assessment: The Overhead Squat (OHSA)
The Overhead Squat Assessment is one of the most valuable tools for a hypertrophy coach. Because it's a dynamic, full-body movement, it simultaneously challenges mobility and stability at the ankles, knees, hips, spine, and shoulders. The compensations a client displays during an OHSA provide a wealth of information about their muscular imbalances and movement limitations.
How to Perform an Overhead Squat Assessment (OHSA)
The NASM blog provides a concise written guide to the OHSA. It defines the assessment, outlines the procedure, and clarifies the crucial difference between overactive and underactive muscles.
Read the sections 'What is the overhead squat assessment?', 'How do you perform the overhead squat assessment?', and 'How do you interpret the overhead squat assessment?'. Focus on the setup, the checkpoints for the anterior and lateral views, and the definitions of overactive (shortened, 'tight') vs. underactive (weak, inhibited) muscles.
Now, let's see it in action.
NASM Overhead Squat Assessment || How to do it AND Real World Application
This video from Axiom Fitness Academy gives a practical demonstration of the OHSA, showing you what to look for in real-time.
Watch the following sections that detail the key checkpoints: Anterior View (02:42 - 14:04): Pay close attention to the two main compensations: feet turning out and knees moving in (knee valgus). Note the discussion of the probable overactive (e.g., adductors, calves) and underactive (e.g., gluteus medius) muscles. Lateral View (14:04 - 23:15): Focus on the compensations of the low back arching, excessive forward lean, and arms falling forward. Listen for the breakdown of the muscular imbalances (e.g., overactive lats/pecs, underactive mid-back muscles).
Let's organize these observations into a quick-reference table.
OHSA Compensation Checklist
| View | Compensation Observed | Probable Overactive Muscles (Tight/Shortened) | Probable Underactive Muscles (Weak/Lengthened) |
|---|---|---|---|
| Anterior | Feet Turn Out | Soleus, Gastrocnemius (Calves) | Medial Gastrocnemius, Medial Hamstring, Tibialis Anterior & Posterior |
| Anterior | Knees Move In (Knee Valgus) | Adductor Complex (Inner Thighs), TFL | Gluteus Medius/Maximus |
| Lateral | Low Back Arches | Hip Flexor Complex, Erector Spinae, Latissimus Dorsi | Gluteus Maximus, Hamstrings, Abdominal Complex (Core) |
| Lateral | Excessive Forward Lean | Hip Flexor Complex, Abdominal Complex, Gastrocnemius/Soleus | Gluteus Maximus, Erector Spinae, Tibialis Anterior |
| Lateral | Arms Fall Forward | Latissimus Dorsi, Pectoralis Major/Minor, Teres Major | Mid/Lower Trapezius, Rhomboids, Rotator Cuff |

The Link to Hypertrophy
How does this relate to building muscle? The Brookbush Institute article you reviewed in a prior module states it perfectly: "Movement Impairments Set the Ceiling."
If a client has restricted ankle dorsiflexion, they might show an "Excessive Forward Lean" in the OHSA. This isn't just a technical flaw; it biomechanically prevents them from achieving deep knee flexion in a squat. This limitation means they cannot effectively train the quadriceps in a lengthened position, which, as we've learned, is a potent stimulus for hypertrophy. By identifying this limitation with a screen, you can program corrective exercises to improve ankle mobility, which unlocks their potential for greater quad growth.
3. Digging Deeper: Specific Joint Assessments
A broad screen like the OHSA often points to a general area of concern. You can then use more specific, isolated tests to confirm your hypothesis. Following our example above, if you suspect poor ankle mobility is causing issues in the squat, you can directly test for it.
The Ankle Dorsiflexion Test (Knee-to-Wall Test)
This is a simple, reliable way to quantify ankle dorsiflexion.
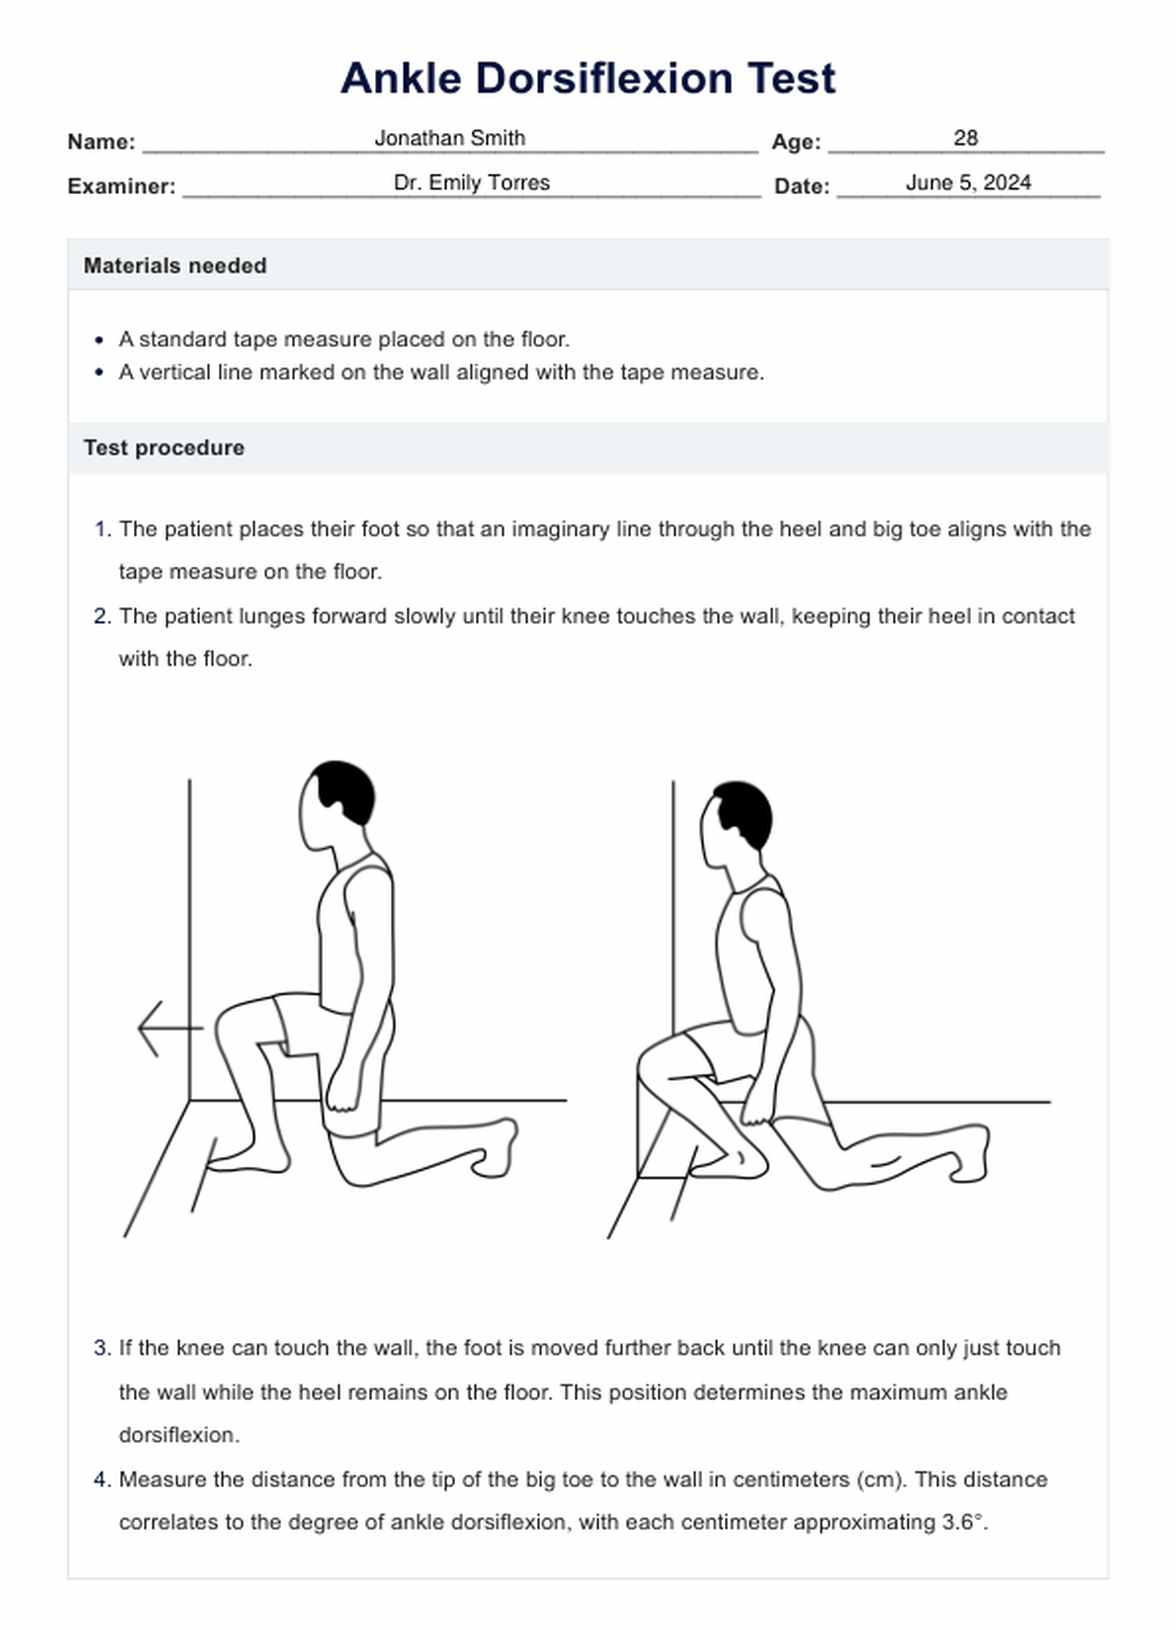
How to Perform It:
- The client stands facing a wall, barefoot.
- They place their big toe a certain distance from the wall (a good starting point is 10 cm or about 4 inches).
- Keeping their heel flat on the floor, they lunge forward and try to touch their knee to the wall.
- If they succeed, they move their foot slightly further back. If their heel lifts, they move it slightly closer.
- The maximum distance from the wall where they can touch their knee to the wall while keeping the heel down is their score.
A score of less than 10-12 cm often indicates a limitation that could affect squat mechanics.
Another practical way to test this, as mentioned in the NASM resources, is to have the client perform the OHSA with their heels elevated on small plates. If the squat form dramatically improves (e.g., less forward lean, more upright torso), it's a strong indicator that restricted ankle dorsiflexion is a primary limiting factor.
Conclusion
You now understand the critical role of assessment in a well-designed training program. A movement screen is not a barrier to training; it is the map that guides you toward the most effective and sustainable path to your client's goals. By identifying movement limitations before adding significant load, you can proactively address them, reducing injury risk and unlocking greater long-term potential for muscle growth.
Key Takeaways:
- The Purpose of a Screen: To establish a baseline of movement health, identify significant compensations and asymmetries, and filter for pain (which requires referral). It's about risk management and informed programming.
- The OHSA is a Powerful Tool: It provides a global view of a client's movement competency, revealing potential muscular imbalances across the entire kinetic chain.
- Identify, Then Interpret: Learn to spot the key compensations (e.g., knee valgus, forward lean, arms falling) and connect them to the likely overactive and underactive muscles.
- From Broad to Specific: Use general screens like the OHSA to identify problem areas, then use specific tests like the Knee-to-Wall test to confirm your hypothesis.
Preview of the Next Lesson
Observing a compensation is the first step. The next is understanding its root cause. In our next lesson, you will learn to diagnose common movement faults (e.g., knee valgus in a squat) by linking them to specific muscular imbalances or mobility restrictions. We will take the data from our screens and apply our anatomical and biomechanical knowledge to build a precise corrective strategy.